

Table of Contents
Introduction
The Contact Us form provides an easy way for customers to keep in touch with your business. More importantly, Contact Us forms also help to reassure customers that there is someone listening to their queries, complaints, and feedback.
So, in this blog, we show you how to configure Contact Us form in Magento 2 store.
I.Enable the Contact Us Form
Step 1: In the Admin Panel, choose Stores>Configuration:
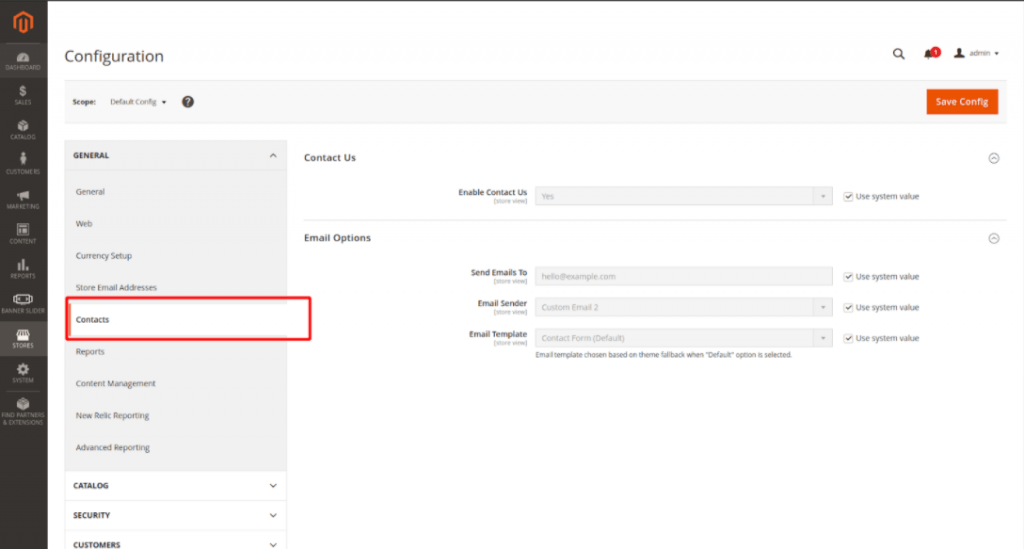
Step 2: In tab General navigate to Contacts

Set Yes for field Enable Contact Us
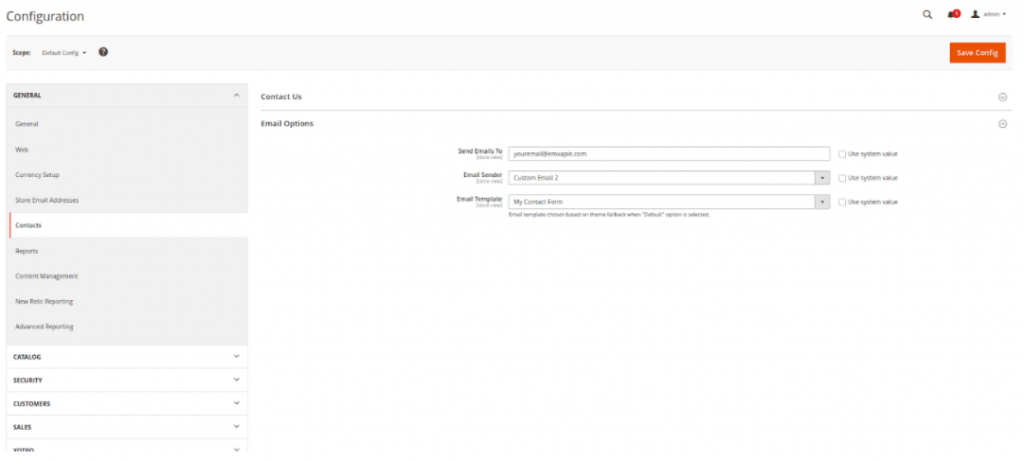
Step 3: Put your contact email in the Send Emails To field. Select the name of the sender that will be set in emails in the Email Sender option:
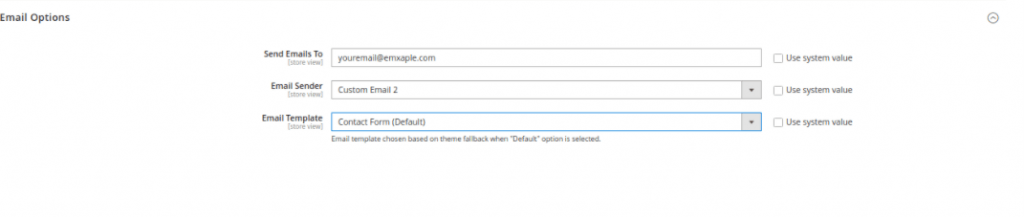
You can choose a template you want to use for your messages in the Email Template option. Then click Save Config button
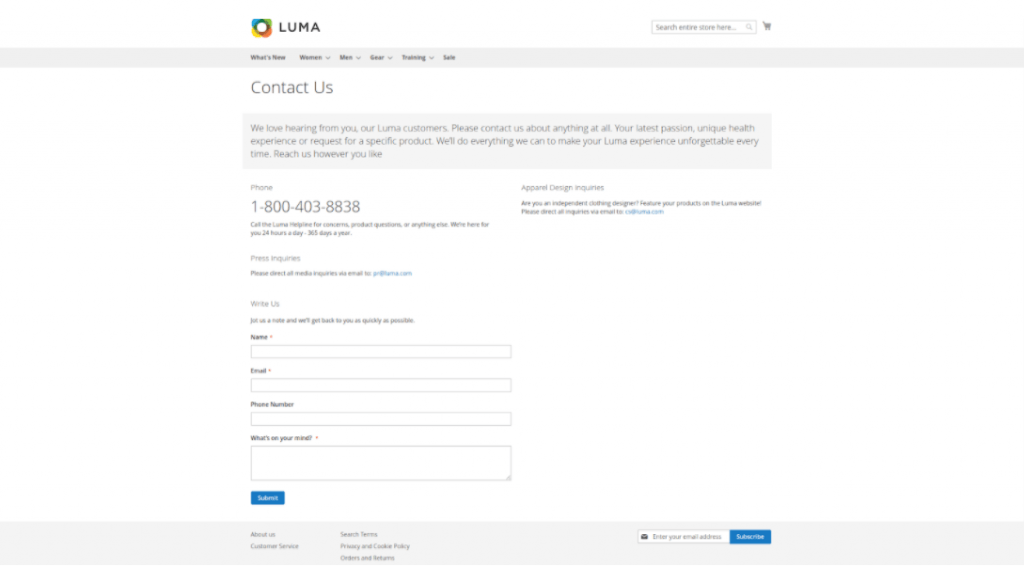
Step 4: Check the result in the frontend to see whether the default Contact Us form has shown up or not:
II.Configure the Contact Us form
Step 1: Go to Content>Blocks:
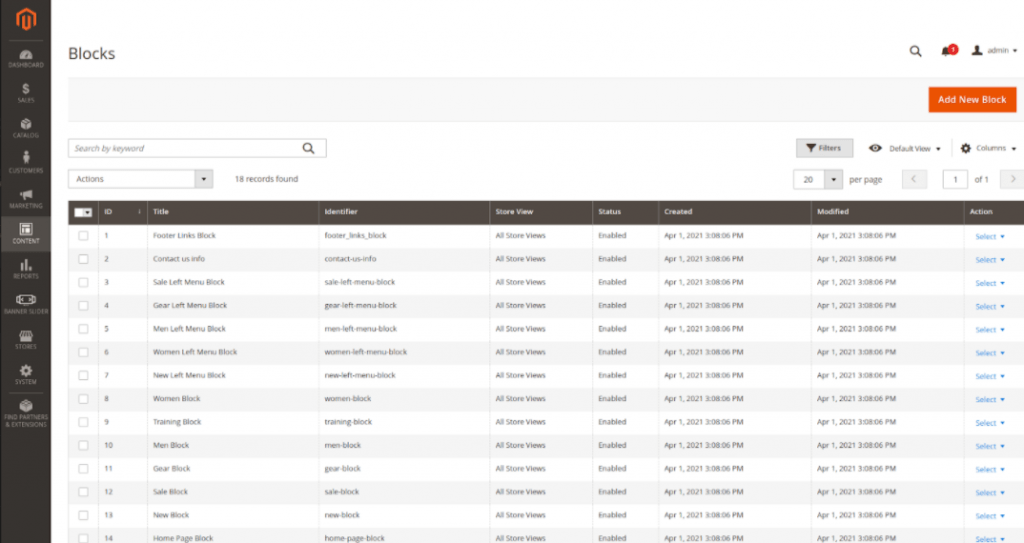
Step 2: Find the block with Title Contact us info and choose Edit in the Select dropdown:

You can customize your Contact Us form by entering your contact info in the Content box and Save the block.
Step 3: Add CAPTCHA to a Contact Us form
Go to Stores > Configuration > Customers > Customers Configuration
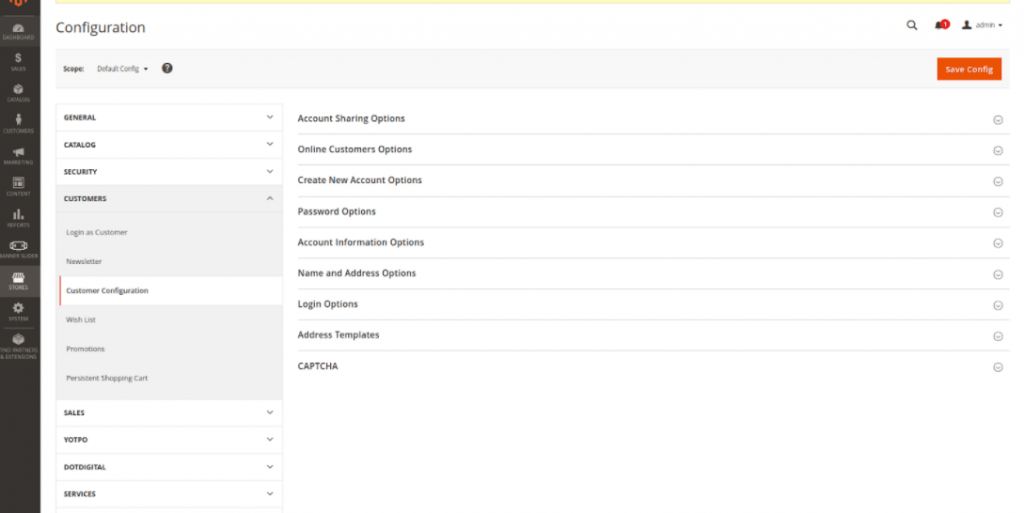
In tab CAPTCHA
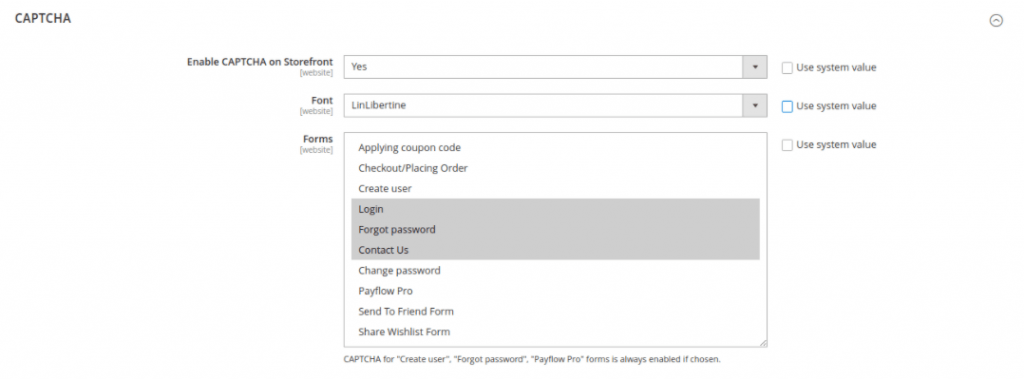
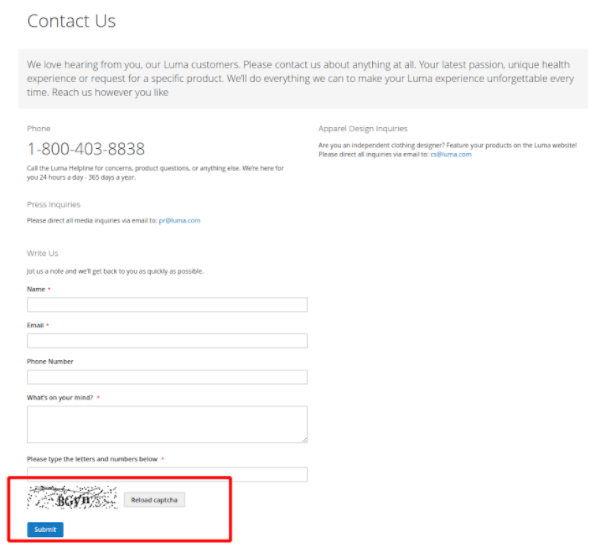
Set Yes for Enable CAPTCHA on Storefront field. Then select Contact Us for field Forms to add a CAPTCHA on this form. After that click the Save Config button. The result in the StoreFront: CAPTCHA will be added to your Contact Us form:
III.Customize the Email Contact form
Step 1: Create file form.phtml in app/code/YourVendor/YourModule/view/frontend/templates. You can take a look at the sample code of ours right below:
<?php

<form class="form contact"
      action="<?= $block->escapeUrl($block->getFormAction()) ?>"
      id="contact-form"
      method="post"
      data-hasrequired="<?= $block->escapeHtmlAttr(__('* Required Fields')) ?>"
      data-mage-init='{"validation":{}}'>

    <fieldset class="fieldset">
        <legend class="legend"><span><?= $block->escapeHtml(__('Write Us')) ?></span></legend><br />
        <div class="field note no-label"><?= $block->escapeHtml(__('Jot us a note and we’ll get back to you as quickly as possible.')) ?></div>
        <div class="field name required">
            <label class="label" for="name"><span><?= $block->escapeHtml(__('Name')) ?></span></label>
            <div class="control">
                <input name="name" id="name" title="<?= $block->escapeHtmlAttr(__('Name')) ?>" value="<?= $block->escapeHtmlAttr($this->helper('Magento\Contact\Helper\Data')->getPostValue('name') ?: $this->helper('Magento\Contact\Helper\Data')->getUserName()) ?>" class="input-text" type="text" data-validate="{required:true}"/>
            </div>
        </div>

       <--New field customize-->
        <div class="field subject required">
             <label class="label" for="subject"><span><?php /* @escapeNotVerified */ echo __('Subject') ?></span></label>
             <div class="control">
                  <input name="subject" id="subject" title="<?php /* @escapeNotVerified */ echo __('Subject') ?>" value="" class="input-text" type="text" data-validate="{required:true}"/>
             </div>
        </div>

        <div class="field email required">
            <label class="label" for="email"><span><?= $block->escapeHtml(__('Email')) ?></span></label>
            <div class="control">
                <input name="email" id="email" title="<?= $block->escapeHtmlAttr(__('Email')) ?>" value="<?= $block->escapeHtmlAttr($this->helper('Magento\Contact\Helper\Data')->getPostValue('email') ?: $this->helper('Magento\Contact\Helper\Data')->getUserEmail()) ?>" class="input-text" type="email" data-validate="{required:true, 'validate-email':true}"/>
            </div>
        </div>

        <div class="field telephone">
            <label class="label" for="telephone"><span><?= $block->escapeHtml(__('Phone Number')) ?></span></label>
            <div class="control">
                <input name="telephone" id="telephone" title="<?= $block->escapeHtmlAttr(__('Phone Number')) ?>" value="<?= $block->escapeHtmlAttr($this->helper('Magento\Contact\Helper\Data')->getPostValue('telephone')) ?>" class="input-text" type="text" />
            </div>
        </div>

        <div class="field comment required">
            <label class="label" for="comment"><span><?= $block->escapeHtml(__('What’s on your mind?')) ?></span></label>
            <div class="control">
                <textarea name="comment" id="comment" title="<?= $block->escapeHtmlAttr(__('What’s on your mind?')) ?>" class="input-text" cols="5" rows="3" data-validate="{required:true}"><?= $block->escapeHtml($this->helper('Magento\Contact\Helper\Data')->getPostValue('comment')) ?></textarea>
            </div>
        </div>

        <?= $block->getChildHtml('form.additional.info') ?>
    </fieldset>

    <div class="actions-toolbar">
        <div class="primary">
            <input type="hidden" name="hideit" id="hideit" value="" />
            <button type="submit" title="<?= $block->escapeHtmlAttr(__('Submit')) ?>" class="action submit primary">
                <span><?= $block->escapeHtml(__('Submit')) ?></span>
            </button>
        </div>
    </div>
</form>
Step 2: Next, create contact_index_index.xml in app/code/YourVendor/YourModule/view/frontend/layout to override the previous form.phtml file with the new one. Take a look at our sample code below:
<?xml version="1.0"?>
<page xmlns:xsi="http://www.w3.org/2001/XMLSchema-instance" layout="1column" xsi:noNamespaceSchemaLocation="urn:magento:framework:View/Layout/etc/page_configuration.xsd">
   <body>
      <referenceBlock name="contactForm" remove="true"/>
       <referenceContainer name="content">
           <block class="Magento\Contact\Block\ContactForm" name="customContactForm" template="Magenticians_Modulecontact::form.phtml" />
       </referenceContainer>
   </body>
</page>
Step 3: Go to MARKETING > Email Templates and click Add New Template button:
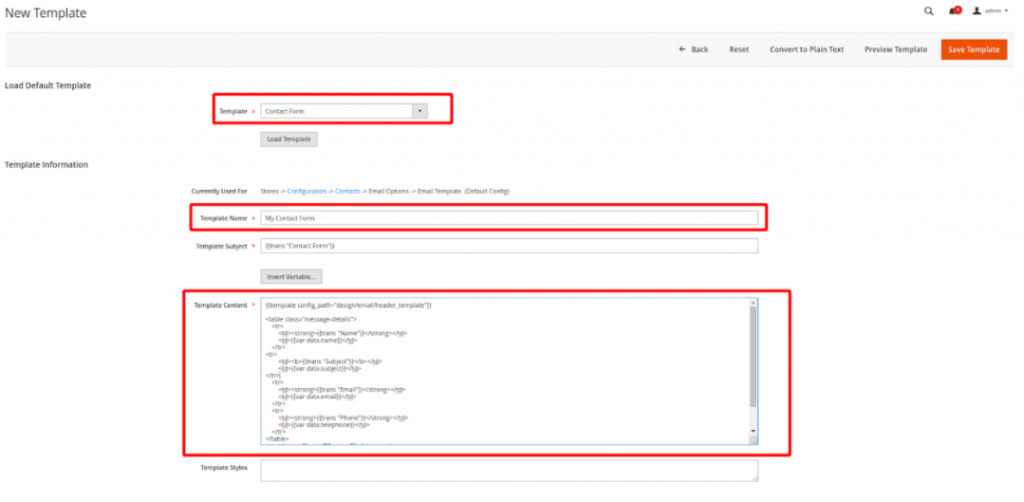
Select Contact Form from the Template field and click the Load Template button. Then click the Save Template button.
Step 4: Go to STORES > Configuration >General > Contacts tab:
Choose My Custom Form that you have created for the Email Template field. Then click Save Config.
If you have done all the steps correctly, your result will be the Contact Us form with a new field Subject like our screencap below:

Conclusions
In this blog, We’ve shown you simple ways to configure the Contact Us form and Contact Email. Hope this blog helps and good luck.
If you have any questions, feel free to leave your comments below.

Joel Pham
Joel Pham is the CEO of Magenest, with extensive experience in eCommerce, business operations, and digital transformation. He has led projects for major brands across Magento, Shopify, Odoo, and enterprise technology solutions.


Weekly Trending
-

Confirmation code: 5 things you need to know about it
March 30 2021 -

Customer Journey Map: Definition, Templates, and Examples
November 9 2020 -

Which is the Top 8 Best Payment Gateway in India?
December 10 2023 -

Customer Value and Satisfaction: What's the Difference?
October 30 2020 -

Social sharing 101: Its Definition, Benefits & Examples
December 11 2020
Recent Posts
-

Payment Gateway Comparison - Top 5 Providers in 2026
April 1 2026 -

Magento 2 Stripe Extension: Installation & Configuration
December 29 2025 -
5 Best-selling Magento 2 Extensions to check out before 2026
December 19 2025 -

8 Best Magento Subscription Extensions For Online Businesses
December 8 2025 -

How to set up payment methods in Stripe Payment Gateway
September 21 2025

