

Today, we will find out how to move elements (blocks, containers, etc..) in Magento 2 to different parts of a page using layout.xml.
Summary
Containers in layouts can contain blocks and are designed to effectively position them within the page. The main containers include DOM elements such as:
- head
- header
- main
- aside (left or right)
These elements divide our page layout into containers for conveniently arranging the blocks we need inside them. By default, 5 types of page layouts are pre-installed in Magento 2:
- empty (a page without containers)
- 1 column (one general container for the content)
- 2 column with left bar (a container for content with a left sidebar)
- 2 column with right bar (a container for content with a right sidebar)
- 3 column (3 optional containers)
A block is a modular unit of content that can be positioned almost anywhere on the page. Content blocks are sometimes referred to as static blocks or CMS blocks. They can be used to display fixed information such as text, images, and embedded video, as well as dynamic information from a widget or that originates in a database or other source. Most elements on the homepage are blocks that can be easily managed.
How to move a block in Magento 2
First of all, we need to edit the layout xml file in order to move the block.
The layout xml can be used for:
- Move the element to another element
- Add or remove some element
But in the scope of this blog, we will focus on how to move the element to another element.
For moving a block to another destination, we need to use the <move> tag with a specific element name and destination place.
<move> Tag will set the declared block or container element as a child of another element in the specified order.
Example
<move element="page.main.title" destination="product.info.main" before="product.info.price"/>
In this example. I’m moving the block name “page.main.title” to “product.info.main” before “product.info.price” element.
When using <move> tag, these attributes are required: element, destination.
These attributes: before & after are used to specify the element should place before or after an element in destination.
Use can use the dash (-) to position the block before or after all other siblings of its level of nesting. If these attributes are omitted, the element is placed after all siblings.
Keep in mind that:
<move>is skipped if the element to be moved is not defined.- If the as attribute is not defined, the current value of the element alias is used. If that is not possible, the value of the name attribute is used instead.
- During layout generation, the <move> instruction is processed before the removal (set using the remove attribute). This means if any elements are moved to the element scheduled for removal, they will be removed as well
Let do it!
In this blog, I will guide you on how to move the price block to another position on the Product details page.
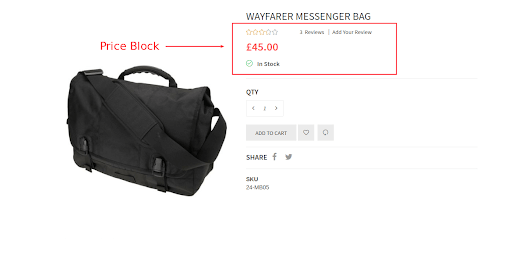
As you see in the image above, the red rectangle is the price block. We are going to move that block to another place: product.info.main
Step 1: You need to create the catalog_product_view.xml file in module/view/frontend/layout/
Because the product detail page is the frontend page and it uses this layout file catalog_product_view.xml. So that we need to create in the correct frontend scope and correct layout xml file name.
Step 2: Add content for catalog_product_view.xml
<?xml version="1.0"?>
<page xmlns:xsi="http://www.w3.org/2001/XMLSchema-instance" xsi:noNamespaceSchemaLocation="urn:magento:framework:View/Layout/etc/page_configuration.xsd">
   <body>
       <move element="product.info.price" destination="product.info.main" />
   </body>
</page>
Step 3: Clean layout cache by this command: php bin/magento cache:clean layout.
This is the result:
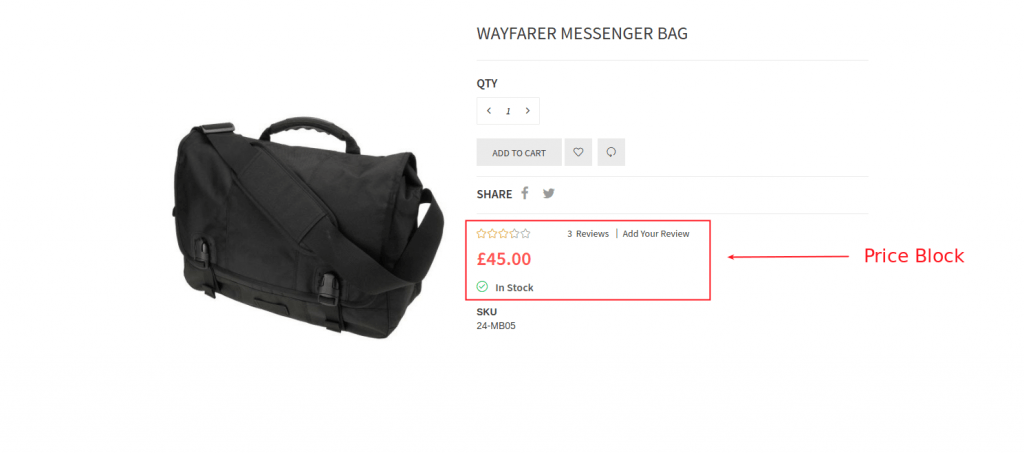
As you can see, the price block is moved successfully to product.info.main section.
How to move a container in Magento 2
Moving the container is very similar to moving the block, you also need to specify the element name, destination, before or after if needed.
That’s all for moving elements in Magento 2 by layout XML file. If you have any queries or issues, don't hesitate to contact us. Thank you!

Joel Pham
Joel Pham is the CEO of Magenest, with extensive experience in eCommerce, business operations, and digital transformation. He has led projects for major brands across Magento, Shopify, Odoo, and enterprise technology solutions.
Weekly Trending
-

4 successful multi-brand retailers that are doing it right
September 25 2018 -

Payment Gateway Comparison - Top 5 Providers in 2026
April 1 2026 -

Magento 2 Stripe Extension: Installation & Configuration
December 29 2025 -
5 Best-selling Magento 2 Extensions to check out before 2026
December 19 2025 -

8 Best Magento Subscription Extensions For Online Businesses
December 8 2025
Recent Posts
-
Payment Gateway Comparison - Top 5 Providers in 2026
April 1 2026 -
Magento 2 Stripe Extension: Installation & Configuration
December 29 2025 -
5 Best-selling Magento 2 Extensions to check out before 2026
December 19 2025 -
8 Best Magento Subscription Extensions For Online Businesses
December 8 2025 -

How to set up payment methods in Stripe Payment Gateway
September 21 2025

