

Table of Contents
When working with forms, sometimes you need to make special requirements to validate the data that customers enter. In this topic, I will show you how to create custom rules in Magento 2.
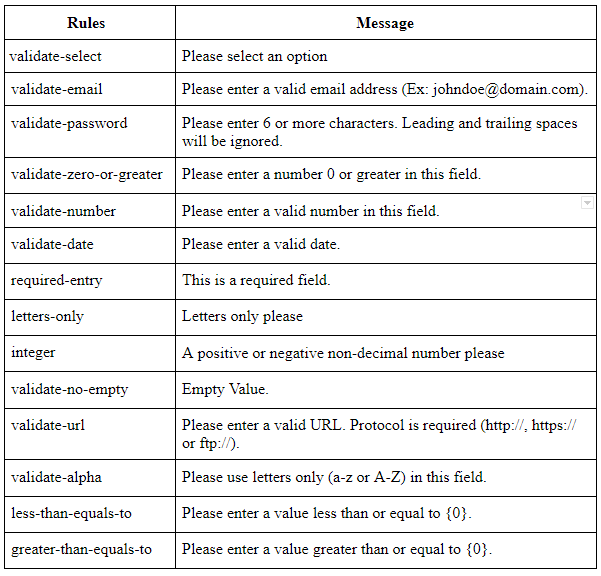
Magento form validation rules
- Magento has created a lot of useful rules and you can find them in vendor/magento/module-ui/view/base/web/js/lib/validation/rules.js
vendor/magento/module-review/view/frontend/web/js/validate-review.js
vendor/magento/module-payment/view/base/web/js/model/credit-card-validation/validator.js
- Below are a few commonly used rules:
How to add a custom validation rule
In this example, I will create the module Magenest_CustomRule, and apply custom rules for the customer address edit form in the frontend and configuration field in the admin panel.
Step 1: To create new custom rules, you can create a js file app/code/Magenest/CustomRule/view/base/web/js/validation.js and calling the $.validator.addMethod function with the custom validation rule parameters like below.
define([
   'jquery',
   'jquery/validate',
   'mage/translate'
], function($) {
   'use strict';

   return function() {
      // Add a validation method that checks if the name is less than 5 characters.
       $.validator.addMethod(
           'custom-validate-length',
           function(name) {
               return name.length <= 5;
           },
           $.mage.__('Length must not be greater than 5 character length!')
       );
      // Add a validation method that checks if the zip code is five-digit or
      // nine-digit(ZIP+4format).
       $.validator.addMethod(
           'custom-validate-zip',
           function(zip) {
               return /^[0-9]{5}(?:-[0-9]{4})?$/g.test(zip);
           },
           $.mage.__('Please enter a valid zip code!')
       );
   }
});
Here I use $.validator.addMethod( name, method, [ message ] )
- name: the name of the method used to identify.
- method: the actual method implementation, returning true if an element is valid.
- message: if the method returns false, the message is displayed.
Step 2: After creating your rules, add the new validation rule to the mixin in app/code/Magenest/CustomRule/view/base/requirejs-config.js
var config = {
  config: {
    mixins: {
      'mage/validation': {
        'Magenest_CustomRule/js/validation': true
      }
    }
  }
}
Now, your rules will be available everywhere.
In Frontend
Step 3: Create a template file app/code/Magenest/CustomRule/view/frontend/templates/address/edit.phtml
Step 4: open the file edit.phtml in vendor/magento/module-customer/view/frontend/templates and copy the content to app/code/Magenest/CustomRule/view/frontend/templates/address/edit.phtml.
Step 5: You need to change the file customer_address_form.xml in module Magento_Customer. So, you must create a file with the same name in app/code/Magenest/CustomRule/view/frontend/layout and add the following content to it:
<page xmlns:xsi="http://www.w3.org/2001/XMLSchema-instance" xsi:noNamespaceSchemaLocation="urn:magento:framework:View/Layout/etc/page_configuration.xsd">
    <body>
       <referenceBlock name="customer_address_edit" >
          <action method="setTemplate">
            <argument name="template" xsi:type="string">Magenest_CustomRule::address/edit.phtml</argument>
          </action>
       </referenceBlock>
    </body>
</page>
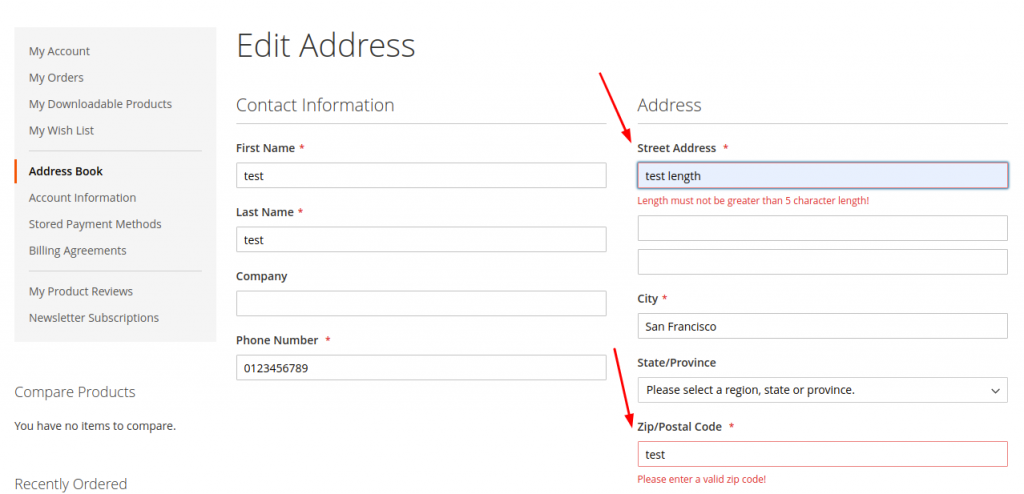
Step 6: Add new rules custom-validate-length to validate street length and custom-validate-zip to validate zip code in edit.phtml like this
<input type="text"
       name="street[]"
       value="<?= $block->escapeHtmlAttr($block->getStreetLine(1)) ?>"
       title="<?= /* @noEscape */ $block->getAttributeData()->getFrontendLabel('street') ?>"
       id="street_1"
       class="input-text <?= $block->escapeHtmlAttr($_streetValidationClass) ?>"
      data-validate="{'custom-validate-length':true}"/>
<input type="text"
       name="postcode"
       value="<?= $block->escapeHtmlAttr($block->getAddress()->getPostcode()) ?>"
       title="<?= /* @noEscape */ $block->getAttributeData()->getFrontendLabel('postcode') ?>"
       id="zip"
       class="input-text custom-validate-zip validate-zip-international <?= $block->escapeHtmlAttr($this->helper('Magento\Customer\Helper\Address')->getAttributeValidationClass('postcode')) ?>">
You can add new rules to forms in these ways:
- As a data-validate attribute
<input id="field-1" ... data-validate='{"validate-custom":true}'/>
- As an attribute
<input id="field-1" ... validate-custom="true"/>
- As a class name
<input id="field-1" ... class="input-text validate-custom"/>
- Using data-mage-init
<form
 data-mage-init='{"validation": {"rules": {"field-1": {"validate-custom":true}}}}'>
 ...
</form>
In the Admin Panel
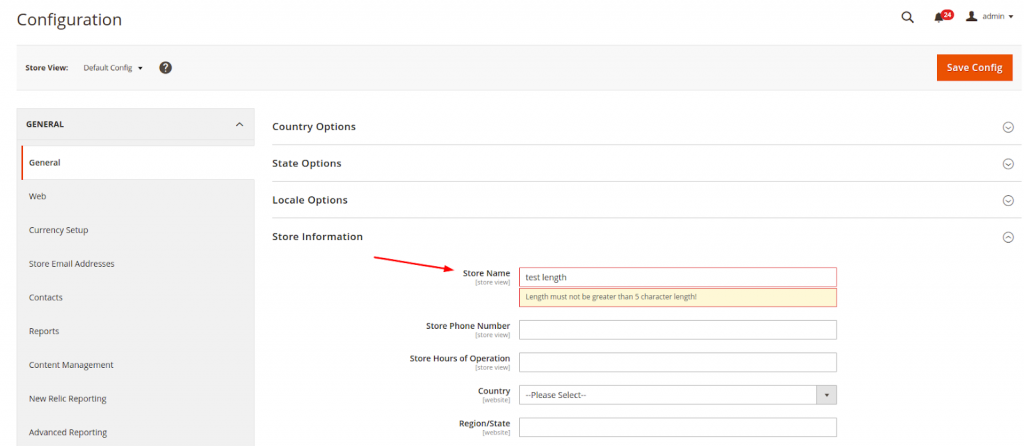
I will add custom validation for the Store Name field in Stores > Configuration > GENERAL > General > Store Information
Step 3: Create app/code/Magenest/CustomRule/etc/adminhtml/system.xml and add the following content:
<?xml version="1.0"?>
<config xmlns:xsi="http://www.w3.org/2001/XMLSchema-instance" xsi:noNamespaceSchemaLocation="urn:magento:module:Magento_Config:etc/system_file.xsd">
    <system>
        <section id="general">
            <group id="store_information">
                <field id="name">
                    <frontend_class>custom-validate-length</frontend_class>
                </field>
            </group>
        </section>
    </system>
</config>
This is the folder structure of the module

When you have done, you have to run bin\magento cache:clean to clear cache and apply the changes. Below is the result, the form gets validated before sending data to the server for processing.
Hope this article is helpful to you. If you have a comment, please comment below so we can better complement this article and the following articles.
Thank you all and good luck.

Joel Pham
Joel Pham is the CEO of Magenest, with extensive experience in eCommerce, business operations, and digital transformation. He has led projects for major brands across Magento, Shopify, Odoo, and enterprise technology solutions.


Weekly Trending
-

Social sharing 101: Its Definition, Benefits & Examples
December 11 2020 -

Top 7 Zoho CRM best practices you should know about in 2024
January 7 2024 -

4 successful multi-brand retailers that are doing it right
September 25 2018


Recent Posts
-

Payment Gateway Comparison - Top 5 Providers in 2026
April 1 2026 -

Magento 2 Stripe Extension: Installation & Configuration
December 29 2025 -
5 Best-selling Magento 2 Extensions to check out before 2026
December 19 2025 -

8 Best Magento Subscription Extensions For Online Businesses
December 8 2025 -

How to set up payment methods in Stripe Payment Gateway
September 21 2025

