

Table of Contents
All Magento programmers are familiar with the task of adding more columns with custom data to the Magento base grid. Here, we are going to learn how to add columns to the grid by joining tables. These custom columns will render data from a custom joined table. This blog will show you how to do it and give you an explanation of how it works.
In this blog, we will create a custom table whose data will be added to the customer listing grid.
Assuming that we all know how to create a basic module, so let’s just get started with three simple steps to add another column to the Magento customer grid.
Step 1: Add new customer attribute
First of all, I will create a new module Magenest_Customer. And then, I will create a new customer attribute that name is ‘new_attribute’.
It is defined in Magenest\Customer\Setup\Patch\Data\AddCustomerAttribute.php
namespace Magenest\Customer\Setup\Patch\Data;

use Magento\Framework\Setup\Patch\DataPatchInterface;

class AddCustomerAttribute implements DataPatchInterface
{
    protected $customerSetupFactory;

    protected $setup;

    public function __construct(
        \Magento\Customer\Setup\CustomerSetupFactory $customerSetupFactory,
        \Magento\Framework\Setup\ModuleDataSetupInterface $setup
    ) {
        $this->customerSetupFactory = $customerSetupFactory;
        $this->setup = $setup;
    }

    /**
     * @inheritDoc
     */
    public static function getDependencies()
    {
        return [];
    }

    /**
     * @inheritDoc
     */
    public function getAliases()
    {
        return [];
    }

    /**
     * @inheritDoc
     */
    public function apply()
    {
        $customerSetup = $this->customerSetupFactory->create(['setup' => $this->setup]);

        $customerSetup->addAttribute(
            \Magento\Customer\Model\Customer::ENTITY,
            'new_attribute',
            [
                'type'     => 'int',
                'backend'  => '',
                'label'    => 'New Attribute',
                'input'    => 'boolean',
                'source'   => 'Magento\Eav\Model\Entity\Attribute\Source\Boolean',
                'visible'  => true,
                'required' => false,
                'default'  => '1',
                'frontend' => '',
                'unique'   => false,
                'note'     => '',
            ]
        );
        $attribute    = $customerSetup->getEavConfig()->getAttribute(\Magento\Customer\Model\Customer::ENTITY, 'new_attribute');
        $attribute->setData('used_in_forms', ['customer_account_edit'])
            ->setData('is_used_for_customer_segment', true)
            ->setData('is_system', 0)
            ->setData('is_user_defined', 1)
            ->setData('is_visible', 1)
            ->setData('sort_order', 110)
            ->setData("is_used_in_grid", 1)
            ->setData("is_visible_in_grid", 1)
            ->setData("is_filterable_in_grid", 1)
            ->setData("is_searchable_in_grid", 1);
        $attribute->save();
    }
}
Step 2: Combine the customized tables
1. Create a table
In order to show whichever data we want, we’ll store it in our own table. Here, we’ll simply call it magenest_custom_column with only two columns, id and value.
To create a new table, you can create file app/code/Magenest/Customer/etc/db_schema.xml and add the following content to it:
<?xml version="1.0"?>
<schema xmlns:xsi="http://www.w3.org/2001/XMLSchema-instance" xsi:noNamespaceSchemaLocation="urn:magento:framework:Setup/Declaration/Schema/etc/schema.xsd">
   <table name="magenest_custom_column" resource="default" engine="innodb" comment="Magenest Custom Column">
       <column xsi:type="int" name="id" unsigned="true" nullable="false" identity="true" comment="Increment ID" />
       <column xsi:type="varchar" length="100" name="value" nullable="false" comment="Custom Column Value"/>
       <constraint xsi:type="primary" referenceId="PRIMARY">
           <column name="id" />
       </constraint>
   </table>
</schema>
2. Join our table with the main customer table
As we already know, the listing grid displays data from the table, which is why in order to add our column(s) we must join two tables with each other.
How to do it, you may ask. A simple plugin file Magenest/Customer/etc/di.xml will do the trick.
<?xml version="1.0"?>
<config xmlns:xsi="http://www.w3.org/2001/XMLSchema-instance"
        xsi:noNamespaceSchemaLocation="urn:magento:framework:ObjectManager/etc/config.xsd">
    <type name="Magento\Framework\View\Element\UiComponent\DataProvider\CollectionFactory">
        <plugin name="grid_custom_column" type="Magenest\Customer\Plugin\GridJoinCollection" sortOrder="5"/>
    </type>
</config>
Before getting to know what this plugin does, we’ll take a quick peek at what getReport function does inside CollectionFactory class.
* Get report collection
*
* @param string $requestName
* @return Collection
* @throws \Exception
*/
public function getReport($requestName)
{
   if (!isset($this->collections[$requestName])) {
       throw new \Exception(sprintf('Not registered handle %s', $requestName));
   }
   $collection = $this->objectManager->create($this->collections[$requestName]);
   if (!$collection instanceof Collection) {
       throw new \Exception(sprintf('%s is not of Collection type.', $requestName));
   }
   return $collection;
}
As we can see here, this function takes in a $requestName as a parameter and returns the collection of the given request. Consequently, we’ll modify this function so that it will join the table based on the given table requested.
So, you need to create file Magenest\Customer\Plugin\GridJoinCollection and add afterGetReport function like below:
public function afterGetReport(     \Magento\Framework\View\Element\UiComponent\DataProvider\CollectionFactory $subject,
        $collection,
        $requestName
    ) {
        if ($requestName == 'customer_listing_data_source') {
            $select = $collection->getSelect();
            $select->joinLeft(
                ["secondTable" => $collection->getTable("magenest_custom_column")],
                'main_table.entity_id = secondTable.id',
                ['value']
            );
        }
        return $collection;
    }
3. Add column using ui_component
After all the hard work, the last thing we need to do now is to add our column to the grid. Based on whichever grid you want, you can add your custom column just by creating a UI component file with the exact same name as a grid file. Particularly, to execute this, we only need to place these ui component files inside our module view/adminhtml/ui_component folder:
Customer grid will be written under the file customer_listing.xml:
<?xml version="1.0" encoding="UTF-8"?>
<listing xmlns:xsi="http://www.w3.org/2001/XMLSchema-instance" xsi:noNamespaceSchemaLocation="urn:magento:module:Magento_Ui:etc/ui_configuration.xsd">
    <columns name="customer_columns" class="Magento\Customer\Ui\Component\Listing\Columns">
        <column name="value">
            <argument name="data" xsi:type="array">
                <item name="config" xsi:type="array">
                    <item name="sortOrder" xsi:type="number">999</item>
                    <item name="filter" xsi:type="string">text</item>
                    <item name="label" translate="true" xsi:type="string">Customer Custom Column</item>
                </item>
            </argument>
        </column>
    </columns>
</listing>
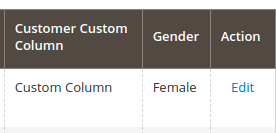
After that, clear cache and go to the admin site and see the magic for yourself. The result should look something like this.
READ MORE. How to add custom columns to product grid in Magento 2
CONCLUSION
Among various ways to add a custom column to the Magento customer grid, this blog shows you the simple and easy-to-understand one, even for beginners. Hope those codes run well for your website. If any problem occurs, feel free to tell us in the comment.

Joel Pham
Joel Pham is the CEO of Magenest, with extensive experience in eCommerce, business operations, and digital transformation. He has led projects for major brands across Magento, Shopify, Odoo, and enterprise technology solutions.

Comments (1)
-
This is crazy but i cannot force magento to intercept getReport method. It is just not triggering and i followed this tutorial step by step. Some help could be appreciated.

Weekly Trending
-

Social sharing 101: Its Definition, Benefits & Examples
December 11 2020 -

Customer Value and Satisfaction: What's the Difference?
October 30 2020


Recent Posts
-

Payment Gateway Comparison - Top 5 Providers in 2026
April 1 2026 -

Magento 2 Stripe Extension: Installation & Configuration
December 29 2025 -
5 Best-selling Magento 2 Extensions to check out before 2026
December 19 2025 -

8 Best Magento Subscription Extensions For Online Businesses
December 8 2025 -

How to set up payment methods in Stripe Payment Gateway
September 21 2025

