

Table of Contents
Why should you install Elasticsearch? Elasticsearch is a real-time distributed search engine that is capable of performing various types of searches. It runs on your web server and its flexible nature enables it to search various types of documents irrespective of their data type which included structured, unstructured, geo, and metrics data type. By installing Elasticsearch, you can improve the performance and accuracy of search queries of your eCommerce site.
From version 2.4, Magento uses Elasticsearch to search instead of using Mysql. In this blog, I’ll walk you through how to install Elasticsearch and then set it up within Magento 2.
1. Install Java (It is necessary for dependencies)
Because Elasticsearch is an open-source that is developed on Java, setting up Java first is vital. As you know, Java is a programming language and a platform. Java is a high-level, robust, object-oriented, and secure programming language. Therefore, you can take your mind off security problems and follow our instructions as below.
Run the following commands to install Java.
sudo apt-get update
sudo apt install openjdk-8-jdk-y
Next, verify if the java was installed properly with the following command:
java -version
The output should look something like this:
openjdk version "1.8.0_292"
OpenJDK Runtime Environment (build 1.8.0_292-8u292-b10-0ubuntu1~20.04-b10)
OpenJDK 64-Bit Server VM (build 25.292-b10, mixed mode)
2. Install Elasticsearch
First, you must add Elasticsearch’s signing key to verify the downloaded package (or skip this step if you’ve already installed the packages from Elasticsearch):
wget -qO - https://artifacts.elastic.co/GPG-KEY-elasticsearch | sudo apt-key add
Next, you need to install the apt-transport-https package:
sudo apt-get install apt-transport-https
Now add the Elasticsearch repository to the system.
echo "deb https://artifacts.elastic.co/packages/7.x/apt stable main" | sudo tee -a /etc/apt/sources.list.d/elastic-7.x.list
Next, update the apt package’s list and install the Elasticsearch engine.
sudo apt-get update && sudo apt-get install elasticsearch
Start the Elasticsearch service.
sudo systemctl enable elasticsearch.service
sudo systemctl start elasticsearch.service
You can verify if the Elasticsearch is running by sending the HTTP request to port 9200 on localhost with the following curl command:
curl -X GET "localhost:9200/"
The result similar to this:
{
  "name" : "P5wiUFd",
  "cluster_name" : "elasticsearch",
  "cluster_uuid" : "WfQWVkBvSUam5sD708C6_w",
  "version" : {
    "number" : "6.8.14",
    "build_flavor" : "default",
    "build_type" : "deb",
    "build_hash" : "dab5822",
    "build_date" : "2021-02-02T19:58:04.182039Z",
    "build_snapshot" : false,
    "lucene_version" : "7.7.3",
    "minimum_wire_compatibility_version" : "5.6.0",
    "minimum_index_compatibility_version" : "5.0.0"
  },
  "tagline" : "You Know, for Search"
}
3. Configure Elasticsearch within Magento 2
After getting Elasticsearch, you are now ready to configure this powerful search engine in your eCommerce site. Let's dive in!
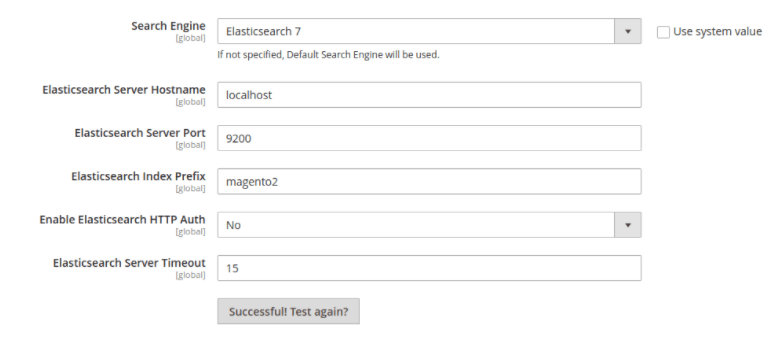
From the Admin sidebar, navigate to Stores > Settings > Configuration > Catalog > Catalog > Catalog Search.
In the Search Engine field, clear the Use system value checkbox and select the version of Elasticsearch that is installed on your server.
Configure the Elasticsearch Connection
- Enter the Elasticsearch Server Hostname. The default is localhost
- Enter the Elasticsearch Server Port.
- Enter a prefix in the Elasticsearch Index Prefix field to determine the Elasticsearch index. For instance: Magento2.
- In the Enable Elasticsearch HTTP Auth field, select the Yes option to use HTTP authentication to suggest a username and password access to Elasticsearch Server.
- Enter the number of seconds before the system times out to the Elasticsearch Server Timeout field. The default number is 15.
To verify the configuration, click the Test Connection button. If successful, the button text will change to 'Successful! Test again?'
Your config should look something like this
After completion, click ‘save config’.
Conclusion
Hope that will be helpful for users who are having trouble installing and configuring Elasticsearch with Magento 2. Moreover, Magenest devotes itself to make your life easier by offering many useful Magento 2 extensions to boost your eCommerce site. In case you have any further questions, feel free to leave a comment below or contact us for support.

Joel Pham
Joel Pham is the CEO of Magenest, with extensive experience in eCommerce, business operations, and digital transformation. He has led projects for major brands across Magento, Shopify, Odoo, and enterprise technology solutions.

Weekly Trending
-

Social sharing 101: Its Definition, Benefits & Examples
December 11 2020 -

Customer Value and Satisfaction: What's the Difference?
October 30 2020


Recent Posts
-

Payment Gateway Comparison - Top 5 Providers in 2026
April 1 2026 -

Magento 2 Stripe Extension: Installation & Configuration
December 29 2025 -
5 Best-selling Magento 2 Extensions to check out before 2026
December 19 2025 -

8 Best Magento Subscription Extensions For Online Businesses
December 8 2025 -

How to set up payment methods in Stripe Payment Gateway
September 21 2025

