

Table of Contents
Magento has changed logic process setup data/schema, which is recommended for Magento versions 2.3 and up. It was introduced in 2018 with the release of Magento 2.3 and now gradually becomes popular. Unlike the upgrade scripts, it helps developers not to write various scripts for each new module version. In this article, you will learn how to use declarative schema & apply schema patches.
1. Create table
Create db_schema.xml file
In MyModule/etc/db_schema.xml, I will create 2 new tables:
<?xml version="1.0"?>
<schema xmlns:xsi="http://www.w3.org/2001/XMLSchema-instance" xsi:noNamespaceSchemaLocation="urn:magento:framework:Setup/Declaration/Schema/etc/schema.xsd">
   <table name="intray_table1" resource="default" engine="innodb" comment="Intray Table 1">
       <column xsi:type="int" name="table_1_id" padding="10" unsigned="true" nullable="false" identity="true" comment="ID"/>
       <column xsi:type="varchar" name="name" comment="Name"/>
       <column xsi:type="varchar" name="body" comment="Body"/>
       <constraint xsi:type="primary" referenceId="PRIMARY">
           <column name="table_1_id"/>
       </constraint>
       <index referenceId="MY_MODULE_TABLE1_ID" indexType="btree">
           <column name="table_1_id"/>
       </index>
   </table>
   <table name="intray_table2" resource="default" engine="innodb" comment="Intray Table 2">
       <column xsi:type="int" name="table_2_id" padding="10" unsigned="true" nullable="false" identity="true" comment="ID"/>
       <column xsi:type="varchar" name="body" comment="Body"/>
       <constraint xsi:type="primary" referenceId="PRIMARY">
           <column name="table_2_id"/>
       </constraint>
   </table>
</schema>
Run : php bin/magento setup:upgrade
Database
Table 1:

Table 2:

Generate whitelist file, showing a history of all tables, columns, and keys added with declarative schema and it’s required for drop operations. After running setup upgrade, you can generate it with the following command:
Run : bin/magento setup:db-declaration:generate-whitelist
Detail:
In element <table...> :
name:table name.comment:comment for the table.engine:SQL engine. This value must be innodb or memory.resource:The database shard on which to install the table. This value must be default, checkout, or sales.
In element <column...> :
xsi:type:column type.name:column name.padding:the size of an integer column.usigned:for numeric data types, specifies whether the column can contain positive and negative values or only positive values.nullable:indicates whether the column can be nullable.identity :indicates whether a column is auto-incremented.comment :comment for the column.
In element <constraint...> :
type:One of primary, unique, or foreign.referenceId:A custom identifier that is used only for relation mapping in the scope of db_schema.xml files. The real entity in the database has a system-generated name. The most convenient way to set the value of this attribute is to use the value that is written in the module’s db_schema_whitelist.json file when you run the generate-whitelist command.
In element <index...> :
indexType:The value must be btree, fulltext, or hash.referenceId:A custom identifier that is used only for relation mapping in the scope of db_schema.xml files. The real entity in the database has a system-generated name. The most convenient way to set the value of this attribute is to use the value that is written in the module’s db_schema_whitelist.json file when you run the generate-whitelist command.
2. Create a Schema Patch
Create AddColumn.php file
In MyModule/Setup/Patch/Schema/AddColumn.php. Now, I want to add columns to the Table2
<?php
/**
* Copyright © 2019 Magenest. All rights reserved.
* See COPYING.txt for license details.
*/
namespace Magenest\MyModule\Setup\Patch\Schema;


use Magento\Framework\DB\Ddl\Table;
use Magento\Framework\Setup\Patch\SchemaPatchInterface;
use Magento\Framework\Setup\ModuleDataSetupInterface;


class AddColumn implements SchemaPatchInterface
{
   private $moduleDataSetup;


   public function __construct(
       ModuleDataSetupInterface $moduleDataSetup
   ) {
       $this->moduleDataSetup = $moduleDataSetup;
   }


   public static function getDependencies()
   {
       return [];
   }


   public function getAliases()
   {
       return [];
   }


   public function apply()
   {
       $this->moduleDataSetup->startSetup();


       $this->moduleDataSetup->getConnection()->addColumn(
           $this->moduleDataSetup->getTable('intray_table2'),
           'name',
           [
               'type' => Table::TYPE_TEXT,
               'length' => 255,
               'nullable' => true,
               'comment'  => 'Name',
           ]
       );


       $this->moduleDataSetup->endSetup();
   }
}
Run: bin/magento setup:upgrade
Database
Table 2

Create DeleteColumn.php file
In MyModule/Setup/Patch/Schema/DeleteColumn.php. Now, I want to delete `body` columns on the Table2 and my public function apply().
public function apply()
   {
       $this->moduleDataSetup->startSetup();


       $this->moduleDataSetup->getConnection()->dropColumn(
           $this->moduleDataSetup->getTable('intray_table2'),
           'name',
           $schemaName = null
       );


       $this->moduleDataSetup->endSetup();
   }
Run: bin/magento setup:upgrade
Database
Table 2

Create ChangeColumn.php file
In MyModule/Setup/Patch/Schema/ChangeColumn.php. Now, I want to change `body` column to `content` column and my public function apply().
public function apply()
{
   $this->moduleDataSetup->startSetup();


   $this->moduleDataSetup->getConnection()->changeColumn(
       $this->moduleDataSetup->getTable('intray_table2'),
       'body',
       'content',
       [
           'type' => \Magento\Framework\DB\Ddl\Table::TYPE_TEXT,
           'length' => 10,
           'nullable' => true,
           'comment' => 'Contents'
       ]
   );


   $this->moduleDataSetup->endSetup();
}
Run: bin/magento setup:upgrade
Database
Table 2

Create DropTable.php file
In MyModule/Setup/Patch/Schema/DropTable2.php. Now, I want to drop `intray_table1` table and my public function apply().
public function apply()
{
   $this->moduleDataSetup->startSetup();


   $this->moduleDataSetup->getConnection()->dropTable(
       $this->moduleDataSetup->getTable('intray_table1')
   );


   $this->moduleDataSetup->endSetup();
}
Run: bin/magento setup:upgrade
Detail
public static function getDependencies()
{
   return [
       \SomeVendor\SomeModule\Setup\Patch\Schema\SomePatch::class
   ];
}
To define a dependency in a patch, add the method public static function getDependencies() to the patch class and return the class names of the patches this patch depends on. The dependency can be in any module.
public function getAliases()
{
   return [
       ExampleSchemaPatch::class
   ];
}
To define aliases for this patch class, since we don’t really specify version numbers anymore, our class name could change, and if it does, we should supply the old class name here so it’s not executed a second time.
public function apply()
{
   $this->moduleDataSetup->startSetup();
   /*
    *  logic here
    */
   $this->moduleDataSetup->endSetup();
}
The method you’ll be using the most is apply(). This is where your code you want to apply in the patch.
If you create multiple files and run bin/magento setup:upgrade, Magento will run the order of files in alphabetical order.
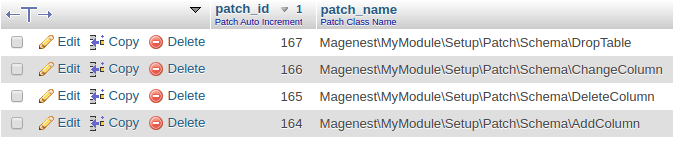
Magento inserts a record into the patch_list database table with the value of the patch_name field being the value of our patch class.
Table patch_list :
CONCLUSION
Schema patches are much more convenient than UpgradeSchema. For example, you want to add a column to 1 table in version 2.0.0 and update the module version to 2.0.1. But then, you delete the added column and continue to update the module version to 2.0.2. With the old way, when you upgrade it, script changes for 2.0.1 and 2.0.2 will also be applied. It's so intricate! Meanwhile, schema patches only work once after each run and each class will operate separately. This new way will replace the old way in the near future.
READ MORE. How to apply data patch in Magento 2?
We hope you have learned something useful from this article. If any problem occurs, let us know in the comment section below. Thank you for reading the article.

Joel Pham
Joel Pham is the CEO of Magenest, with extensive experience in eCommerce, business operations, and digital transformation. He has led projects for major brands across Magento, Shopify, Odoo, and enterprise technology solutions.
Weekly Trending
-

Customer Journey Map: Definition, Templates, and Examples
November 9 2020 -

Confirmation code: 5 things you need to know about it
March 30 2021 -

Which is the Top 8 Best Payment Gateway in India?
December 10 2023 -

How credit card processing works: What you should know?
November 18 2021

Recent Posts
-

Payment Gateway Comparison - Top 5 Providers in 2026
April 1 2026 -

Magento 2 Stripe Extension: Installation & Configuration
December 29 2025 -
5 Best-selling Magento 2 Extensions to check out before 2026
December 19 2025 -

8 Best Magento Subscription Extensions For Online Businesses
December 8 2025 -

How to set up payment methods in Stripe Payment Gateway
September 21 2025


hi all :)