

Table of Contents
The most given task for all Magento programmers should be adding more columns with custom data to the Magento base grid. In this blog, we are going to learn how to add columns to the grid by joining tables and updating new columns in the sales_order & sales_order_grid table.
Step 1: Using new column in sales_order & sales_order_grid table
1. Create custom columns in the database
First of all, we need to create a custom column in both table sales_order and sales_order grid, so in the file app/code/Vendor/Module/etc/db_schema.xml we have:
<?xml version="1.0"?>
<schema xmlns:xsi="http://www.w3.org/2001/XMLSchema-instance" xsi:noNamespaceSchemaLocation="urn:magento:framework:Setup/Declaration/Schema/etc/schema.xsd">
   <table name="sales_order">
       <column xsi:type="varchar" name="magenest_custom_column" nullable="true" comment="Magenest Custom Column" />
   </table>
   <table name="sales_order_grid">
       <column xsi:type="varchar" name="magenest_custom_column" nullable="true" comment="Magenest Custom Column" />
   </table>
</schema>
2. Add column in the virtual class grid
To customize the column in the sales_order_grid table so that it will automatically update when we customize the column in sales_order update, we have to add this column in virtual class grid at app/code/Vendor/Module/etc/di.xml
<?xml version="1.0"?>
<config xmlns:xsi="http://www.w3.org/2001/XMLSchema-instance" xsi:noNamespaceSchemaLocation="urn:magento:framework:ObjectManager/etc/config.xsd">
   <virtualType name="Magento\Sales\Model\ResourceModel\Order\Grid" type="Magento\Sales\Model\ResourceModel\Grid">
       <arguments>
           <argument name="columns" xsi:type="array">
               <item name="magenest_custom_column" xsi:type="string">sales_order.magenest_custom_column</item>
           </argument>
       </arguments>
   </virtualType>
</config>
3. Add column using UI component
Creating sales_order_grid.xml file in folder app/code/Vendor/Module/view/adminhtml/ui_component/ with flowowing code:
<?xml version="1.0" encoding="UTF-8"?>
<listing xmlns:xsi="http://www.w3.org/2001/XMLSchema-instance" xsi:noNamespaceSchemaLocation="urn:magento:module:Magento_Ui:etc/ui_configuration.xsd">
   <columns name="sales_order_columns">
       <column name="magenest_custom_column" sortOrder="300">
           <settings>
               <filter>text</filter>
               <label translate="true">Magenest Custom Column</label>
           </settings>
       </column>
   </columns>
</listing>
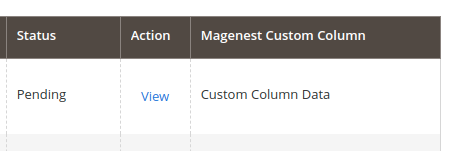
After that, update sales_order data and clear cache, we can see the new column was created in the admin sales order grid.
Step 2: Join custom table
1. Create a table
In order to show whichever data we want, we’ll store it in our own table. Here, we’ll simply call it magenest_custom_column with only two columns, id and value.
At Vendor/Module/etc/db_schema.xml, the content should be something like.
<?xml version="1.0"?>
<schema xmlns:xsi="http://www.w3.org/2001/XMLSchema-instance" xsi:noNamespaceSchemaLocation="urn:magento:framework:Setup/Declaration/Schema/etc/schema.xsd">
   <table name="magenest_custom_column" resource="default" engine="innodb" comment="Magenest Custom Column">
       <column xsi:type="int" name="id" unsigned="true" nullable="false" identity="true" comment="Increment ID" />
       <column xsi:type="varchar" length="100" name="value" nullable="false" comment="Custom Column Value"/>
       <constraint xsi:type="primary" referenceId="PRIMARY">
           <column name="id" />
       </constraint>
   </table>
</schema>
2. Join custom table with our wishlist one
As we already know, listing grid display data from table, which is why in order to add our column(s) we must join two tables with each other.
How to do it, you may ask. A simple plugin file will do the trick.
<type name="Magento\Framework\View\Element\UiComponent\DataProvider\CollectionFactory">
   <plugin name="grid_custom_column" type="Magenest\Grids\Plugin\GridJoinCollection" sortOrder="5" />
</type>
Before getting to know what this plugin does, we’ll take a quick peek at what getReport function does inside CollectionFactory class.
/**
* Get report collection
*
* @param string $requestName
* @return Collection
* @throws \Exception
*/
public function getReport($requestName)
{
   if (!isset($this->collections[$requestName])) {
       throw new \Exception(sprintf('Not registered handle %s', $requestName));
   }
   $collection = $this->objectManager->create($this->collections[$requestName]);
   if (!$collection instanceof Collection) {
       throw new \Exception(sprintf('%s is not of Collection type.', $requestName));
   }
   return $collection;
}
As we can see here, this function takes in a $requestName as a parameter and return collection of given request. Consequently, we’ll modify this function so that it will join table based on given table requested.
public function afterGetReport(
   CollectionFactory $subject,
   $collection,
   $requestName
) {
   if ($requestName == 'sales_order_grid_data_source') {
       $select = $collection->getSelect();
       $select->joinLeft(
           ["secondTable" => $collection->getTable("magenest_custom_column")],
           'main_table.increment_id = secondTable.id',
           array('value')
       );
   }   return $collection;
}
3. Add column using UI component
After all the hard work, the last thing we need to do now is to add our column to the grid. Based on whichever grid you want, you can add your custom column just by creating a UI component file with the exact same name as ui grid file. Particularly, to execute this, we only need to place these ui component files inside our module view/adminhtml/ui_component folder.
Order grid will be written under the file sales_order_grid.xml:
<?xml version="1.0" encoding="UTF-8"?>
<listing xmlns:xsi="http://www.w3.org/2001/XMLSchema-instance" xsi:noNamespaceSchemaLocation="urn:magento:module:Magento_Ui:etc/ui_configuration.xsd">
   <columns name="sales_order_columns">
       <column name="value">
           <argument name="data" xsi:type="array">
               <item name="config" xsi:type="array">
                   <item name="sortOrder" xsi:type="number">999</item>
                   <item name="filter" xsi:type="string">text</item>
                   <item name="label" translate="true" xsi:type="string">Order Custom Column</item>
               </item>
           </argument>
       </column>
   </columns>
</listing>
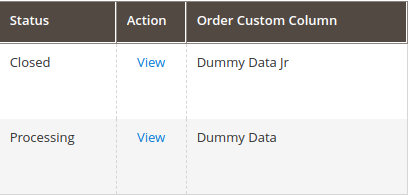
After that, clear cache and go to the admin site and see the magic for yourself. The result should look like this.
CONCLUSION
In this blog, I’ve shown you a simple way to add more columns to the Sales order grid by joining a custom table with your own data.
Happy coding!

Joel Pham
Joel Pham is the CEO of Magenest, with extensive experience in eCommerce, business operations, and digital transformation. He has led projects for major brands across Magento, Shopify, Odoo, and enterprise technology solutions.


Weekly Trending
-

Customer Journey Map: Definition, Templates, and Examples
November 9 2020 -

Confirmation code: 5 things you need to know about it
March 30 2021 -

Which is the Top 8 Best Payment Gateway in India?
December 10 2023 -

How credit card processing works: What you should know?
November 18 2021 -

Best Store Locator Page Examples: Sell online & offline smarter
November 22 2019
Recent Posts
-

Payment Gateway Comparison - Top 5 Providers in 2026
April 1 2026 -

Magento 2 Stripe Extension: Installation & Configuration
December 29 2025 -
5 Best-selling Magento 2 Extensions to check out before 2026
December 19 2025 -

8 Best Magento Subscription Extensions For Online Businesses
December 8 2025 -

How to set up payment methods in Stripe Payment Gateway
September 21 2025

