

Table of Contents
In this article, we will learn how to add sections to the sale order view page in Magento 2. Each component will have its own custom function depending on the purpose of each person. We will introduce several ways to add a new element to order view, code snippets are under a module named ‘Magenest_CustomSection’.
1. Add a custom button
Firstly, we’ll learn how to add a top button to order view.
Step 1: Declare a button
We start by using a plugin targeting 'beforeSetLayout'. Add the following “type” node into the “app/code/Magenest/CustomSection/etc/adminhtml/di.xml” file of your module as shown below.
<?xml version="1.0"?>
<config xmlns:xsi="http://www.w3.org/2001/XMLSchema-instance" xsi:noNamespaceSchemaLocation="urn:magento:framework:ObjectManager/etc/config.xsd">

   <!--Add a button-->
   <type name="Magento\Sales\Block\Adminhtml\Order\View">
       <plugin name="sales_order_adminhtml_view_custom_button_plugin" type="Magenest\CustomSection\Plugin\Sales\Block\Adminhtml\Order\View"/>
   </type>

</config>
Step 2: Define button attributes
Create Button class to add button and its attributes
Add the following code into the “app/code/Magenest/CustomSection/Plugin/Sales/Block/Adminhtml/Order/Button.php” file:
<?php
namespace Magenest\CustomSection\Plugin\Sales\Block\Adminhtml\Order;

use Magento\Sales\Block\Adminhtml\Order\View as OrderView;

class Button
{
   public function beforeSetLayout(OrderView $subject)
   {
       $subject->addButton(
           'order_custom_button',
           [
               'label' => __('Custom Button'),
               'class' => __('custom-button'),
               'id' => 'order-view-custom-button',
               'onclick' => 'setLocation(\'' . $subject->getUrl('routes/controller/action') . '\')'
           ]
       );
   }
}
Here we’ve defined a button with its own ID, name, and route triggered when the user presses the button.
Result
Clear layout cache and view an order from the backend. You will see the "Custom Button" button element has been created:

READ MORE. How to add custom fields to the Customer Registration page in Magento 2 - Magenest Blog
2. Add a custom tab
Next up, we’ll learn how to add a new tab to the left-hand menu.
Step 1: Declare a new tab in layout XML
First, we will create a sales_order_view.xml file in the app/code/Magenest/view/adminhtml/layout directory with the following content.
<?xml version="1.0"?>
<page xmlns:xsi="http://www.w3.org/2001/XMLSchema-instance" layout="admin-2columns-left" xsi:noNamespaceSchemaLocation="urn:magento:framework:View/Layout/etc/page_configuration.xsd">
   <body>
       <referenceContainer name="left">
           <referenceBlock name="sales_order_tabs">
               <action method="addTab">
                   <argument name="name" xsi:type="string">custom_tab</argument>
                   <argument name="block" xsi:type="string">Magenest\CustomSection\Block\Adminhtml\Order\View\Tab\CustomTab</argument>
               </action>
           </referenceBlock>
       </referenceContainer>
   </body>
</page>
In this file, we declared a new tab in the left-hand menu, with its name and responsible block class.
Step 2: Define block class
Under app/code/Magenest/CustomSection/Block/Admin/Order/View/Tab we will create CustomTab class:
<?php

namespace Magenest\CustomSection\Block\Adminhtml\Order\View\Tab;

class CustomTab extends \Magento\Backend\Block\Template implements \Magento\Backend\Block\Widget\Tab\TabInterface
{
   protected $_template = 'order/view/tab/customtab.phtml';
   /**
    * @var \Magento\Framework\Registry
    */
   private $_coreRegistry;

   /**
    * View constructor.
    * @param \Magento\Backend\Block\Template\Context $context
    * @param \Magento\Framework\Registry $registry
    * @param array $data
    */
   public function __construct(
       \Magento\Backend\Block\Template\Context $context,
       \Magento\Framework\Registry $registry,
       array $data = []
   ) {
       $this->_coreRegistry = $registry;
       parent::__construct($context, $data);
   }

   /**
    * Retrieve order model instance
    *
    * @return \Magento\Sales\Model\Order
    */
   public function getOrder()
   {
       return $this->_coreRegistry->registry('current_order');
   }
   /**
    * Retrieve order model instance
    *
    * @return int
    *Get current id order
    */
   public function getOrderId()
   {
       return $this->getOrder()->getEntityId();
   }

   /**
    * Retrieve order increment id
    *
    * @return string
    */
   public function getOrderIncrementId()
   {
       return $this->getOrder()->getIncrementId();
   }
   /**
    * {@inheritdoc}
    */
   public function getTabLabel()
   {
       return __('My Custom Tab');
   }

   /**
    * {@inheritdoc}
    */
   public function getTabTitle()
   {
       return __('My Custom Tab');
   }

   /**
    * {@inheritdoc}
    */
   public function canShowTab()
   {
       return true;
   }

   /**
    * {@inheritdoc}
    */
   public function isHidden()
   {
       return false;
   }
}
Finally, we will create the template file to add content to the custom tab.
<?php
/**
* @var $block \Magenest\CustomSession\Block\Adminhtml\Order\View\Tab\CustomTab
*/
?>

<div class="fieldset-wrapper order-information">
   <div>
       <h2>Magenest</h2>
   </div>
   <div class="fieldset-wrapper-title">
       <span class="title"><?php /* @escapeNotVerified */
           echo __('Information for new Order tab') ?></span>
   </div>
   <table class="admin__table-secondary">
       <tbody>
       <?php echo $block->getChildHtml(); ?>
       <tr>
           <th><?php /* @escapeNotVerified */
               echo __('Order ID:') ?></th>
           <td><?php echo $block->getOrderIncrementId(); ?></td>
       </tr>
       <tr>
           <th><?php /* @escapeNotVerified */
               echo __('Last History:') ?></th>
           <td><?php echo __('History of order') ?></td>
       </tr>
       </tbody>
   </table>
</div>
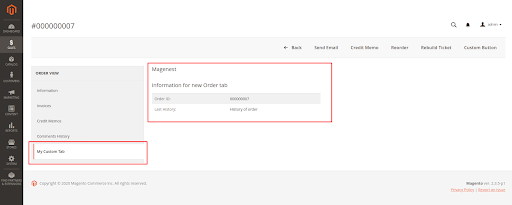
Our new tab is added to the left panel as seen below:
3. Add a custom block to order view information
Step 1: Declare custom block in layout XML
First, we need to add the following code to the sales_order_view.xml file in app/code/Magenest/CustomSection/view/adminhtml/layout path and add the following code.
<?xml version="1.0"?>
<page xmlns:xsi="http://www.w3.org/2001/XMLSchema-instance" layout="admin-2columns-left" xsi:noNamespaceSchemaLocation="urn:magento:framework:View/Layout/etc/page_configuration.xsd">
   <body>
       <!--add custom block -->
       <referenceBlock name="order_additional_info">
           <block class="Magenest\CustomSection\Block\Adminhtml\Order\View\View" name="sales_custom_view" template="order/view/view.phtml" />
       </referenceBlock>

   </body>
</page>
Our custom block will be placed in the Additional Information order block.
Step 2: Define block class
Next we will create the View.php file in the app/code/Magenest/CustomSection/Block/Adminhtml/Order/View folder.
<?php
namespace Magenest\CustomSection\Block\Adminhtml\Order\View;
class View extends \Magento\Backend\Block\Template
{
   public function myFunction()
   {
       //your code in here
       return "Magenest";
   }
}
Step 3: Define view template
Finally, we create the view.phtml file, which contains the content for the block.
<?php
/**
* @var $block \Magenest\CustomSection\Block\Adminhtml\Order\View\View
*/
?>

<div>
   <h2 style="color: red"><?php echo $block->myFunction()?></h2>
   <h3>Add custom block to order view information</h3>
</div>
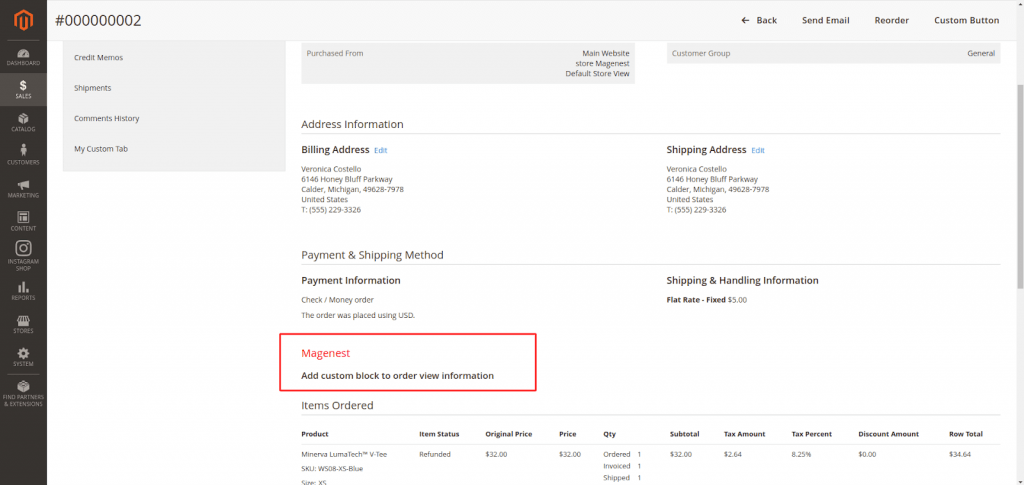
After that, clear the cache, click to view any order and you will see 1 block has been added as the red cavity below.
We hope that this article will be helpful to you.
Thanks for reading!

Joel Pham
Joel Pham is the CEO of Magenest, with extensive experience in eCommerce, business operations, and digital transformation. He has led projects for major brands across Magento, Shopify, Odoo, and enterprise technology solutions.


Weekly Trending
-

Confirmation code: 5 things you need to know about it
March 30 2021 -

eCommerce Product Images: Which is the best size?
September 25 2020 -

Payment Gateway Comparison - Top 5 Providers in 2026
April 1 2026 -

Everything you need to know about Guest Blogging in 2024
December 2 2023

Recent Posts
-
Payment Gateway Comparison - Top 5 Providers in 2026
April 1 2026 -

Magento 2 Stripe Extension: Installation & Configuration
December 29 2025 -
5 Best-selling Magento 2 Extensions to check out before 2026
December 19 2025 -

8 Best Magento Subscription Extensions For Online Businesses
December 8 2025 -

How to set up payment methods in Stripe Payment Gateway
September 21 2025

