
Table of Contents
Before Magento introduced the new feature Multi-Source Inventory (MSI) in Magento 2.3 version, merchants can only have one source for their store. It causes many difficulties in inventory management and delivery. MSI is a huge improvement to the Magento core, which connects multiple inventory sources to your e-commerce website.
Inventory Management features include
- Decrease considerable delivery time and cost.
- Advance drop shipping opportunities.
- Stocks for tracking available aggregated quantities through assigned sources.
- Allow the store owner to make a separate shipment from a different warehouse with quick delivery service for an order with multiple items, in case a customer wants to receive a particular item in advance.
- Integrate with third-party inventory systems and customize the default implementation of the MSI easier.
- Shipment matching algorithms.
Create MSI Sources
Sources represent physical locations that store and ship available products. These locations can include warehouses, brick-and-mortar stores, distribution centers, and drop shippers. (Any location can be designated as a source for virtual products.)
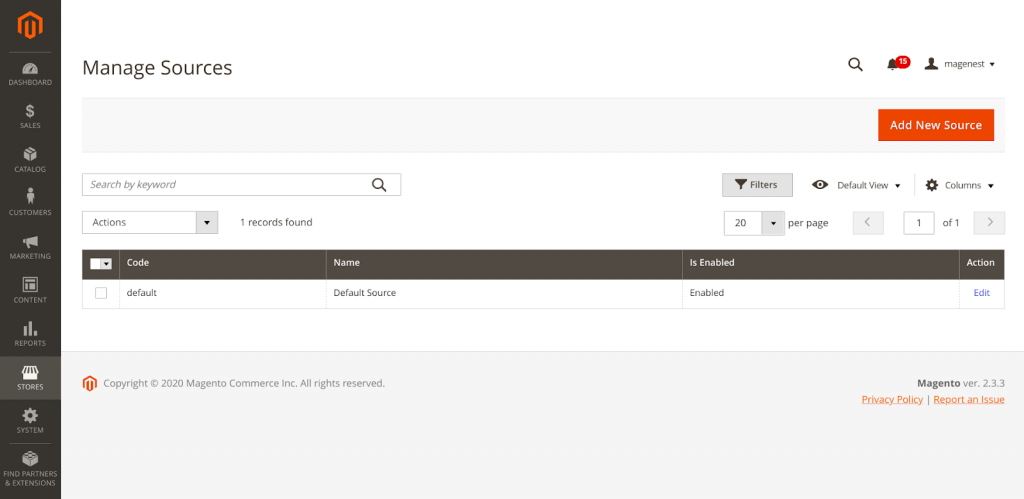
Step 1. On the Admin sidebar: Store > Inventory > Source.
The default source is created by M2 and all products are assigned in the single-source model.
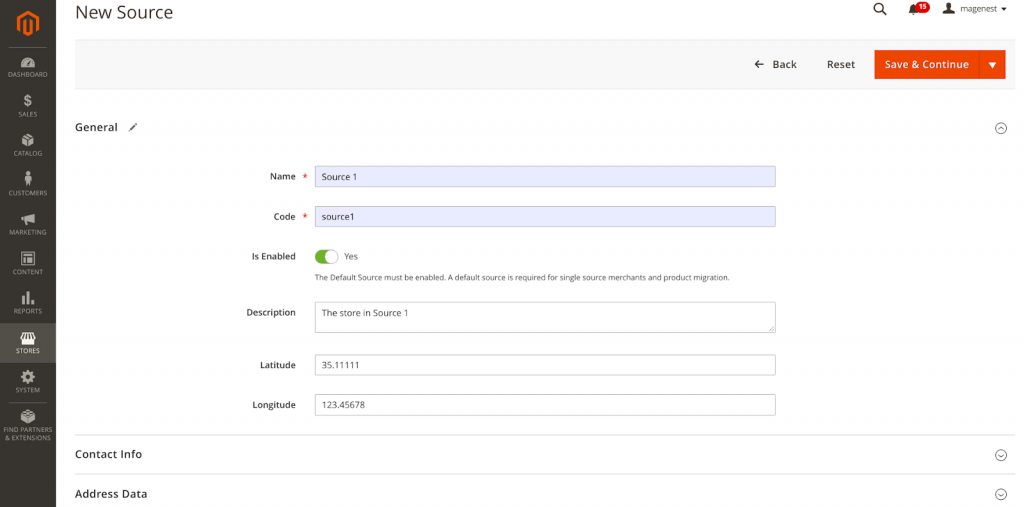
Step 2. Add A New Source.
Note:
- Name and Code are required fields for a source.
- Products are assigned by source (Enable). The source must have assigned stock for one or more websites. The Default Source cannot be disabled.
Step 3. Complete contact information and the address of the source.

Note: Country and Postcode are required fields.
Step 4. Finish, click on the Save button at the top right of the screen to save this source.
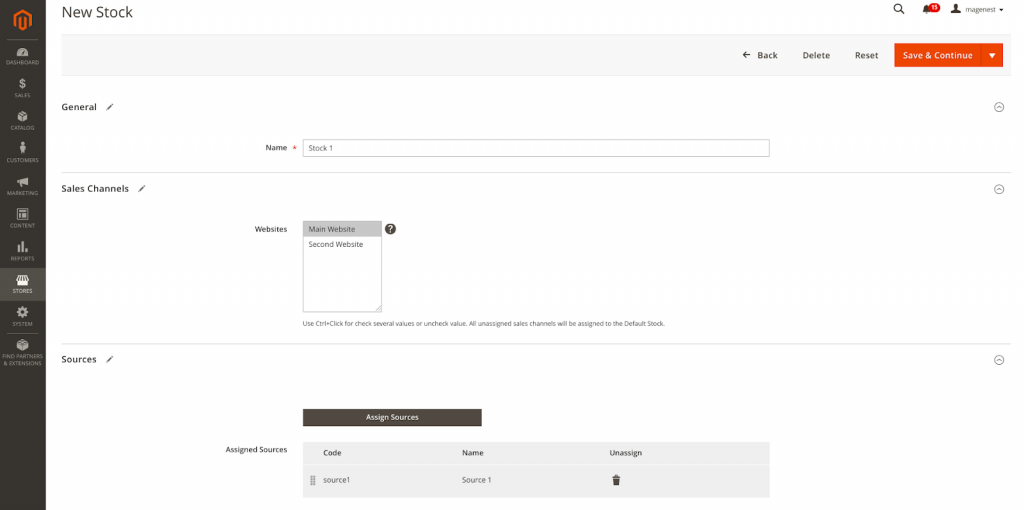
Create MSI Stock
Stocks map a sales channel (currently limited to websites) to source locations and on-hand inventory. A stock can map to multiple sales channels, but a sales channel can be assigned to only one stock.
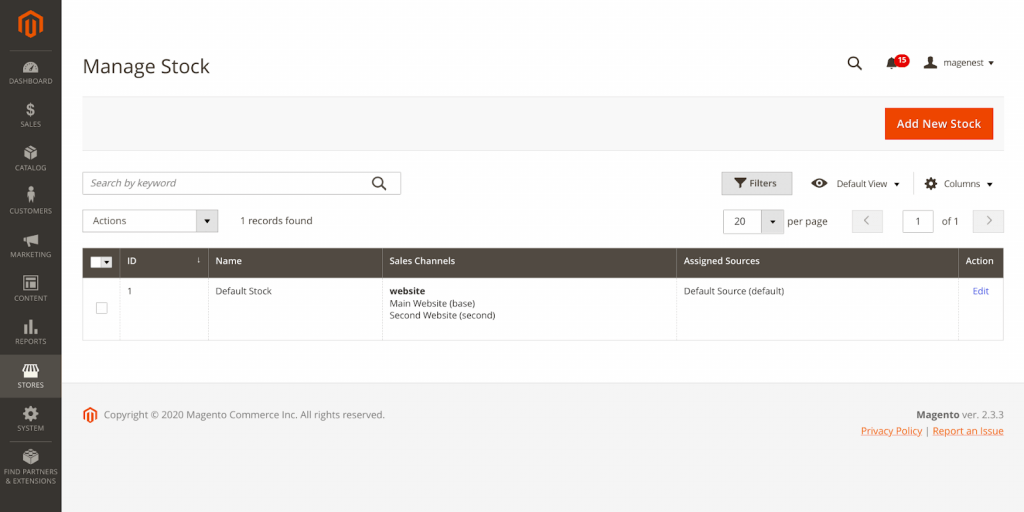
Step 1. Go to Stores > Inventory > Stocks.
The default stock is also created by M2 and assigned to the default source and the main website.
Step 2. Add new Stock.
- Enter Name field with the name of the new stock
- Select the sales channel, you can assign the stock to one or more listed sales channels.
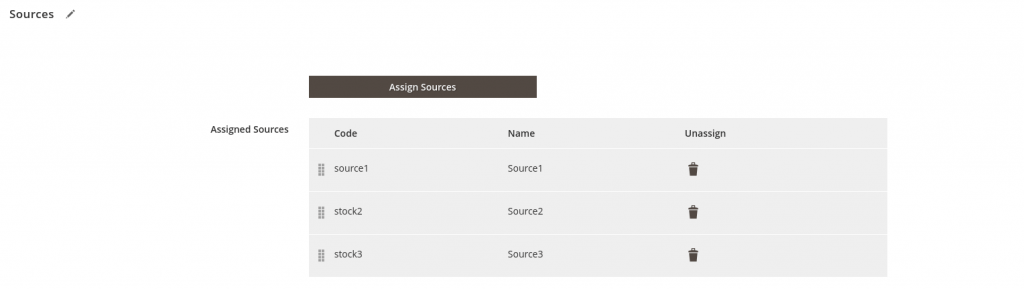
- Assign the sources: Choose the sources you want to apply to the new stock. Then, click Done.
Manage Catalog Product Inventory
Step 1. Go to the Catalog > Products
You can select any products to assign by the source. Add New Product or Edit.
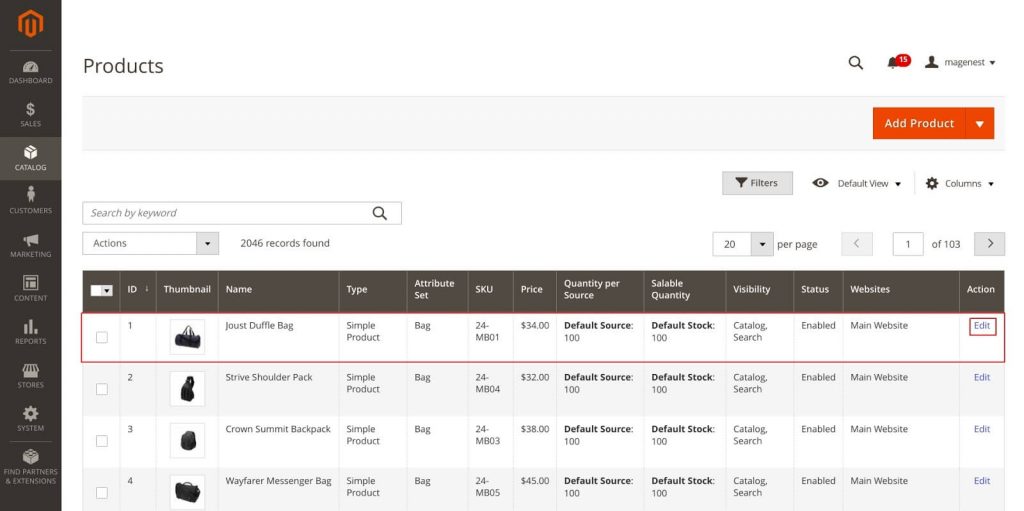
After creating the source, the product edit page includes a completely new section named "Sources".
Step 2. In this section, choose the sources to be assigned and click to the Done button.
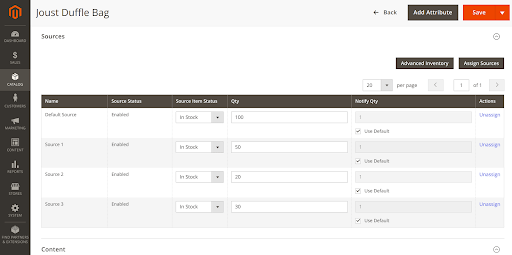
The grid indicates fields (Name, Source Status, Qty, …) that make you easily define information about each source.
Manage Salable Quantity
Salable Quantity is the total virtual inventory that can be sold through a sales channel. The amount is calculated across all sources assigned to a stock
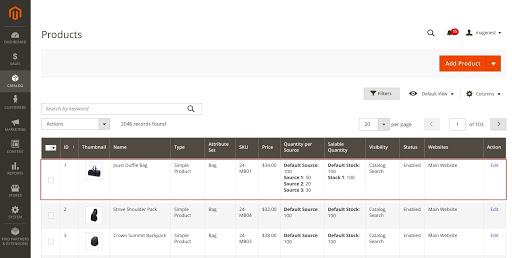
Salable Quantity = SUM_QTY(stocks)
Stock = SUM_QTY(sources) + Reservation
Manage Reservations
Reservations track deductions from the salable quantity as customers add products to carts and complete checkout. When an order ships, the reservation clears and deducts the shipped amounts from specific source inventory quantities.
Reservations calculations:
- A customer or merchant places an order.
- A customer or merchant fully or partially cancels an order.
- The merchant creates a shipment for a physical product.
- The merchant creates an invoice for a virtual or downloadable product.
- The merchant issues a credit memo.
When the order is complete, the sum of all reservations for the product is 0.
Observe inventory_reservation table in order to follow reservations value.
For example:
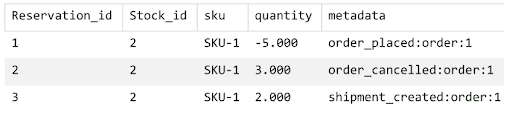
- Submitted Order - When an order submits for a number of products, a reservation enters for that amount. For example, ordering five backpacks from a US website enters a reservation of -5 for that SKU and stock. The salable quantity is reduced by 5.
- Canceled Order - When an order is canceled (all or partial), a compensation reservation enters to clear that amount. For example, canceling three backpacks enters a +3 reservation for that SKU and stock, clearing the hold. The salable quantity is increased by 3.
- Shipped Order - When order ships (all or partial), a compensation reservation enters to clear that amount. For example, shipping two backpacks enter a +2 reservation for that SKU and stock, clearing the hold. The product quantity is directly reduced by 2 for the shipment. The calculated salable quantity is also updated for the reduced stock amount but is no longer affected by the reservation.
Configuring Source Priority Algorithm
Custom stocks include an assigned list of sources to sell and ship available product inventory through the storefront. This algorithm uses the order of assigned sources in your stock to make recommendations.
When run, the algorithm:
- Works through the configured order of sources at the stock level starting at the top.
- Skips any disabled sources.
- Continues down the list until the order shipment is filled.
- Recommends a quantity to ship and source per product based on the order in the list, available quantity, and quantity ordered.
Configuring Distance Priority Algorithm
The Distance Priority Algorithm compares the location of the shipping destination address with source locations to determine the closest source to fulfill shipments. The distance may be determined by physical distance or time spent traveling from one location to another, using imported database locations or Google directions (driving, walking, or bicycling).
Two options calculating for distance: Google MAP and Offline
Google Maps
Uses Google Maps Platform services to calculate the distance and time between the shipping destination address and source locations. This option uses the source’s Latitude and Longitude (GPS coordinates) and may use the street address depending on the computation mode. You must provide a Google API key with Geocoding API and Distance Matrix API enabled, and you may incur charges through Google.
Step 1: On the Admin sidebar, go to Stores > Settings > Configuration > Catalog > Inventory.
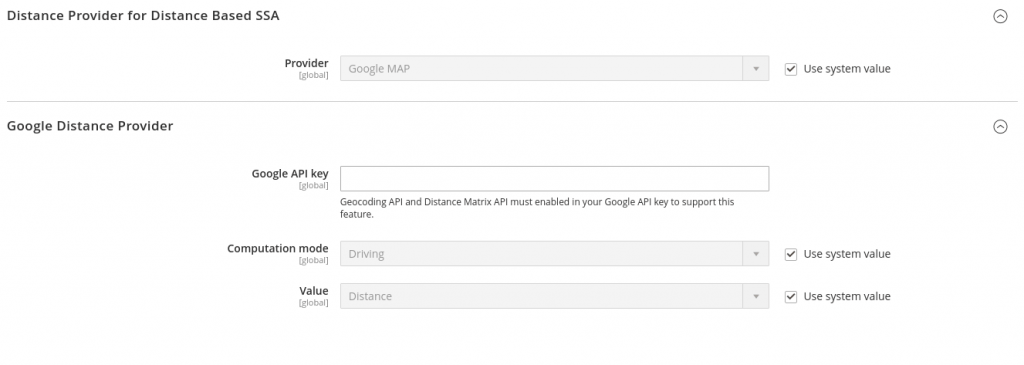
Step 2: Set Provider to Google MAP.
For Google API key, enter the key copied from your Google Account.
For Computation mode: Select a configuration, if routes and data do not return for the selected Computation mode, the Source Priority is used.
- Driving: Default setting, requests standard driving directions using the road network.
- Walking: Requests walking directions using pedestrian paths and sidewalks (where available).
- Bicycling: Requests bicycling directions using bicycle paths and preferred streets (where available). The Distance Matrix Service is currently only available in the US and some Canadian cities.
For Value: Select a configuration
- Distance: Default setting, returns the distance between points in metrics (kilometers and meters) or imperial (miles and feet).
- Time to Destination: Returns the time required to travel from the source locations to the shipping address in hours and minutes.
Step 3: When complete, click the Save Config button.
Offline
Offline calculations use country codes to determine the distance between the shipping destination and source addresses.
Step 1: Download and Import Geocodes
- Open a command line.
- Enter the following command with a space separated list of country codes (using ISO-3166 alpha2 on geonames.org):
php bin/magento inventory-geonames:import <country code>
The system downloads and imports the geocodes data to your database. A message displays "Importing country code: OK" when complete.
For example, if you want to import geocodes for the United States, United Kingdom, Italy, and France, you would use the command:
php bin/magento inventory-geonames:import us gb fr it
Run this command anytime you need to add more geocodes.
Step 2: Set The Calculation
On the Admin sidebar, go to Stores > Settings > Configuration > Catalog > Inventory.

Set Provider to Offline calculation.
When complete, click the Save Config button
Conclusion
MSI is a highlight feature of Magento that connects sources and uses the search selection algorithm to select a source depending on various conditions. Additionally, it is a great way to optimize delivery efficiency.
We are here to help when you have questions on any steps, don’t hesitate to contact us via support@magenest.com.

Joel Pham
Joel Pham is the CEO of Magenest, with extensive experience in eCommerce, business operations, and digital transformation. He has led projects for major brands across Magento, Shopify, Odoo, and enterprise technology solutions.

Weekly Trending
-

Confirmation code: 5 things you need to know about it
March 30 2021 -

eCommerce Product Images: Which is the best size?
September 25 2020 -

Payment Gateway Comparison - Top 5 Providers in 2026
April 1 2026 -

Customer Value and Satisfaction: What's the Difference?
October 30 2020

Recent Posts
-
Payment Gateway Comparison - Top 5 Providers in 2026
April 1 2026 -

Magento 2 Stripe Extension: Installation & Configuration
December 29 2025 -
5 Best-selling Magento 2 Extensions to check out before 2026
December 19 2025 -

8 Best Magento Subscription Extensions For Online Businesses
December 8 2025 -

How to set up payment methods in Stripe Payment Gateway
September 21 2025

