

Table of Contents
Magento allows us to create multiple websites and store views that use different attributes and content in only one installation. This blog will show you how to configure multiple websites, multiple store views in Magento 2.
Step 1: Create websites
1. In the Magento 2 panel, go to Stores >> Settings >> All Stores.
2. On the Stores page, click Create Website.
The following figure shows an example.
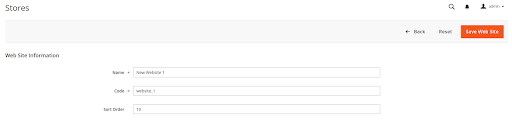
- Name - Enter a name to identify the website.
- Code - Enter a unique code to avoid conflicts.
- Sort Order - Enter an optional numerical sort order.
3. Click Save Web Site.
Step 2: Create stores
1. In the Magento 2 panel, go to Stores >> Settings >> All Stores.
2. On the Stores page, click Create Store.
The following figure shows an example.
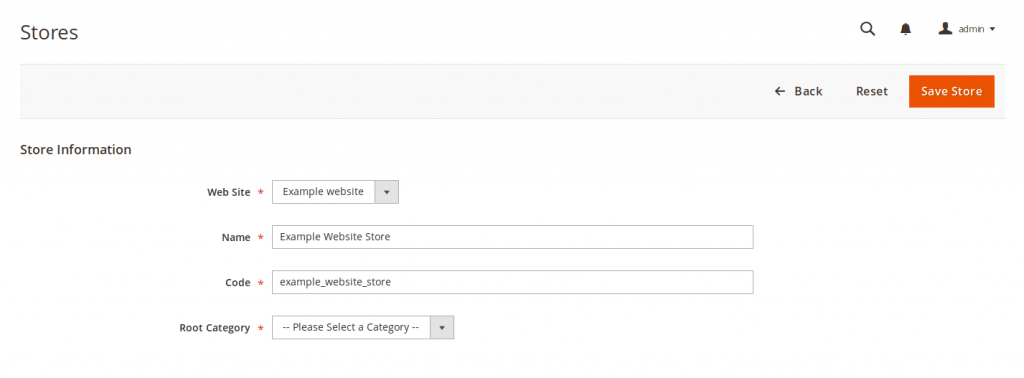
- Web Site - Click the name of the website with which to associate this store. One website can have multiple stores.
- Name - Enter a name to identify the store.
- Code - Enter a unique code to identify the store.
- Root Category - Click the name of the root category for this store.
3. Click Save Store.
Step 3: Create store views
1. In the Magento 2 panel, go to Stores >> Settings >> All Stores.
2. On the Stores page, click Create Store View.
The following figure shows an example.

- Store - Click the name of the store with to associate this store view. Each store can have multiple store views.
- Name - Enter a name to identify this store view.
- Code - Enter a unique name to identify this store view.
- Status - Select Enabled.
- Sort Order - Enter an optional numerical sort order.
3. Click Save Store View
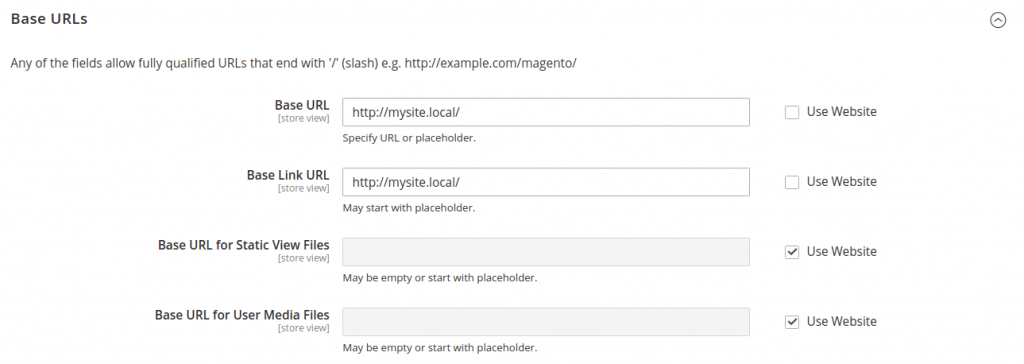
Step 4: Change the website base URL
To access a website using a unique URL like http://mysite.local, you must change the base URL for each site in the Magento Admin.
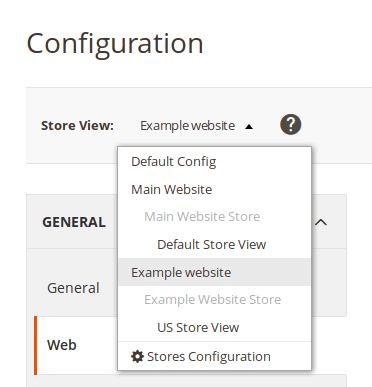
1. In the Magento 2 panel, go to Stores >> Settings >> Configuration >> General >> Web.2. Select Store View in the upper-left corner to check the new website view you’ve added, choose OK to confirm the actions.
3. Expand Base URLs section.
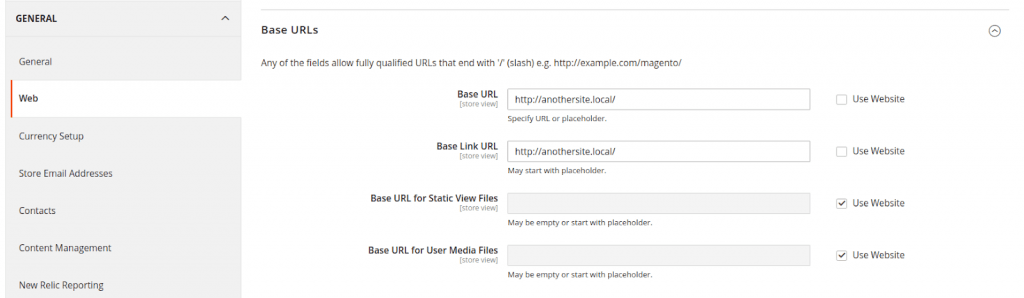
4. Clear the Use Default checkbox next to Base URL and Base Link URL fields.Enter the website’s URL in the Base URL and Base Link URL fields. Make sure to end the URL with a forward slash, so it can be extended with additional URL Keys from your store. For example: http://mysite.local/
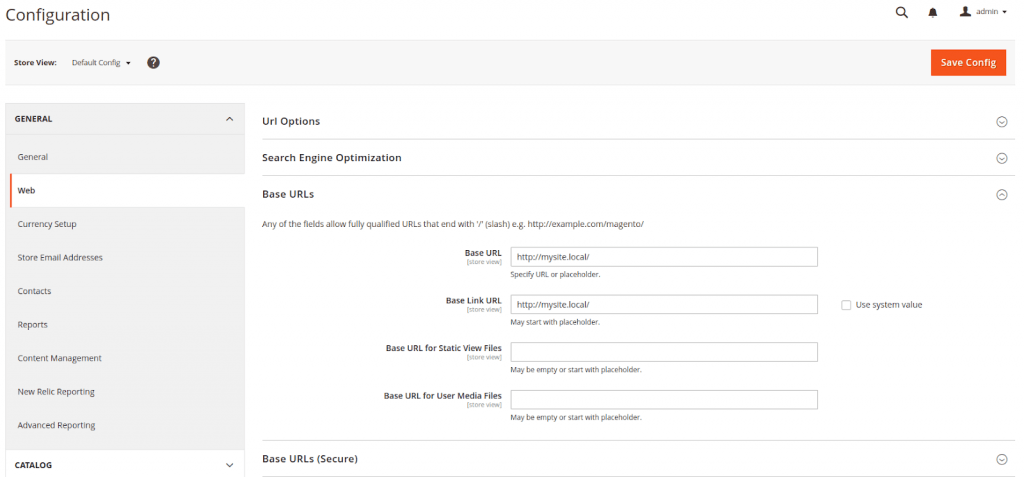
5. Repeat the previous step in the Base URLs (Secure) section.
6. If you have more than two websites, add new website like Step 1 and switch website (store) with the Store View section and configure new url for new website:
Example:
7. Click Save Config.
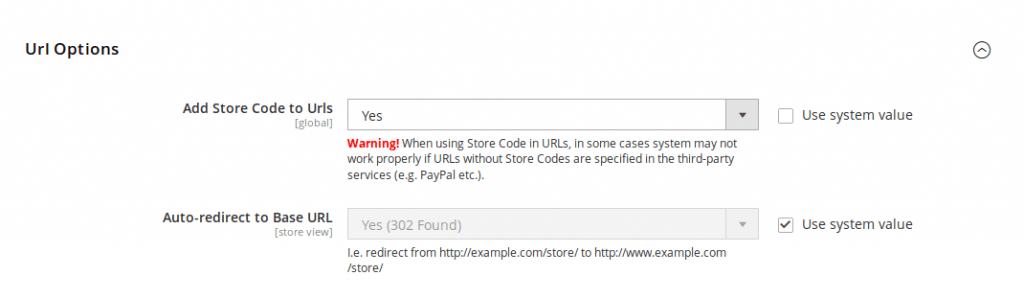
Step 5: Add the store code to the base URL (Optional)
Magento gives you the option to add the store code to site base URL, which simplifies the process of setting up multiple stores.
1. In the Magento 2 panel, go to Stores >> Settings >> Configuration >> General >> Web.
2. Select Store View in the upper-left corner, click Default Config.
3. Expand Url Options.4. Clear the Use system value checkbox next to Add Store Code to Urls field. From the Add Store Code to Urls list, click Yes.
5. Click Save Config.
Step 6: Change the default store view base URL
After this step, you will lose access to the Magento Admin, your access return after you setup virtual hosts.
1. In the Magento 2 panel, go to Stores >> Settings >> Configuration >> General >> Web.
2. Select Store View in the upper-left corner, click Default Config.
3. Expand Base URLs.4. Clear the Use Default checkbox next to Base Link URL field. Enter the URL you want in the Base URL and Base Link URL fields. For example: http://exam.com/
5. Repeat the previous step in the Base URLs (Secure) section.
6. Click Save Config.
Step 7: Configure server and domain for new websites and stores
Set up multiple websites with nginx
#1 Create an nginx virtual host for Magento website
Open a text editor and add the following contents to a new file named /etc/nginx/sites-available/example.com.conf. With content as sample below but replace sample data with your website data.
server {
    listen 80;
    server_name mysite.local;
    set $MAGE_ROOT /var/www/html/magento2;
    set $MAGE_MODE production;
    set $MAGE_RUN_TYPE website; #or set $MAGE_RUN_TYPE store;
    set $MAGE_RUN_CODE website_1;
    include /var/www/html/mysite/nginx.conf;
}
If you have more than one websites (stores), you can create two config file as above or simplify using one config file as below with the same name. By using just one nginx virtual host file, you can keep your nginx configuration simple and clean. By using several virtual host files, you can customize each store.
Example with another website (store):
server {
    listen 80;
    server_name anothersite.local;
    set $MAGE_ROOT /var/www/html/magento2;
    set $MAGE_MODE production;
    set $MAGE_RUN_TYPE website; #or set $MAGE_RUN_TYPE store;
    set $MAGE_RUN_CODE website_2;
    include /var/www/html/mysite/nginx.conf;
}
Or you can use one config file for multi websites:
map $http_host $MAGE_RUN_CODE {
    mysite.local website_1;
    anothersite.local website_2;
}

server {
    listen 80;
    server_name mysite.local;
    set $MAGE_ROOT /var/www/html/magento2;
    set $MAGE_MODE production;
    set $MAGE_RUN_TYPE website; #or set $MAGE_RUN_TYPE store;
    include /var/www/html/magento2/nginx.conf;
}

server {
    listen 80;
    server_name anothersite.local;
    set $MAGE_ROOT /var/www/html/magento2;
    set $MAGE_MODE production;
    set $MAGE_RUN_TYPE website; #or set $MAGE_RUN_TYPE store;
    include /var/www/html/magento2/nginx.conf;
}
After that, create symbolic links in the /etc/nginx/sites-enabled directory, in order to load your website configuration into server. Using this command:
ln -s /etc/nginx/sites-available/example.com.conf /etc/nginx/sites-enabled/example.com.conf
The name file, example.com.conf can change based on your website name.
#4 Config param for virtual host file
Open a text editor and modify the nginx.conf.sample file, this file is located in your Magento installation directory <magento2_installation_directory>/nginx.conf.sample.
Find this section in the nginx.conf.sample and modify it as below.
# PHP entry point for main application

location ~ (index|get|static|report|404|503|health_check)\.php$ {
    try_files $uri =404;
    fastcgi_pass   fastcgi_backend;
    fastcgi_buffers 1024 4k;

    fastcgi_param  PHP_FLAG  "session.auto_start=off \n suhosin.session.cryptua=off";
    fastcgi_param  PHP_VALUE "memory_limit=756M \n max_execution_time=18000";
    fastcgi_read_timeout 600s;
    fastcgi_connect_timeout 600s;

    fastcgi_index  index.php;
    fastcgi_param  SCRIPT_FILENAME  $document_root$fastcgi_script_name;
    # START - Multisite customization
    fastcgi_param MAGE_RUN_TYPE $MAGE_RUN_TYPE;
    fastcgi_param MAGE_RUN_CODE $MAGE_RUN_CODE;
    # END - Multisite customization
    include        fastcgi_params;
}
Save it! And restart your server, if you don’t have DNS set up for your stores’ URLs, you must add a static route to the host in your hosts file in location /etc/hosts.
After finish, you can re-check your website via browser.
Set up multiple websites with apache
Open a text editor and modify and modify apache 2 configuration file, with Apache 2.4, the configuration file is located in /etc/apache2/apache2.conf.
Add the following section to your configuration file:
<VirtualHost *:80>
   ServerName          mysite.local
   DocumentRoot        /var/www/html/magento2
   SetEnv MAGE_RUN_CODE "website_1"
   SetEnv MAGE_RUN_TYPE "website" # or SetEnv MAGE_RUN_TYPE "store"
</VirtualHost>
Similarly, if you add more than one website, add more section like above in your config file:
<VirtualHost *:80>
   ServerName          anothersite.local
   DocumentRoot        /var/www/html/magento2
   SetEnv MAGE_RUN_CODE "website_2"
   SetEnv MAGE_RUN_TYPE "website" # or SetEnv MAGE_RUN_TYPE "store"
</VirtualHost>
Replace your sample data with your website information. Restart your apache server. If you don’t have DNS set up for your stores’ URLs, you must add a static route to the host in your hosts file in location /etc/hosts.
Re-check your website via browser.
Document Reference

Joel Pham
Joel Pham is the CEO of Magenest, with extensive experience in eCommerce, business operations, and digital transformation. He has led projects for major brands across Magento, Shopify, Odoo, and enterprise technology solutions.


Weekly Trending
-

Confirmation code: 5 things you need to know about it
March 30 2021 -

eCommerce Product Images: Which is the best size?
September 25 2020 -

Access Control Lists (ACL) in Magento 2
April 29 2020 -

Everything you need to know about Guest Blogging in 2024
December 2 2023

Recent Posts
-

Payment Gateway Comparison - Top 5 Providers in 2026
April 1 2026 -

Magento 2 Stripe Extension: Installation & Configuration
December 29 2025 -
5 Best-selling Magento 2 Extensions to check out before 2026
December 19 2025 -

8 Best Magento Subscription Extensions For Online Businesses
December 8 2025 -

How to set up payment methods in Stripe Payment Gateway
September 21 2025

