

Table of Contents
The Date Selection Fields in Magento 2 is primarily needed when it comes to scheduling certain plans/actions. For Magento 2 users, it does not only reduces typing errors but also saves the admin a lot of time. With the standardized format, Magento 2 date picker helps enhance the user experience: Instead of using the keyboard, the user can simply click to select on the calendar.
In this article, we will show you how to add a date selection/date picker field in both the backend and frontend of Magento 2.
Date Selection Fields in Magento 2 Backend
Add date picker in Magento 2 configuration section using system.xml
Step 1: Create system.xml
Let’s assume that we have created a module for this task. Now let’s create the system.xml file.
The system.xml file will be located at app/code/NameSpace/ModuleName/etc/adminhtml/system.xml
<?xml version="1.0"?>
<config xmlns:xsi="http://www.w3.org/2001/XMLSchema-instance"
       xsi:noNamespaceSchemaLocation="urn:magento:module:Magento_Config:etc/system_file.xsd">
   <system>
       <tab id="yoursectionid" translate="label" sortOrder="200">
           <label>Magenest</label>
       </tab>
       <section id="qbdesktop" translate="label" type="text" sortOrder="5" showInDefault="1" showInWebsite="1"
                showInStore="1">
           <class>separator-top</class>
           <label>Custom Date</label>
           <tab>magenest</tab>
           <resource>NameSpace_ModuleNmae::config_modulename</resource>
           <group id="general" translate="label" type="text" sortOrder="10" showInDefault="1" showInWebsite="1"
                  showInStore="1">
               <label>General Settings</label>
               <!-- Date picker field code start-->
               <field id="from_date" translate="label" type="date" sortOrder="15" showInDefault="1" showInWebsite="1"
                      showInStore="1">
                   <label>From</label>
                   <!-- Here we pass class where we create date picker-->
                   <frontend_model>NameSpace\ModuleNmae\Block\DatePicker</frontend_model>
               </field>
               <!-- Date picker field code end-->
           </group>
       </section>
   </system>
</config>
Step 2: Create DatePicker
Create DatePicker class in file DatePicker.php at app/code/NameSpace/ModuleName/Block/ where we create date picker element.
<?php
namespace NameSpace\ModuleNmae\Block;

class DatePicker extends \Magento\Config\Block\System\Config\Form\Field
{
   public function render(\Magento\Framework\Data\Form\Element\AbstractElement $element)
   {
       $element->setDateFormat(\Magento\Framework\Stdlib\DateTime::DATE_INTERNAL_FORMAT);
       $element->setTimeFormat('HH:mm:ss'); //set date and time as per your need
       $element->setShowsTime(true);
       return parent::render($element);
   }
}
In this file, we expand the class \Magento\Config\Block\System\Config\Form\Field
There are four date formats to use:
- DATETIME_INTERNAL_FORMAT: yyyy-MM-dd HH:mm:ss
- DATE_INTERNAL_FORMAT: yyyy-MM-dd
- DATETIME_PHP_FORMAT: Y-m-d H:i:s
- DATE_PHP_FORMAT: Y-m-d
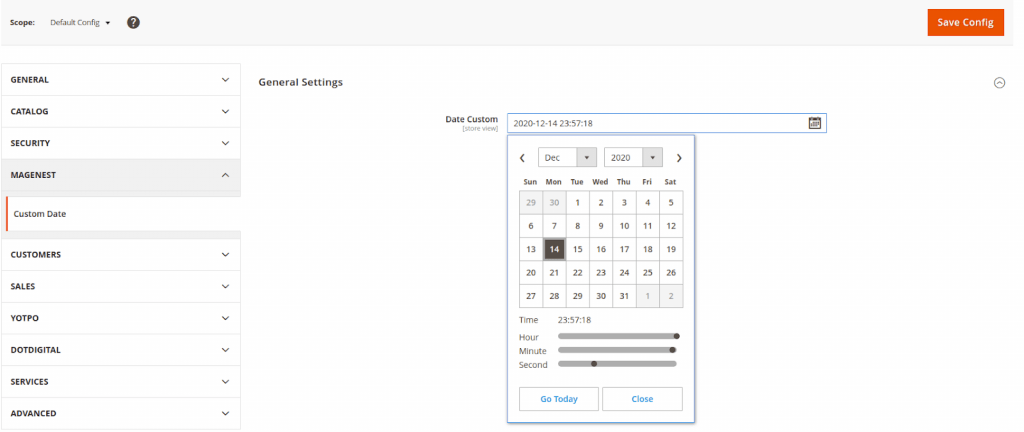
This datepicker element will be shown under store configuration as following
Add date picker in UI Component
In this section, we will show you how to add a date picker in the UI Component section. In case you missed out our previous Magento article, find out here: How to use UI component to create UI Form in Magento 2?
<field name="from_date" formElement="date">
   <argument name="data" xsi:type="array">
       <item name="config" xsi:type="array">
           <item name="source" xsi:type="string">page</item>
       </item>
   </argument>
   <settings>
       <dataType>text</dataType>
       <label translate="true">From</label>
   </settings>
</field>
<field name="to_date" formElement="date">
   <argument name="data" xsi:type="array">
       <item name="config" xsi:type="array">
           <item name="source" xsi:type="string">page</item>
       </item>
   </argument>
   <settings>
       <dataType>text</dataType>
       <label translate="true">To</label>
   </settings>
</field>
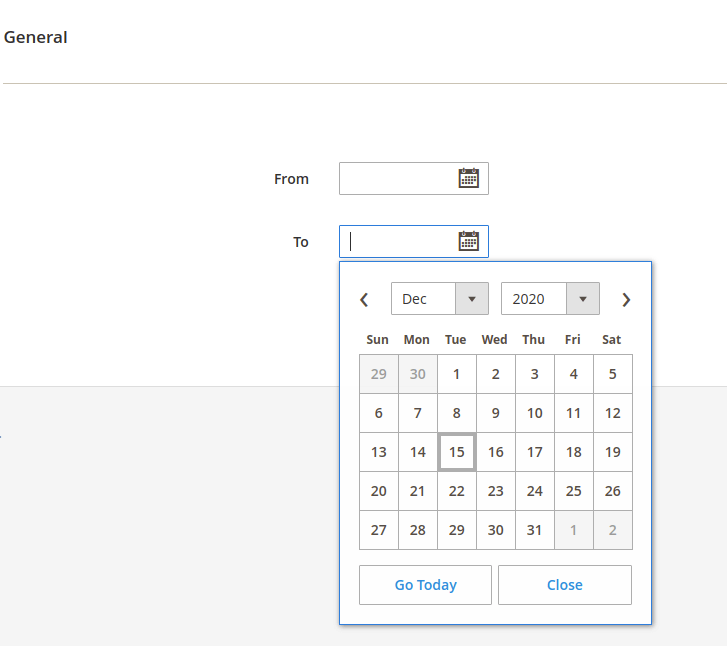
Here is the result:
Once you add the code to the correct location, clear the cache and refresh your admin configuration page and your date picker will begin to show up where you set it.
Date Selection Fields in Magento 2 Frontend
To show date-range fields, first of all, we need to add fields for date-range.
<div class="field overview required" id="date-range">
   <label for="from" class="label">
       <span>From date</span>
   </label>
   <div class="control">
       <input class="input-text required-entry" type="text" id="date-from" name="from" />
   </div>

   <label for="to" class="label">
       <span>To date</span>
   </label>
   <div class="control">
       <input class="input-text required-entry" type="text" id="date-to" name="to" />
   </div>
</div>
After the from and to date fields are defined in the form, either add the following script at the end of the file, i.e. after the form tag ends, or add the script to a separate file:
define([
   'jquery',
   'mage/mage',
   'mage/calendar'
],function ($) {
   'use strict';
   return function () {
       $('#date-range').dateRange({
           buttonText: 'Select Date',
           from: {
               id: 'date-from'
           },
           to: {
               id: 'date-to'
           }
       });
   }
});
Here’s our result:
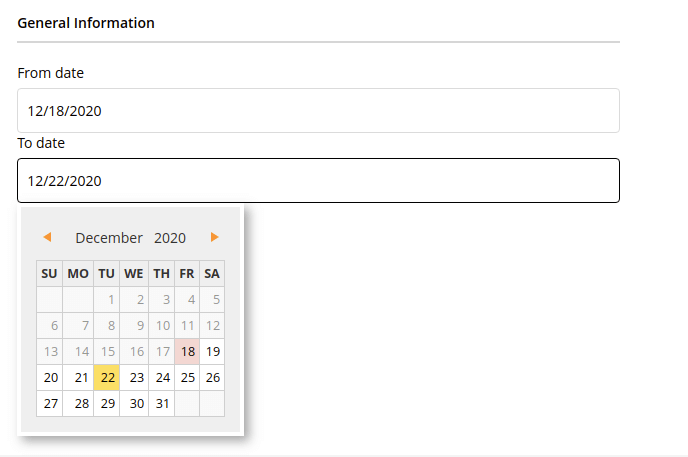
Adding data selection fields in Magento 2 will be your regular task in development projects. I hope that this article helps you simplify your tasks.
Thanks for reading!

Joel Pham
Joel Pham is the CEO of Magenest, with extensive experience in eCommerce, business operations, and digital transformation. He has led projects for major brands across Magento, Shopify, Odoo, and enterprise technology solutions.


Weekly Trending
-

Social sharing 101: Its Definition, Benefits & Examples
December 11 2020 -
Top 7 Zoho CRM best practices you should know about in 2024
January 7 2024


Recent Posts
-

Payment Gateway Comparison - Top 5 Providers in 2026
April 1 2026 -

Magento 2 Stripe Extension: Installation & Configuration
December 29 2025 -
5 Best-selling Magento 2 Extensions to check out before 2026
December 19 2025 -

8 Best Magento Subscription Extensions For Online Businesses
December 8 2025 -

How to set up payment methods in Stripe Payment Gateway
September 21 2025

