

Table of Contents
Cron job in Magento helps you to schedule a number of activities to occur in the future such as automatically sending emails to customers at a specific time, updating product price, reindexing, etc.
It is a great way to save time as all tasks will be completed automatically when you are on another job.
Those are default features in Magento 2, but sometimes you need to create some custom cron jobs to satisfy the customer's requirements.
This article will show you how to set up and schedule a custom cron jobs in Magento 2. This cron job will automatically add some messages to log every minute.
(Before we start: Make sure that you have already registered your own module, we suggest that you should put your module into Magenest vendor folder and set its name to Cron.)
Crontab
First, you have to configure a crontab for your Magenest_Cron module.
Create a crontab.xml file in app/code/Magenest/Cron/etc folder and put the below codes to the new file.
<?xml version="1.0"?>
<config xmlns:xsi="http://www.w3.org/2001/XMLSchema-instance" xsi:noNamespaceSchemaLocation="urn:magento:module:Magento_Cron:etc/crontab.xsd">
       <group id="default">
           <job name="magenest_cron_add_msg_to_log"
                    instance="Magenest\Cron\Cron\AddMessage"
                    method="addInfo">
               <schedule>* * * * *</schedule>
           </job>
           <job name="magenest_cron_add_debug_log"
    instance="Magenest\Cron\Cron\AddMessage"
    method="addDebug">
   <schedule>* * * * *</schedule>
                         </job>
       </group>
</config>
As you can see in the above code, the value of the "id" attribute in Group tag is set as "default". It means you are using the default cron group in Magento.
A job’s name is a unique identity for this cron job.
A job’s instance is a class to be instantiated and the job method is one of the methods of the instantiated class.
You need to set a specific cron time format in Schedule tag. Crontab will use that time format to schedule your job. For example, '* * * * *' means the method will be executed every minute. Here is a useful website for setting up time format: https://crontab.guru/.
Remember that you can create as many as cron jobs in a group because Magento does not limit that.
Cron Group
In some situations, the default cron group may not meet your demands. You should go to Stores -> Configuration -> Advanced -> System -> Cron (Scheduled Task) and open Cron configuration options for group: default.
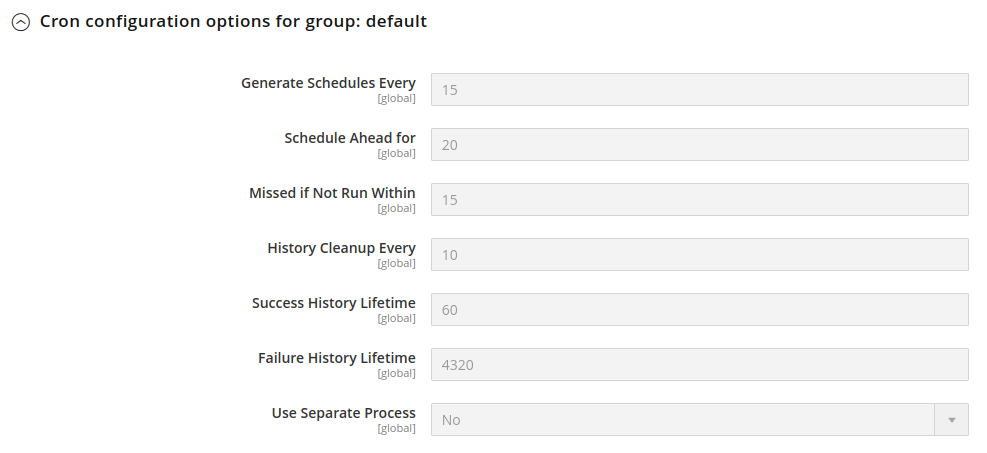
Here, you can change the configuration, but if you do that, all jobs which are using the default cron group will be influenced. Hence, you should create and specify your own cron groups to use instead of the default.
All configuration for your new cron groups is in cron_groups.xml file in app/code/Magenest/Cron/etc folder. Like cron jobs, you can create as many as cron groups, it depends on your demands.
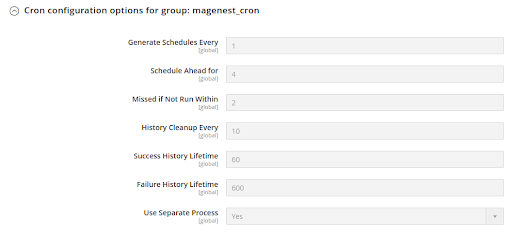
The below code is an example of creating a new cron group.
<config>
    <group id="magenest_cron">
        <schedule_generate_every>1</schedule_generate_every>
        <schedule_ahead_for>4</schedule_ahead_for>
        <schedule_lifetime>2</schedule_lifetime>
        <history_cleanup_every>10</history_cleanup_every>
        <history_success_lifetime>60</history_success_lifetime>
        <history_failure_lifetime>600</history_failure_lifetime>
        <use_separate_process>1</use_separate_process>
    </group>
</config>
Each configuration plays an important role in a cron group.
- Id: A unique id for the cron group.
- schedule_generate_every: Frequency (in minutes) that schedules are written to the cron_schedule table.
- schedule_ahead_for: Time (in minutes) in advance that schedules are written to the cron_schedule table.
- schedule_lifetime: Window of time (in minutes) that cron job must start or will be considered missed (“too late” to run).
- history_cleanup_every: Time (in minutes) that cron history is kept in the database.
- history_success_lifetime: Time (in minutes) that the record of successfully completed cron jobs is kept in the database.
- history_failure_lifetime: Time (in minutes) that the record of failed cron jobs is kept in the database.
- use_separate_process: Run this crongroup’s jobs in a separate php process
Clear cache and go to Cron (Scheduled Task), you will see that your own cron group now is there.
Next, create an AddMessage.php file in the following path: app/code/Magenest/Cron/Cron. After that, copy this code to that file:
<?php

namespace Magenest\Cron\Cron;

class AddMessage
{
   protected $logger;

   public function __construct(\Psr\Log\LoggerInterface $logger)
   {
       $this->logger = $logger;
   }

   public function addInfo()
   {
       $this->logger->info(__('This message is added by magenest_cron_add_info_log job'));
   }

   public function addDebug()
   {
       $this->logger->debug(__('This message is added by magenest_cron_add_debug_log job'));
   }
}
Take a look at this class, the name of two functions in this class must be mapped with the two method names which you have declared in the crontab.xml file.
But before executing your new cron job and making sure your cron job works correctly, you have to manually check crontab in your Magento installation directory.
Enter the following command: crontab -l in the Terminal, if the output does not show your crontab like the below text, then please run php bin/magento cron:install in your Magento installation directory. This command will create a crontab for you.
#~ MAGENTO START
* * * * * /usr/bin/php /var/www/html/magento2/bin/magento cron:run | grep -v Ran jobs by schedule >> /var/www/html/magento2/var/log/magento.cron.log
* * * * * /usr/bin/php /var/www/html/magento2/update/cron.php >> /var/www/html/magento2/var/log/update.cron.log
* * * * * /usr/bin/php /var/www/html/magento2/bin/magento setup:cron:run >> /var/www/html/magento2/var/log/setup.cron.log
#~ MAGENTO END
Magento supports running cron jobs manually from command lines for debugging purpose, clear cache and run: bin/magento cron:run --group=”default” from the command line in your Magento root directory. If you have created your own cron group, you can run the above command line by replacing the “default” string to the cron group’s id.
After running this command line, all the jobs of the default group will be scheduled to execute, if the jobs have been scheduled, then it will be executed.
Wait a minute, and go to system.log and debug.log file in var/log folder to see the result. For every minute, the messages will be automatically added to log, like this:
system.log
[2019-10-04 02:17:06] main.INFO: This message is added by magenest_cron_add_info_log job [] []
debug.log
[2019-10-04 02:19:02] main.DEBUG: This message is added by magenest_cron_add_debug_log job [] []
You can also keep track of scheduled cron jobs in the database. The “cron_schedule” table is where Magento 2 stores the history of cron jobs.

Conclusion,
That is all about how to schedule Cron jobs in Magento 2. Hope this article of Magenest Blog will help you to understand clearly Magento Cron.

Lucy Pham
Marketing Manager
Weekly Trending
-

Salesforce - No.1 CRM Platform for Magento In 2024
January 14 2024 -

Confirmation code: 5 things you need to know about it
March 30 2021


Recent Posts
-

11 Best Magento 2 Social Login Extensions Free and Paid 2024
January 27 2024 -

Payment Gateway Comparison - Top 5 Providers in 2024
January 21 2024 -

6+ Voice Search Statistics and Trends You Can't Miss in 2024
January 20 2024 -

2024 Hottest Trend: Voice Search Technology
January 16 2024 -
Salesforce - No.1 CRM Platform for Magento In 2024
January 14 2024

