Email is a common communication method between vendors and customers. Email marketing helps you connect with your customers with the aims of brand promotion and sales increasing.
Aside from the default email templates in Magento 2, many extensions require their own emails with various custom templates, parameters, and conditions.
In this blog post, we will learn about sending email in Magento 2, with code snippets taken from our Magento 2 Abandoned Cart Email extension, in which sending email is the main function to remind customers of their pending carts.
Basic Requirements
- Declare your email template
- Define the email template
- Customize email with attachments
- Create a function to send your email
How to send email in Magento 2
1. Declare your email template
To declare a custom email template that goes with your extension, create the file /etc/email_templates.xml.
In our example: Magenest/AbandonedCart/etc/email_templates.xml
- Sample Code:
<config
xmlns:xsi="http://www.w3.org/2001/XMLSchema-instance" xsi:noNamespaceSchemaLocation="urn:magento:module:Magento_Email:etc/email_templates.xsd">
    <template id="abandonedcart_item1"
              label="Abandoned Cart Item 1"
              file="abandonedcart_item1.html"
              type="html"
              module="Magenest_AbandonedCart"
              area="frontend"
    />
</config>
In which:
- Template id: Your template id
- Label: Your Label will show in the dropdown email.
- file: Your email template file.
- type: Type of your email.
- module: Your module.
- area: The place your email in the module directory view/frontend or view/adminhtml
To declare more templates, you can create more template items inside config tags.
2. Define the email template
Create a HTML file based on file and area in Step 1. In our example, our custom template has file="abandonedcart_item1.html" and area="frontend" so that the path to this template is /view/frontend/email/abandonedcart_item1.html.
Sample Code:
<!--@subject {{trans "Did you forget something?"}} @-->
{{template config_path="design/email/header_template"}}
<table style="float:left; margin-right: 10px" class="fue-abc-items">
<tr>
<td>
<div class="greeting">Hi {{var customerName}},</div>
<!-- Custom Image with your email-->
<img src="{{view url='Magenest_AbandonedCart::images/customimage.png'}}"/>
<div>
{{trans "I’m from %store_name. " store_name=$store.getFrontendName()}},
{{trans "you haven’t forgotten us as well as the shopping cart you left in our store recently. "}}
{{trans "Thus, we would love to be sure that below items will catch your attention again."}}
</div>
</td>
</tr>
<tr>
<td>
{{var cart_items}}
</td>
</tr>
<tr>
<td style="text-align: center;">
<div style="margin-top: 30px;">
{{trans "Use coupon code "}}
<span style="font-weight: bold">{{var coupon.code}}</span>
{{trans "at checkout!"}}
</div>
<div>{{var checkOpened}}</div>
</td>
</tr>
<tr>
<td style="text-align: center;">
{{trans "If you want to complete your purchase just click the link below."}}
</td>
</tr>
<tr>
<td style="text-align: center;">
<a style="color: #fff;border: 1px solid transparent; padding: 16px 32px; outline: none; text-decoration: none; cursor: pointer; text-align: center;border-radius: 4px;"
href="{{var resumeLink}}" target="_blank">
<button style="color: white; margin-top: 10px;margin-bottom: 30px;border: 0; -webkit-box-shadow: none; -moz-box-shadow: none; box-shadow: none; background: #000; padding: 10px 15px; -webkit-border-radius:5px; -moz-border-radius:5px; border-radius:5px;">
{{trans "Checkout Now"}}
</button>
</a>
</td>
</tr>
<tr>
<td>
<div>
{{trans "Or if anything got you confused in shopping process?"}}
{{trans "Feel free to contact again to discuss problems you may have."}}
{{trans "Your satisfaction is the best product we desire to deliver."}}
</div>
</td>
</tr>
<tr>
<td>
<div>
{{trans "Looking forward to seeing you around!"}}
</div>
</td>
</tr>
<tr>
<td>
<div style="font-size: 9px;text-align: center;">No longer want to receive these email ? You can
<a href="{{var unsubscribeLink}}" style="text-decoration-line: underline;font-weight: 400;">unsubscribe
here</a>
</div>
</td>
</tr>
</table>
{{template config_path="design/email/footer_template"}}
In which:
- trans for texts that support translation (if provided by the extension’s i18n). You can use default variables i.e. $store.getFrontendName() to get the store’s name on the email.
- var for variables supplied by the email controller.
- template to automatically inject other templates (i.e. header/footer) based on config_path
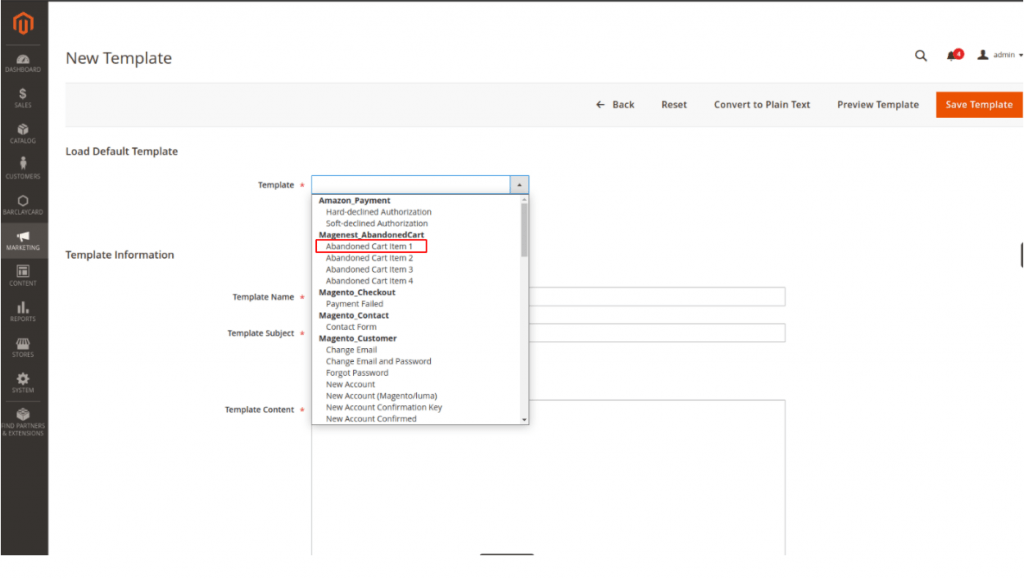
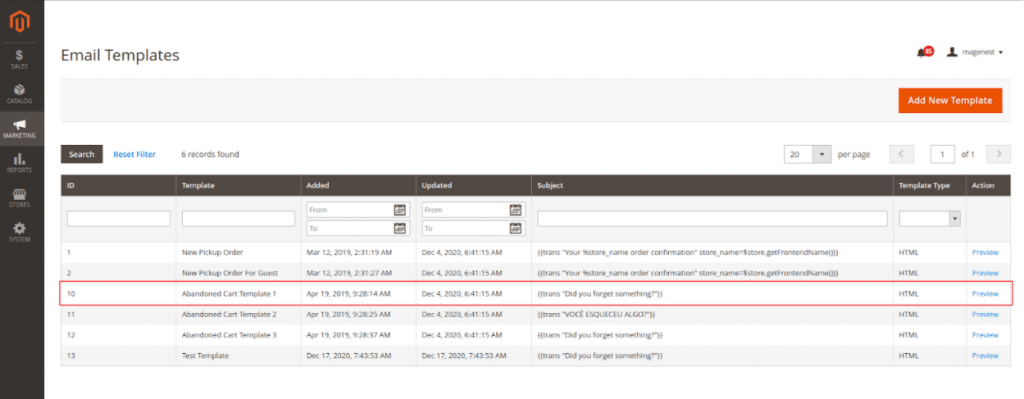
Note: Some email clients support only CSS style as inline on the style attribute of HTML tags. You can see your custom email template by going to Marketing -> Email templates -> Add New Template
3. Create a transport builder
- To customize the email function of Magento we will need to create a transport builder class, extending “Magento\Framework\Mail\Template\TransportBuilder”.
In our example, we will add the function to send pdf and images attachments to the email
- File name: Magenest/AbandonedCart/Model/Mail/TransportBuilder.php
- Sample code:
class TransportBuilder extends
\Magento\Framework\Mail\Template\TransportBuilder
{
    public function getMessage()
	{
    	return $this->message;
	}
    //create attachment items for email based on parameters
    public function createAttachment($params, $transport = false)
	{
    	$type = isset($params['cat']) ? $params['cat'] : \Zend_Mime::TYPE_OCTETSTREAM;
    	if ($transport === false) {
        	if ($type == 'pdf') {
            	$this->message->createAttachment(
                	$params['body'],
                	'application/pdf',
                	\Zend_Mime::DISPOSITION_ATTACHMENT,
                	\Zend_Mime::ENCODING_BASE64,
                	$params['name']
            	);
        	} elseif ($type == 'png') {
            	$this->message->createAttachment(
                	$params['body'],
                	'image/png',
                	\Zend_Mime::DISPOSITION_ATTACHMENT,
                	\Zend_Mime::ENCODING_BASE64,
                	$params['name']
            	);
        	} else {
$encoding =
isset($params['encoding']) ? $params['encoding'] : \Zend_Mime::ENCODING_BASE64;
            	$this->message->createAttachment(
                	$params['body'],
                	$type,
                	\Zend_Mime::DISPOSITION_ATTACHMENT,
                	$encoding,
                	$params['name']
            	);
        	}
    	} else {
        	$this->addAttachment($params, $transport);
    	}
    	return $this;
	}

	public function addAttachment($params, $transport)
	{
    	$zendPart = $this->createZendMimePart($params);
    	$parts	= $transport->getMessage()->getBody()->addPart($zendPart);
    	$transport->getMessage()->setBody($parts);
	}

	protected function createZendMimePart($params)
	{
    	if (class_exists('Zend\Mime\Mime') && class_exists('Zend\Mime\Part')) {
        	$type          	= isset($params['type']) ? $params['type'] : \Zend\Mime\Mime::TYPE_OCTETSTREAM;
        	$part          	= new \Zend\Mime\Part(@$params['body']);
        	$part->type    	= $type;
        	$part->filename	= @$params['name'];
        	$part->disposition = \Zend\Mime\Mime::DISPOSITION_ATTACHMENT;
        	$part->encoding	= \Zend\Mime\Mime::ENCODING_BASE64;
        	return $part;
    	} else {
        		throw new \Exception("Missing Zend Framework Source");
    	}
	}

	public function reset()
	{
    		return parent::reset();
	}
}
4. Send the email
- To send emails from a class, its constructor needs to call a transportbuilder class. You can use the default one Magento\Framework\Mail\Template\TransportBuilder.php or a custom one (Magenest\AbandonedCart\Model\Mail\TransportBuilder.php in our example).
- Below is a snippet of sendMail() function which covers all steps to create an email object:
use Magenest\AbandonedCart\Model\Mail\TransportBuilder
...
public function sendMail()
{
	//define variables for the email generate email template with template file and templates variables
	$template = 'abandonedcart_item1';
	$recipient_address = '[recipient email]';
	$recipient_name = ‘[recipient name]’;
	$from_address = ‘[
  		‘Name’ => [sender name],
  ‘Email’ => [sender email]
]’;
	//an array with variables, format is key = variable name, value = variable value
	$vars = [
   	    ...
	];
	//several variables in email template, i.e. storeName are generated based on store Id
	$storeId = [store Id];

	$this->_inlineTranslation->suspend();
	$version = $this->_helperData->getVersionMagento();
	if(version_compare($version,'2.2.0') < 0){
    	//create email object for Magento 2.1.x
    	$this->_transportBuilder->setTemplateIdentifier(
        	$template
    	)->setTemplateOptions(
        	[
            	'area'  => \Magento\Framework\App\Area::AREA_FRONTEND,
            	'store' => $storeId,
        	]
    	)->setTemplateVars(
        	$vars
    	)->addTo(
        	$recipient_address,
        	$recipient_name
    	);
	}
	//create email template for Magento 2.2.x and 2.3.x
else {
    	$this->_transportBuilder->setTemplateIdentifier(
        	$template
    	)->setTemplateOptions(
        	[
            	'area'  => \Magento\Framework\App\Area::AREA_FRONTEND,
            	'store' => $storeId,
        	]
    	)->setTemplateVars(
        	$vars
    	)->setFrom(
        	$from_address
    	)->addTo(
        	$recipient_address,
        	$recipient_name
    	);
	}

	//add bcc email address
	$bccMail = ‘[email address]’;
   	$this->_transportBuilder->addBcc($bccMail);

	//add attachments to email object
	if ($attachments) {
//check version of Zend Framework in use based on the existence of createAttachment function in Magento 2’s default transportBuiler
    	if (method_exists($this->_transportBuilder->getMessage(), 'createAttachment')) {
        	foreach ($attachments as $attachment) {
            	if ($attachment) {
                	$this->_transportBuilder->createAttachment($attachment);
            	}
        	}
        	$transport = $this->_transportBuilder->getTransport();
    	} else {
        	$transport = $this->_transportBuilder->getTransport();
        	foreach ($attachments as $attachment) {
            	if ($attachment) {
                	$this->_transportBuilder->createAttachment($attachment, $transport);
            	}
        	}
    	}
	}

	//create the transport
	if (!isset($transport)) {
    	$transport = $this->_transportBuilder->getTransport();
	}

	//send the email
	try {
    	$transport->sendMessage();
    	$this->_inlineTranslation->resume();
	} catch (\Exception $exception) {
	//log failed email send operation
    	$this->_logger->critical($exception->getMessage());
	}
}
5. Result
Our custom email template:

Our custom template with custom image:

Want to explore useful extensions to boost your sales?








We have installed magenest gift registry and tried to follow the steps you mentioned. After creating the gift registry, still customer is not receiving the email.
Thank you,
April