

Table of Contents
Caching is a crucial part of any website. Caching becomes even more essential with heavy platforms like Magento 2. By using caching, merchants can reduce the page load time, speed up page response to create a better user experience.
One of the most popular caching techniques in Magento 2 is Varnish. Varnish serves as a full page cache mechanism to reduce workloads to the Magento 2 server. Hence, performance is improved.
Varnish Cache is an open-source web application accelerator (HTTP proxy). Varnish stores data in memory. This enables Varnish to reduce response time and network bandwidth consumption on futures. Unlike web servers like Apache and Nginx, Varnish was designed for use exclusively with the HTTP protocol.
How to Install Varnish in Magento 2
Magento has its own caching mechanism (reading, writing data to files), but it is not very efficient enough.
Magento itself highly recommends Varnish for its users. To run Varnish on Magento 2, you need to install Varnish and deploy Varnish configuration file (VCL file) to Varnish implementation in your system.
Magento 2 supports Varnish 4 and Varnish 5. Varnish 6 is currently not supported.
Run the following series of command as a root user (sudo su).
apt-get install apt-transport-https
curl https://repo.varnish-cache.org/GPG-key.txt | apt-key add -
echo "deb https://repo.varnish-cache.org/ubuntu/ trusty varnish-4.1" \
     >> /etc/apt/sources.list.d/varnish-cache.list
apt-get update
apt-get install varnish
If everything goes right you should be able to see the Varnish version with:
varnishd -V
How to Configure Varnish in Magento 2
Step 1: Modify webserver listen port
Once Varnish is installed, you need to configure your current web server.
Configure your webserver to listen on a port (8080) other than default port (80).
Find your current “server” directive and change the listening port to 8080.
server {
    listen 8080 default_server;
    server_name  your-magento2-store.dev;
    ...
}
Step 2: Modify default.vcl
Backup old default one
cp /etc/varnish/default.vcl /etc/varnish/default.vcl.bak
Download Default VCL config from Magento 2 backend.
Go to STORES > Configuration > ADVANCED > System > Full Page Cache. Click the drop-down box of “Caching Application.” Choose “Varnish Caching” from the list.
Download Varnish file version equivalent as your varnish you installed in your system.
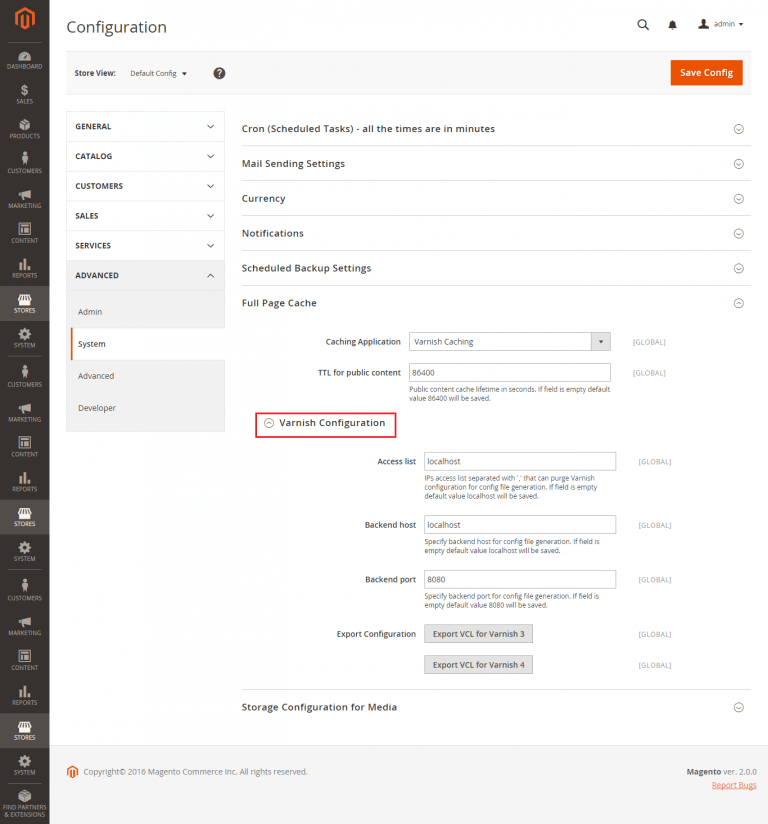
Copy this file you just export to /etc/varnish/default.vcl
Find and edit the lines under backend default
# Default backend definition. Set this to point to your content server.
backend default {
.host = "127.0.0.1";
.port = "8080";
}
Where
- .host – fully qualified hostname or IP address and listen port of the Varnish backend or origin server; that is, the server providing the content Varnish will accelerate. Typically, this is your web server.
- .port – the web server’s listen port (8080 in this example)
Step 3: Configuration Nginx port 80 (or 443) pass to Varnish
Open Nginx configuration file (located at /path/to/nginx/sites-enabled/default)
server {
    listen 80;
    location / {
          proxy_pass http://127.0.0.1:6081/;
          proxy_set_header Host $host;
    	proxy_set_header X-Forwarded-Host $http_host;
	proxy_set_header X-Real-IP $remote_addr;
	proxy_set_header X-Forwarded-For $proxy_add_x_forwarded_for;
		proxy_set_header Ssl-Offloaded "1";
		proxy_set_header      X-Forwarded-Port 443;
		proxy_set_header X-Forwarded-Proto https;
		proxy_set_header X-Forwarded-Ssl on;

}
6081 is default port of varnish.
Finally, restart the Varnish & Nginx(or apache)
service nginx restart
service varnish restart
How to Verifying Varnish in Magento 2
Step 1: Check if Varnish is listening to port 6081
netstat -tulpn | grep varnished
Step 2: Verify contents in var/cache, var/page_cache folder is not regenerated
Since FPC is configured to serve the content from Varnish, once cleared, cache folders (var/cache, var/page_cache) should always be empty.
Step 3: Verify the HTTP response headers
Load your Magento 2 Frontend and check the response from the browser console.
You are done. Please comment or contact us if you have any issues regarding Varnish Magento 2 Installation.

Joel Pham
Joel Pham is the CEO of Magenest, with extensive experience in eCommerce, business operations, and digital transformation. He has led projects for major brands across Magento, Shopify, Odoo, and enterprise technology solutions.

Weekly Trending
-

Confirmation code: 5 things you need to know about it
March 30 2021 -

Customer Journey Map: Definition, Templates, and Examples
November 9 2020 -

Which is the Top 8 Best Payment Gateway in India?
December 10 2023 -

Customer Value and Satisfaction: What's the Difference?
October 30 2020 -

Social sharing 101: Its Definition, Benefits & Examples
December 11 2020
Recent Posts
-

Payment Gateway Comparison - Top 5 Providers in 2026
April 1 2026 -

Magento 2 Stripe Extension: Installation & Configuration
December 29 2025 -
5 Best-selling Magento 2 Extensions to check out before 2026
December 19 2025 -

8 Best Magento Subscription Extensions For Online Businesses
December 8 2025 -

How to set up payment methods in Stripe Payment Gateway
September 21 2025


I have Magento 2 store on Centos 7 + NGINX + https, and I tried to configure Varnish on it, I studied lots of sources that include your source but these did not work for me
May be help me to solve this issue
there is missing bracket at the end of the example, should be } }
netstat -tulpn | grep varnished:
varnishd not varnished