

Table of Contents
What is credit card reconciliation?
Why is credit card reconciliation important?
Important Things to Remember About The Credit Card Reconciliation Process
How to Reconcile Credit Cards in QuickBooks
Knowing how to reconcile credit cards in QuickBooks is a crucial step for good bookkeeping. Through reconciling the credit cards, users can ensure that the activity of their credit card matches the activity of its statements in their QuickBooks account. Today we are going to show you how to make that reconciliation process become easier with step-by-step instructions. Stay tuned and let’s learn what exactly is reconciliation, why it’s so important, and how to reconcile credit cards in QuickBooks.

What is credit card reconciliation?
Every successful company needs a clean book to survive and thrive in the long term. Therefore, good accounting is not only a crucial factor for a growing business but it’s also a legal requirement that any business should know and follow carefully.
One common task that your finance teams have to handle every month even if they don’t like it is reconciling credit cards.
Credit card reconciliation is the system that accountants would use to make sure all the transactions in a credit card statement will match those on the book of the company.
To put it simply, accountants will compare the credit card statements of the company against the general ledger. And if all payments in the ledger match with those on the statement then the ledger could be considered accurate. If parts of the ledger do not match what’s on the credit card statement, there will be discrepancies and the financial controller needs to find out what are its causes.
Typically, the financial process occurs monthly, quarterly, or yearly for larger closing exercises.
Why is credit card reconciliation important?
Reconciling credit cards is vital because it shows how financially healthy the company is.
Reconciliation uses further documentary evidence to prove your book is accurate, using bank statements, receipts, and credit card statements to verify that each transaction is exactly what you claim it to be.
This is even more essential during an audit because, at that time, the tax office or a third-party auditor will need proof of every payment that took place. Without that proof, your company may fail an audit and miss out on potential investment, even face legal problems, and those are things that all businesses never want them to happen.
Banks and credit card processors are human and they can make mistakes so you cannot expect their statements to be 100% correct all the time. Things go wrong occasionally, but you shouldn’t worry about how to deal with the reconciling process, accounting automation software QuickBooks has made it super easy.

With the help of Quickbooks, reconciliation is no longer a time-consuming task.
With more than 3.4 million small companies on board, QuickBooks is one of the most popular accounting automation platforms on the market. What’s greater about it is that it’s built to be accessible for even non-finance professionals to use and help them smoothly run their business.
QuickBooks enables merchants to get better financial management by automatically update all data from Magento to Quickbooks in real-time. Plus, Quickbooks can also be integrated natively with most of the major payment providers out there such as PayPal, Square, and Stripe. Moreover, Retail and eCommerce companies now can keep track of payments automatically with Magento 2 QuickBooks Online Extension by just a few setups.
Important Things to Remember About The Credit Card Reconciliation Process
By entering your ending statement balance and matching the transactions between QuickBooks and your transaction statement, your credit card accounts will be reconciled.
There are some errors the reconciliation process often encounter such as:
- Find missing transactions: If you haven’t entered transactions on your statement in QuickBooks, then you will have to do that before the account reconciles.
- Identify incorrect amounts: If there is a difference in the amounts of the transactions and the bank statement, then the account cannot be reconciled.
- Locate duplicate transactions: You can identify the transactions that are not contained in QuickBooks by reviewing transactions.
- Find erroneous or fraudulent charges: All the charges entered into QuickBooks should be examined to determine whether they are legitimate.
How to Reconcile Credit Cards in QuickBooks
Basically, there will be 5 easy steps to reconcile credit cards in QuickBooks:
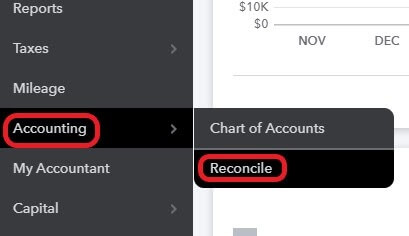
Step 1: Choose Accounting and Reconcile on the left menu.
Step 2: From the drop-down box, choose the amount to reconcile and then enter your statement information
Step 3: Match the transactions of credit cards.
Step 4: Confirm $0.00 difference.
Step 5: Create a bill or make a payment.
We will walk you through the process of how to reconcile credit cards in QuickBooks in greater detail.
1. Navigate to the QuickBooks credit card reconciliation screen
The first step to do is opening the QuickBooks Credit Credit Reconciliation Screen. To do that, you hover your cursor over Accounting in the left menu bar and then choose Reconcile:
2. Choose the Account and Input Your Statement Information
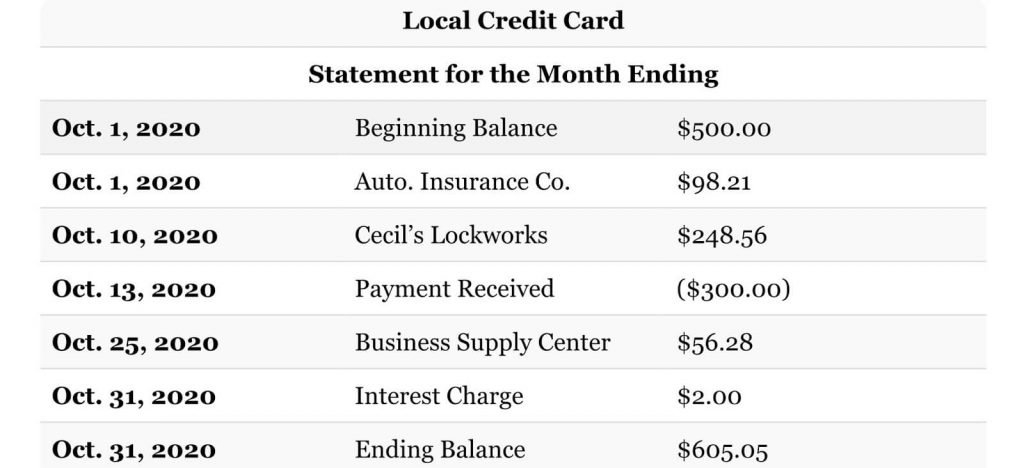
We will use the short credit card statement below to illustrate the process of how to reconcile credit cards in QuickBooks in general.
After finishing step one above, you will see the following reconciliation screen:
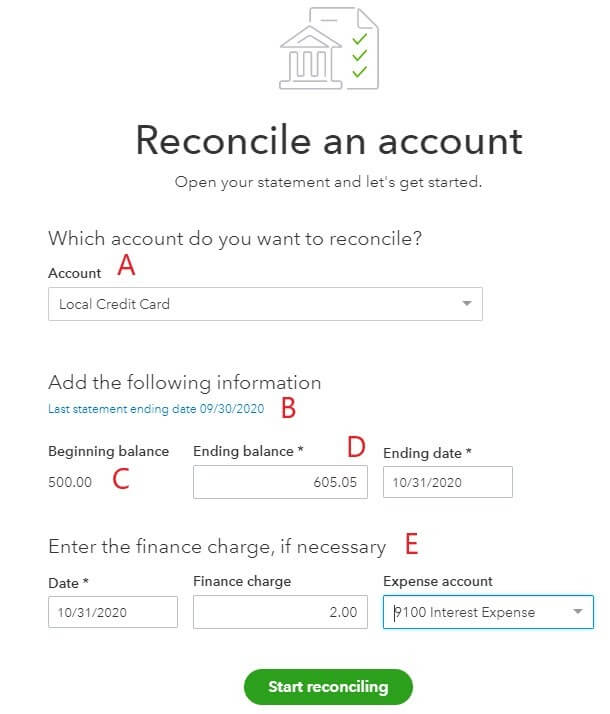
-A. Chose account: Select the credit card account you want to reconcile.
-B. Last statement ending date: The date of the last statement that was reconciled for the credit card account will be indicated here and this information will be missing if this is the first time you reconcile.
Note: Do not skip months. Because a reconciliation always starts with the reconciled balance from the previous month, you can’t skip them. If it’s been several months since the last reconciliation, you should go all the way back to fill in the information.
-C. Beginning balance: QuickBooks indicates the ending balance of the previous statement that is reconciled as it is the beginning balance of the current statement. This amount should be put as zero if this is the first time your credit card has been reconciled.
To make sure your reconciliation works, the beginning balance calculated by QuickBooks must match the balance in the last reconciliation time. And if the beginning balance is not the same, QuickBooks will offer you a link to help identify what leads to the change in the transaction conducted.
-D. Ending balance: From your credit card statement, input the ending balance.
-E. Finance charge: Input the finance charge from your credit card statement if you haven’t done it. Include the date of the charge assessed, category, and the expense amount to track the expense. QuickBooks will automatically record this expense when the reconciliation is completed.
After all the statement information is entered, click the green button “Start Reconciling”.
3. Match Credit Card Transactions
After you are done with the second step, QuickBooks will display a screen with a summary of file reconciliation in the top half and more detailed information of the transactions will be shown in the bottom half.
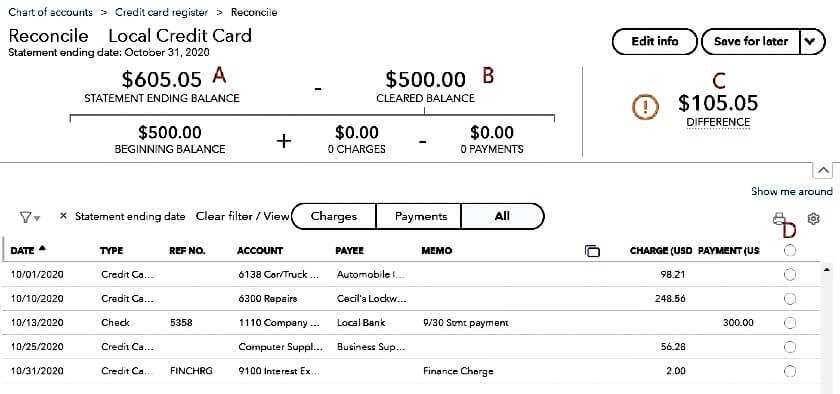
-A. Statement ending balance: This is where the statement balance from your input in the previous screen should match the ending balance on your credit card statement.
-B. Cleared balance: QuickBooks calculate the cleared balance, charges, and minus payments you mark as cleared.
-C. Difference: This number should be zero before you finalize a reconciliation. It means there is no difference between the statement ending balance and cleared balance.
-D. Cleared transaction: You will need to click the radial button in the right column for every transaction that appears on your credit card statement and after that, the transaction will be included in the B section (Cleared balance)
To match transactions between QuickBooks and your statement, you have to trace transactions from QuickBooks to your statement as well as investigate unmarked ones.
Trace Transactions From QuickBooks to Your Statement
To do this, you start by looking at every transaction listed in QuickBooks and your credit card statement.
You have to investigate any transaction in QuickBooks that is not displayed in your bank statement. Although the most likely cause may be an error of your QuickBooks accounting, sometimes you should not delete the transaction because it can affect other accounts or periods. Some most common errors that make errant QuickBooks credit card transactions appear:
- Duplicate transactions: You may have unintentionally created a duplicate one and it’s not shown on the statement while the original transaction will be. For example, if the credit card activity is input by the bank, you may have added it one more time without matching it to the existing transaction. If that’s the case, you need to delete the duplicate transaction.
- Wrong account: The suspect transaction may be caused by a charge on a different credit card and wrongly recorded on the account. What you need to do is editing the transaction and assign it to the payment account.
- Wrong date: The date of the transaction may be entered incorrectly in QuickBooks and if the correct date is after the end date of the statement, then the transaction will not be included on the statement. Therefore, if the transaction occurred at the very end of the period, there may be nothing wrong. In case the date is wrong, you can edit the transaction to rectify that mistake.
Investigate Unmarked Transactions on Your Statement
In the prior step of tracing transactions, you placed a mark next to every transaction on your statement that appears in QuickBooks. Now, it’s time to look for any transactions on your statement that do not contain a mark next to them. If unmarked transactions are valid, they should be added to QuickBooks. Also, after adding, remember to mark the transaction as cleared by clicking the radial button in the column on the right.
Note: You can open a second QuickBooks tab at the same time by right-clicking on the tab on your internet browser and choosing “Duplicate” to open it. That way you can navigate in the second tab to make needed changes as normal. After the changes are made and saved, refresh the original tab to see new changes you’ve just made.
4. Confirm the difference is Zero
When all the transactions in QuickBooks match the transactions on your statement, the Difference (C) between the ending balance and the cleared balance should be zero. Although it’s frustrating to find errors, sometimes simple math can help you guarantee that you are doing it right. That will happen when your beginning balances match, your transactions match, and your ending balance also matches as well.
Below is an example of reconciliation with all the transactions matched to the statement.
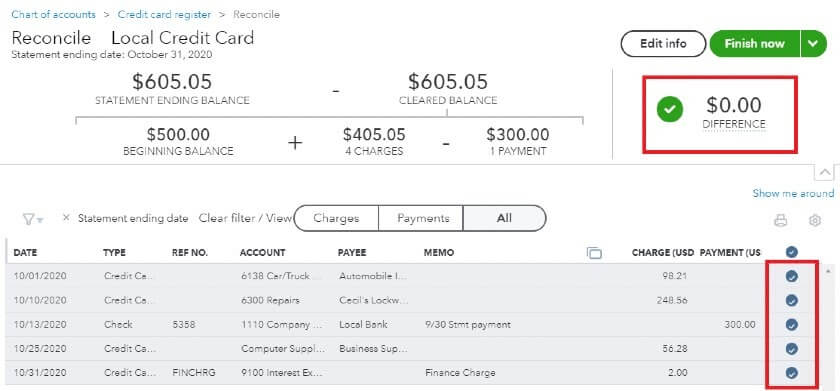
Finally, when the reconciliation is completed, click the green button “Finish” right upper the corner of the screen to wrap things up.
5. Make a Payment on the Credit Card Balance (Optional)
This step is not compulsory to do but if you want to create a bill or make a payment towards the credit card balance, you can do it after QuickBooks gives you a message that the reconciliation is completed.
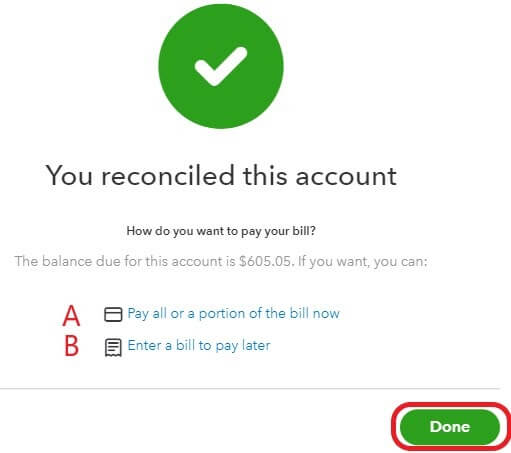
-A. Pay all or a portion of the bill now: This is where you can create a check you wish to pay.
-B. Enter a bill to pay later: This option allows you to enter a bill for the balance you wish to pay by the due date shown on the credit card statement. The date of the bill should be relevant to the due date on the credit card statement.
Conclusion
The basic way to reconcile your credit card in QuickBooks is to enter the ending statement balance to match your transactions to the transactions on the statement in your account. Hopefully, this step by step of how to reconcile credit cards in QuickBooks is useful to you and we are looking forward to your stories about using QuickBooks effectively, leave us a comment right here, and don’t forget to visit our blog for more excellent extensions.

Joel Pham
Joel Pham is the CEO of Magenest, with extensive experience in eCommerce, business operations, and digital transformation. He has led projects for major brands across Magento, Shopify, Odoo, and enterprise technology solutions.

Weekly Trending
-

Confirmation code: 5 things you need to know about it
March 30 2021 -

Access Control Lists (ACL) in Magento 2
April 29 2020 -

eCommerce Product Images: Which is the best size?
September 25 2020


Recent Posts
-

Payment Gateway Comparison - Top 5 Providers in 2026
April 1 2026 -

Magento 2 Stripe Extension: Installation & Configuration
December 29 2025 -
5 Best-selling Magento 2 Extensions to check out before 2026
December 19 2025 -

8 Best Magento Subscription Extensions For Online Businesses
December 8 2025 -

How to set up payment methods in Stripe Payment Gateway
September 21 2025

