
Table of Contents
Working with Magento 2 observers is one of many different ways of extending the core functionality of a Magento 2 powered eCommerce store. Thanks to Observers, you can run your custom codes in response to a specific Magento event or even with a custom event.
You can choose other options such as extending and overriding the core modules, copying the core class to the local directory and put it in the same directory path it was in the core directory, and modify the core class directly. However, creating an observer is the number one choice.
How observers work
Observers are used for catching the action which was triggered before or after events. In observers, you can set the required functionality or logic that is to be executed in response.
Magento 2 observers can be created by lacing your class file under the Module-Root/Observer directory. Your observer class should implement the following:
Magento\Framework\Event\ObserverInterface and define its execution function.
READ MORE. How to extend styling from parent theme in Magento 2 using Less
How to use observers
Make sure you have registered the new module to test it before, we will practice on this module.
I will use my module SampleEvent. And then, I will use an observer to customize the product name on the product view page.
Create a Magento 2 Event:
- At the first step, we need to create an event for Magento 2. To create add a new file events.xml in app/code/Magenest/SampleEvent/etc and add some codes to it:
<?xml version="1.0"?>
<config xmlns:xsi="http://www.w3.org/2001/XMLSchema-instance" xsi:noNamespaceSchemaLocation="urn:magento:framework:Event/etc/events.xsd">
   <event name="catalog_controller_product_view">
       <observer name="vendor_resgister_observer" instance="Magenest\SampleEvent\Observer\ProductEvents" />
   </event>
</config>
The above XML code is listening for the catalog_controller_product_view event. You need to remember the name and instance attributes are in the <observer> element. The name attribute defines the Observer Name that must be unique for each event, and the instance attribute defines the specific Magento 2 class that needs to be executed when the catalog_controller_product_view event is dispatched.
READ MORE. How to add custom fields in Product Edit Pages
Create a Magento 2 Observer
- Now to create Magento 2 observer, we can add a new file ProductEvents.php in App\Code\Magenest\SampleEvent\Observer and add this code to it:
<?php
namespace Magenest\SampleEvent\Observer;
use Magento\Framework\Event\Observer;
use Magento\Framework\Event\ObserverInterface;
class ProductEvents implements ObserverInterface
{
   /**
    * Below is the method that will fire whenever the event runs!
    *
    * @param Observer $observer
    */
   public function execute(Observer $observer)
   {
       $product = $observer->getProduct();
       $originalName = $product->getName();
       $modifiedName = $originalName . ' - Content added by Magenest ';
       $product->setName($modifiedName);
   }
}
- Magenest\SampleEvent\Observer is the namespace which maps through the folder structure of our Magento 2 module.
- Magento\Framework\Event\Observer and Magento\Framework\Event\ObserverInterface are the classes I am using in the observer class.
- ProductEvents implements ObserverInterface is the class which is same as the file name. It implements the ObserverInterface class defined above.
- Class observer must implements ObserverInterface.
- Public function execute (Observer $observer) is the execute() method. It takes the Observer class as can argument. Further, in the code, I get the product object through the method: getProduct(). Then, I get the product name, modify it and finally set the product name using setName() method on the product class.
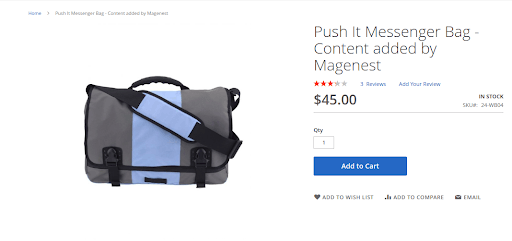
When you're done, clean cache to apply the changes. And see the product view.
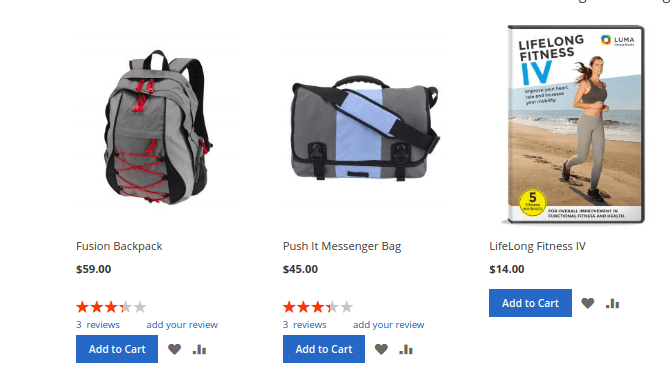
But remember the observer is listening for the catalog_controller_product_view event, it will only make changes to the product view. So, the category view will remain unchanged.
Some practices when using observer Magento 2:
- Make your observer efficient: You should try to keep your observer small and efficient by avoiding complex computations if you can. Because having complex computations in your observer can slow down application processes.
- Don’t include business logic: Your observer should not contain logic other than what is needed for it to run. Business logic should be encapsulated in other classes that your observer uses.
- Declare observer in the appropriate scope:
+ For the frontend events, declare observers in etc/frontend/events.xml, this event will be only used in the frontend. You can't use this event in the backend.
+ For the backend events, declare observers in etc/adminhtml/events.xml, this event will be only used in the backend. This event can't be used in the frontend.
+ Use the global etc/events.xml file only when an event can occur on both the frontend and the backend.
+ You can put events.xml in etc > webapi_rest > events.xml while handling Rest API request.
+ You can put events.xml in etc > webapi_soap > events.xml while handling Soap API request.
+ You can put events.xml in etc > crontab > events.xml while handling scheduled jobs only.
+ You can put events.xml in etc > setup > events.xml while Magento or extensions are being installed or upgraded.
Some perfect events in Magento 2:
- Events in Magento controller:
+ controller_action_predispatch - executes before each controller dispatching.
+ controller_action_postdispatch_{full_action_name} - executes after a controller with specific {full_action_name}.
+ controller_action_postdispatch_{route_name} - executes after each controller with specific {route_name}.
+ controller_action_postdispatch - executes after each controller dispatching.
- Events in models:
Usually, models extend the Magento\Framework\Model\AbstractModel class. It gives an ability to observe a predefined set of model events. And the model should have AbstractModel::_eventPrefix attribute specified for observing events of a specific model. The attribute's value equals to "core_abstract" by default.
Also, in models we have AbstractModel::_eventObject attribute that gives an ability to specify a name of the current model’s instance for different model-specific events.
A list of the global models events:
- model_load_before - executes before each model is loader. Here we can get an access to the following event’s data.
- $observer->getField() - gets currently processed model’s field name.
- $observer->getValue() - gets currently processed model’s field value.
- model_load_after - executes after each model loading.
- model_save_after - executes after each model saving.
- model_save_before - executes before each model saving.
- clean_cache_by_tags - executes after model related cache tags are cleaned.
- model_delete_before - executes before model is deleted.
- model_delete_after - executes after model is deleted.
- model_save_commit_after - executes after the models saving transaction is committed.
- model_delete_commit_after - executes after the models saving transaction commit is deleted.
In this mentioned events, we can get an access to the following data:
$observer->getObject()
List model-specific events:
- {event_prefix}_load_before – executes before model with {event_prefix} is loaded.
- {event_prefix}_load_after – executes after model with {event_prefix} is loaded.
- {event_prefix}_save_before – executes before model with {event_prefix} is saved.
- {event_prefix}_save_after – executes after model with {event_prefix} is saved.
- {event_prefix}_delete_before – executes before model with {event_prefix} is deleted.
- {event_prefix}_delete_after – executes after model with {event_prefix} is deleted.
- {event_prefix}_save_commit_after – executes after model’s data with {event_prefix} is committed.
- {event_prefix}_delete_commit_after – executes after model’s data commit with {event_prefix} is deleted.
- {event_prefix}_clear – executes when a model object is being prepared for correct deleting by the garbage collector.
Furthermore, we can get an access to the following event data from each of them:
- $observer->getDataObject() – gets the current model reference.
- $observer->get{event_object} – gets an event object for the current model.
If you want to find an event in code, you can do this.
Example: You need an event save_before or save after.
- Create an event observer to hook in the event [model prefix]_save_before. In here we will have observer variable, this variable could get the Model of model which we need to save data on it.
- And then we can use setData(‘column_name’,[new value]) to adjust the data of a column before saving to the database.
So why can we do that?
What is Model Prefix: in object Model, we have a property, this is protected $_eventPrefix; (You can see in the model, if you don’t have it, you can create it). It’s is a string type. Getting the value and join it with _save_before, we will have an event name.
EG: protected $ _eventPrefix = 'abc'; => Event Observer = 'abc_save_before'.
You can declare another event:
- [prefix]_load_before
- [prefix]_save_after
- [prefix]_load_after
These events are default and always available with a model, If you want to use a custom event, you can use eventManager->dispatch(‘event_name’,$data);
And how to use the dispatch function, you can follow my example.
Step 1: Dispatch Event
Create a file: app/code/Magenest/SampleEvent/Controller/Index/TestEvent.php and add this code:
<?php
namespace Magenest\SampleEvent\Controller\Index;
class TestEvent extends \Magento\Framework\App\Action\Action
{
	public function execute()
	{
		$textDisplay = new \Magento\Framework\DataObject(array('text' => 'Magenest'));
		$this->_eventManager->dispatch(magenest_display_text, ['mp_text' => $textDisplay]);
		echo $textDisplay->getText();
		exit;
	}
}
Step 2: events.xml
- In this step, we only catch the event to show the word Magenest on the frontend so we should create an events.xml file in etc/frontend folder.
<?xml version="1.0"?>
<config xmlns:xsi="http://www.w3.org/2001/XMLSchema-instance" xsi:noNamespaceSchemaLocation="urn:magento:framework:Event/etc/events.xsd">
    <event name="magenest_display_text">
        <observer name="display_text" instance="Magenest\SampleEvent\Observer\DisplayText" />
    </event>
</config>
Step 3: Create observer
Now we will create a class to execute the above event.
File: app/code/Magenest/SampleEvent/Observer/DisplayText.php
<?php
namespace Magenest\SampleEvent\Observer;
class DisplayText implements \Magento\Framework\Event\ObserverInterface
{
	public function execute(\Magento\Framework\Event\Observer $observer)
	{
		$displayText = $observer->getData('mp_text');
		echo $displayText->getText() . " - Some content </br>";
		$displayText->setText('Execute event successfully.');

		return $this;
	}
}
And then clean cache and see your result.
Happy Coding with Magento 2 Events and Observers!

Joel Pham
Joel Pham is the CEO of Magenest, with extensive experience in eCommerce, business operations, and digital transformation. He has led projects for major brands across Magento, Shopify, Odoo, and enterprise technology solutions.
Weekly Trending
-

Confirmation code: 5 things you need to know about it
March 30 2021 -

Customer Journey Map: Definition, Templates, and Examples
November 9 2020 -
Which is the Top 8 Best Payment Gateway in India?
December 10 2023 -
Customer Value and Satisfaction: What's the Difference?
October 30 2020 -

Social sharing 101: Its Definition, Benefits & Examples
December 11 2020
Recent Posts
-

Payment Gateway Comparison - Top 5 Providers in 2026
April 1 2026 -

Magento 2 Stripe Extension: Installation & Configuration
December 29 2025 -
5 Best-selling Magento 2 Extensions to check out before 2026
December 19 2025 -

8 Best Magento Subscription Extensions For Online Businesses
December 8 2025 -

How to set up payment methods in Stripe Payment Gateway
September 21 2025

