

Table of Contents
Access Control List (ACL) rules allow an admin to limit the permissions of users in their eCommerce system. This feature is helpful to make sure that no one will make changes in parts, not under their responsibility.
For example, you can use ACL rules to authorize some users to access certain features like menus, controllers, API endpoints depending on the employee’s role. Or, the customer support staff may only have access to the customer and orders sections, while the sales staff may have access to both these sections and the marketing section.
Today, I will guide you on how to use the ACL in Magento 2.
How ACL works
When a user logs in to a system, the authorization system immediately implements rules to identify what a user is allowed to do in this system. A system owner is enabled to:
- Create logical roles without limits
- Assign a set of Access Control Lists rules to each individual role
An access control rule will define specific permission granted to users in your system. You can see it in System > User Roles -> Add/Edit Role -> Role Resources
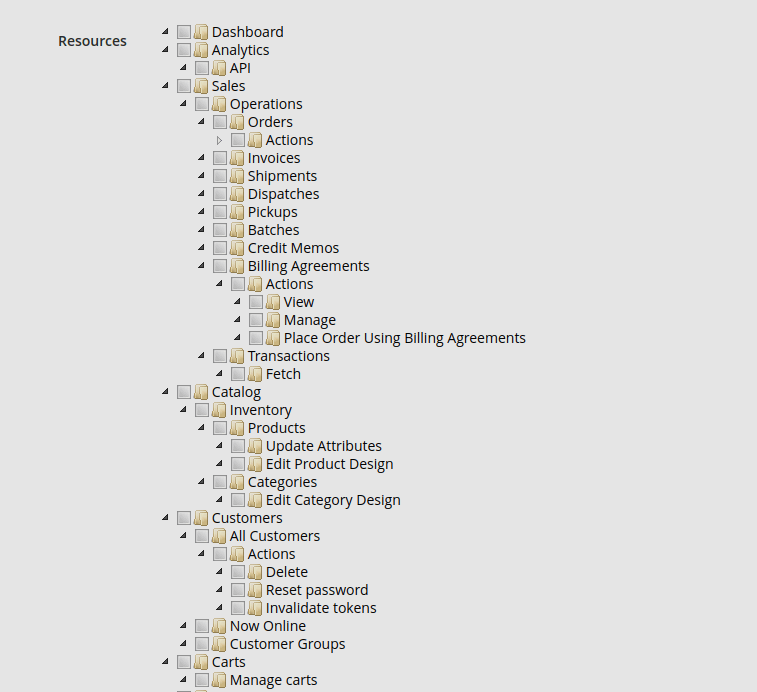
Each individual rule controls access to a system feature. It is necessary to tailor a set of rules into a set of roles that an individual business can use to run their online store.
First, we have some places where you will add your ACL rule to your module:
- Your controller in the admin application must implement an
_isAllowedmethod or const Admin_Resource which determines if a user can access the URL endpoint. - Menu item needs a specific ACL rule that controls this menu can display for the logged-in user. And every configuration field in
System > Configurationis the same as the menu item.
Sometime we will want to add some additional rules that are specific to our module. So, we will find out together how to check current users against a specific rule, look up id values for existing rules, and how to create your ACL rules.
Define the custom resources
Make sure you have registered the new module to test it before, we will practice on this module.
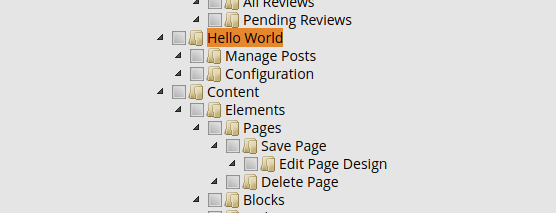
To register a resource in your system, we will use an acl.xml file which is located in app/code/{vendor}/{module}/etc/acl.xml.
<?xml version="1.0"?>
<config xmlns:xsi="http://www.w3.org/2001/XMLSchema-instance" xsi:noNamespaceSchemaLocation="urn:magento:framework:Acl/etc/acl.xsd">
    <acl>
        <resources>
            <resource id="Magento_Backend::admin">
                <resource id="Magenest_HelloWorld::helloworld" title="Hello World" sortOrder="51">
                    <resource id="Magenest_HelloWorld::post" title="Manage Post" sortOrder="10"/>
                    <resource id="Magenest_HelloWorld::helloworld_configuration" title="Configuration" sortOrder="99" />
                </resource>
                <resource id="Magento_Backend::stores">
                    <resource id="Magento_Backend::stores_settings">
                        <resource id="Magento_Config::config">
                            <resource id="Magenest_HelloWorld::helloworld_config" title="Hello World"/>
                        </resource>
                    </resource>
                </resource>
            </resource>
        </resources>
    </acl>
</config>
This resource will be placed as a child of Magento_Backend::admin. Each resource will have an id, title, and sort order attribute:
- id is a unique string and the identifier of this resource. You can use this when defining resources in the Admin menu, configuration, and limit access to your module controller. It should be in the format Vendor_ModuleName::resourceName
- title which is displayed in the menu bar
- sortOrder is the position in which the menu is displayed.
When you are done, please refresh the cache and see your result on the resource tree.
As noted above, we have some places to add the ACL rule to make it limit the access.
The first is Admin Menu: You can put the ACL resource to hide the menu if it’s not allowed by the store owner. For example, we will add ACL resource to a custom menu app/code/Magenest/HelloWorld/etc/adminhtml/menu.xml
<add id="Magenest_HelloWorld::helloworld" title="Hello World" module="Magenest_HelloWorld" sortOrder="51" resource="Magenest_HelloWorld::helloworld"/>
The second is system configuration: You can put the ACL resource to manage who can use some section page. For example, we will add some code to File: app/code/Magenest/HelloWorld/etc/adminhtml/system.xml
<section id="helloworld" translate="label" sortOrder="130" showInDefault="1" showInWebsite="1" showInStore="1">
          <resource>Magenest_HelloWorld::helloworld_configuration</resource>
</section>
With resources, it also uses for your controller.
In admin controllers: Magento provides an abstract type Magento\Framework\AuthorizationInterface which you can use to validate the currently logged in user against a specific ACL. You can call that object by using the variable: $this->_authorization. In the controller, you have to write a protected function to check the resource:
Example: File
vendor/magento/module-customer/Controller/Adminhtml/Index.php
protected function _isAllowed()
{
 return $this->_authorization->isAllowed('Magento_Customer::manage');
}
In the controller, we have another way to define admin resources, this way is to use const ADMIN_RESOURCE. For example, we can see module shipping of core Magento 2.
const ADMIN_RESOURCE = 'Magento_Sales::shipment';
Use this and we don’t need _isAllowed method.
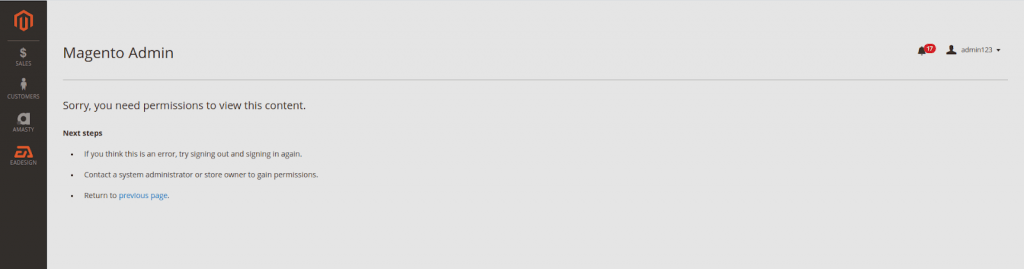
And this is the result when a user tries to access a feature by URL without permission.
Hope you can set up roles for each user quickly after reading this blog.
Happy coding!

Joel Pham
Joel Pham is the CEO of Magenest, with extensive experience in eCommerce, business operations, and digital transformation. He has led projects for major brands across Magento, Shopify, Odoo, and enterprise technology solutions.
Weekly Trending
-

Customer Journey Map: Definition, Templates, and Examples
November 9 2020 -

Confirmation code: 5 things you need to know about it
March 30 2021 -

How credit card processing works: What you should know?
November 18 2021


Recent Posts
-

Payment Gateway Comparison - Top 5 Providers in 2026
April 1 2026 -

Magento 2 Stripe Extension: Installation & Configuration
December 29 2025 -
5 Best-selling Magento 2 Extensions to check out before 2026
December 19 2025 -

8 Best Magento Subscription Extensions For Online Businesses
December 8 2025 -

How to set up payment methods in Stripe Payment Gateway
September 21 2025

