

Table of Contents
In this article, we are going to provide you with 3 different methods of entering credit card charges in QuickBooks. Although it’s convenient to use your business credit card to pay for purchases, it means you have to account for those transactions in your bookkeeping. QuickBooks is a software tool that allows you to easily account for all your transactions and keep them in the record.
There are 3 ways about entering credit cards in QuickBooks Online you should know, now let’s take a closer look at each of them.
3 Methods of Entering Credit Card Charges in QuickBooks Online you should know
#1: Enter the transaction and match it to the bank feed
Entering credit card charges in QuickBooks and then matching them to the bank feed is considered the most correct method to do but it’s also the least commonly used way.
In the traditional way, bookkeepers would enter transactions from source documents (like receipts) into ledgers and then reconcile the ledgers to credit card statements or the bank every month. Thanks to the advent of bank feed in accounting software, it’s possible to reconcile accounts in real-time. You may still need a thorough reconciliation of your accounts each month, but it’s undeniable that the real-time reconciliation and the data entry process have sped up considerably with bank feeds.
Although using bank feed can increase the accuracy and the speed of your bookkeeping, it’s not ideal for the check and balance measures that have been the core of bookkeeping in the traditional method.
However, there’s nothing wrong with using bank feed technology for entering credit card charges in QuickBooks because it’s technically correct. Here is how to use this method:
1. Click the New button on the Dashboard and choose Expense under Vendors.
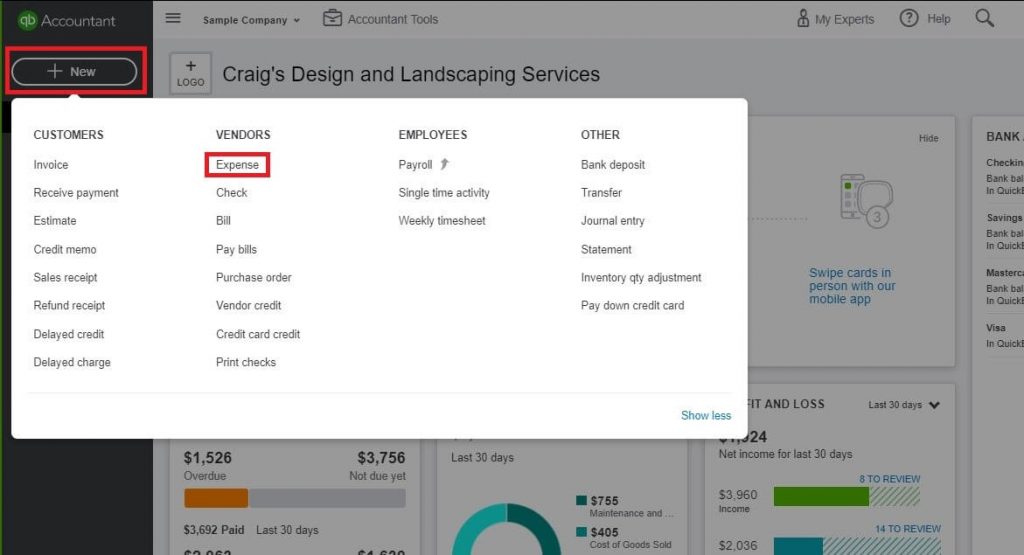
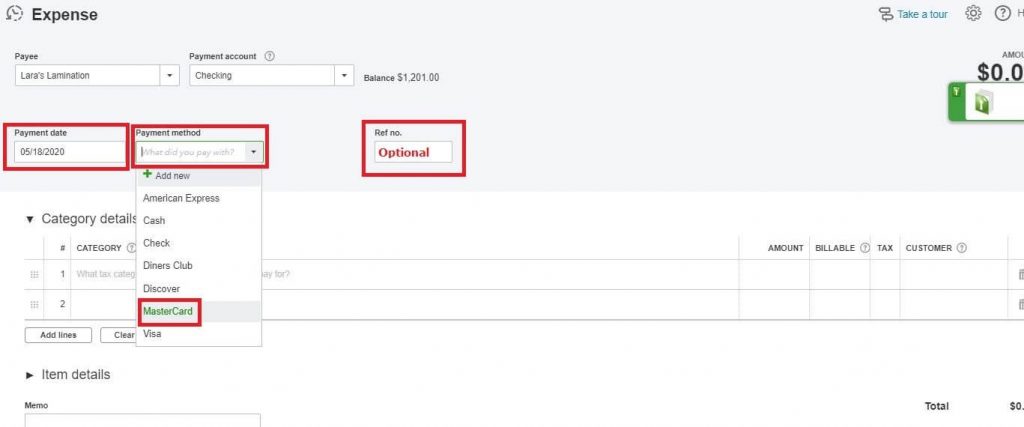
2. In the Payee, you enter the payee name. From the Payment Account drop-down and choose the credit card used for the transaction and in this example, we will use the Mastercard.
3. In the Payment Date field, enter the date of the transaction and select the payment method you want. You may need to fill in a reference number if requested.
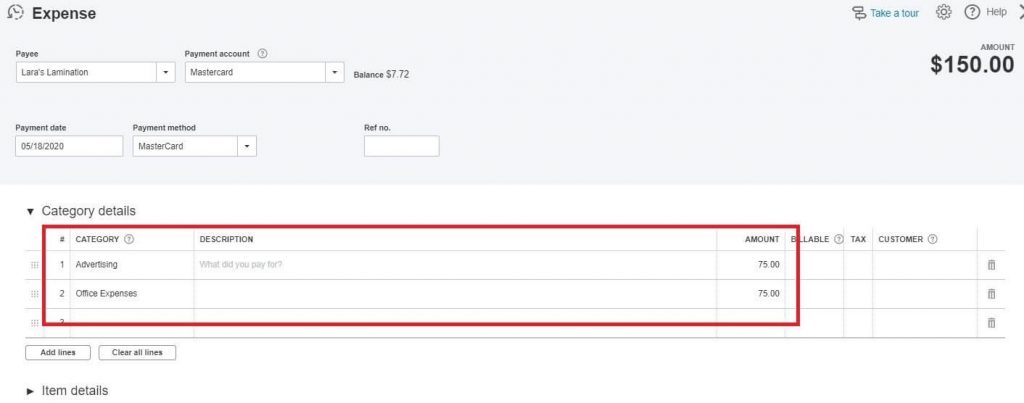
4. To complete the rest of the transaction, enter the category details and description if necessary, along with the transaction amount. Transactions between categories can be split by entering multiple lines if you want.
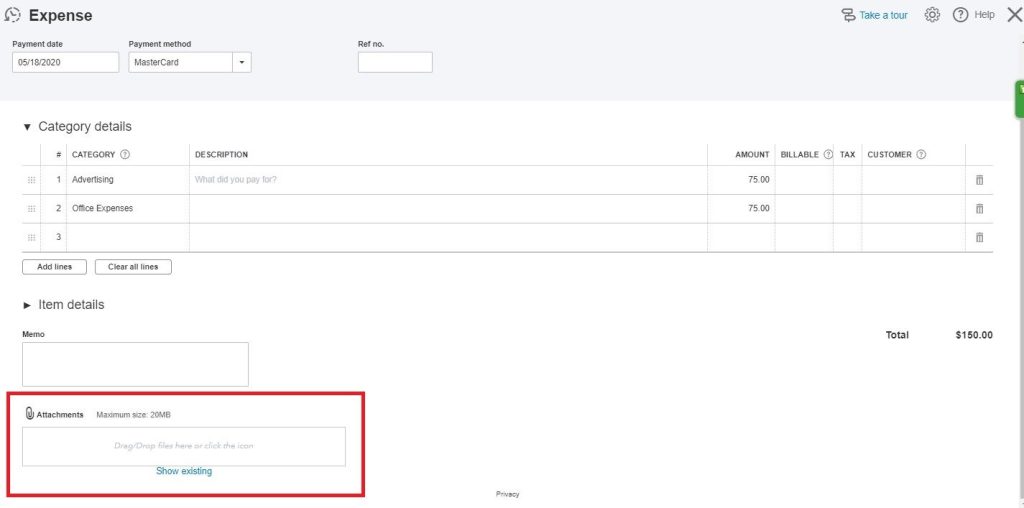
In this example, we will split the transaction of 150.000 for Advertising and Office Expenses evenly and will not discuss the Billable, Tax, and Customer fields in this example.
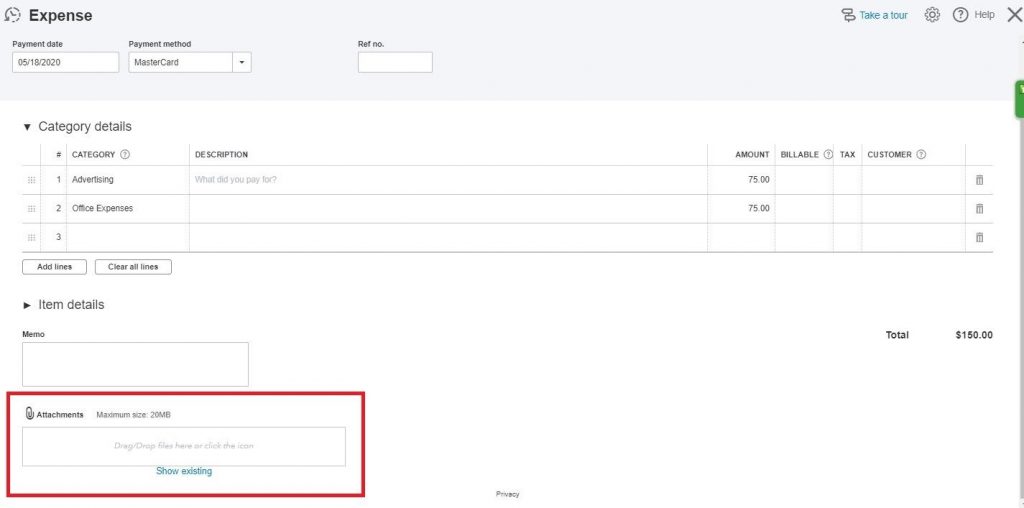
5. This step is optional, you still can attach a receipt by dragging an image into the Attachments box from your computer. If you used to upload attachments into QuickBooks before, then you just need to click Show Existing link to open them and attach them again.
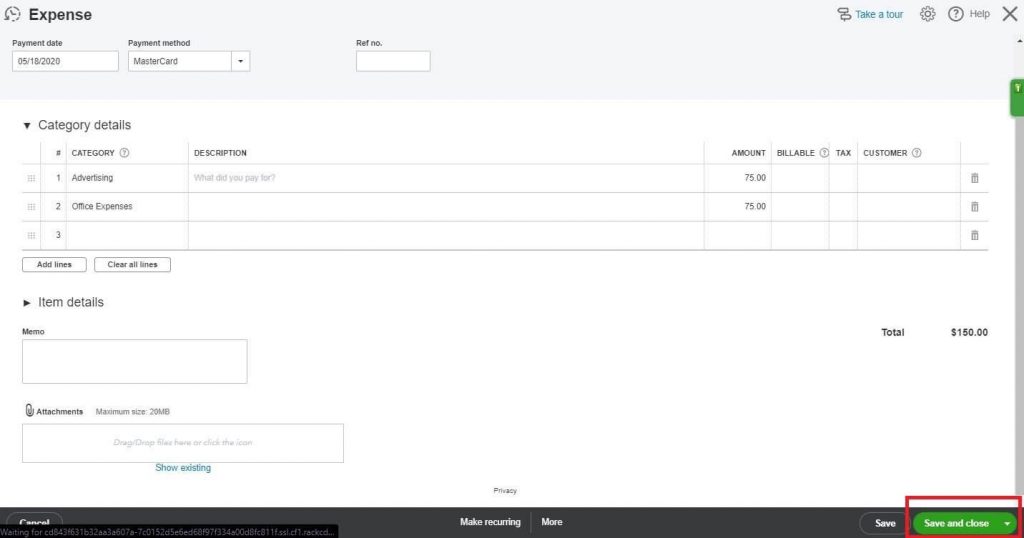
6. Once you completed the editing, just click Save and Close button.
Using the Receipts Feature
This method can be expedited by using the Recept feature in QuickBooks.
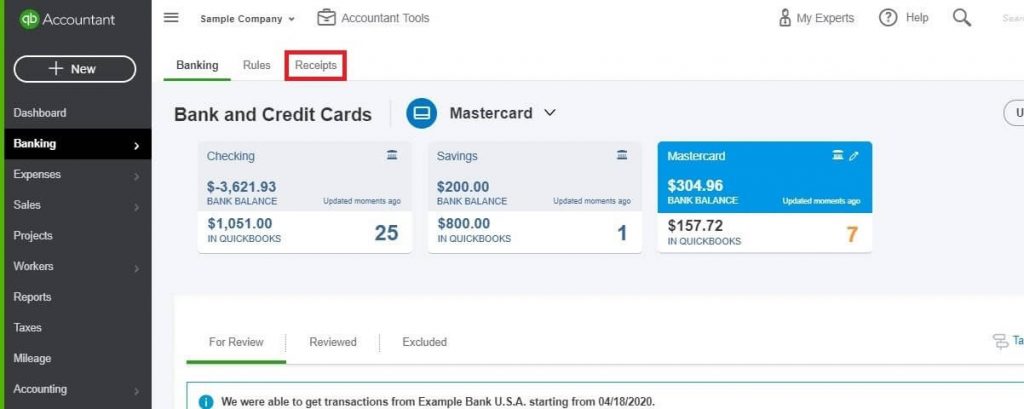
- Click Banking in the Dashboard.

2. Then on the next screen, choose Receipts.
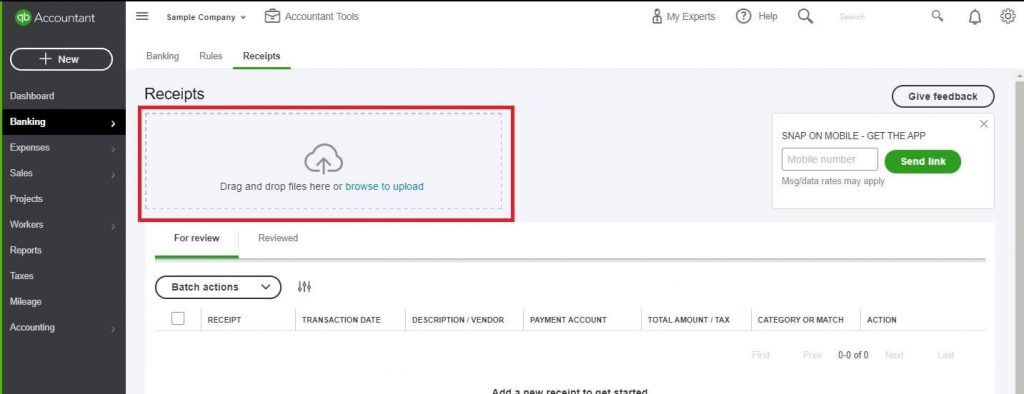
3. When the Receipt screen shows up, you could upload the receipts. If you are using your smartphone to go on QuickBooks, you can directly add photos of receipts, access and add them to your books from your phone.
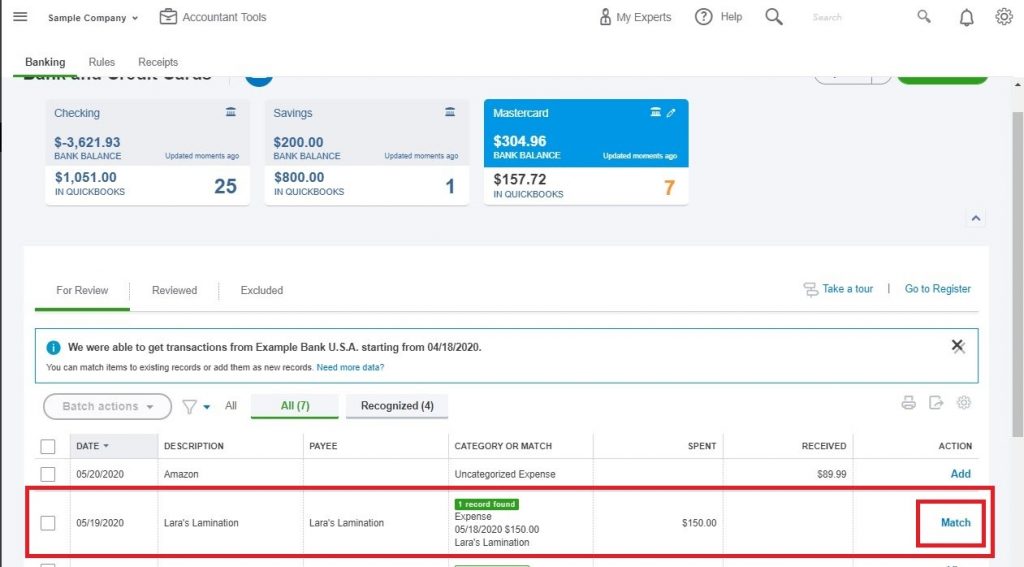
Whether you choose the first or the second method for entering credit card charges in QuickBooks, you still can match the transaction from the Banking screen like this picture.
Note: The date of the transaction in the bank feed is always a day or two later compared to the date of the transaction because it takes a little bit of time for the transaction to be processed before it reaches your credit card account.
#2: Enter transactions from bank feed or import
In fact, not all business owners will use the first method for entering credit card charges in QuickBooks, most of them actually would choose to connect the credit card account and enter transactions from the bank feed.
Connecting your bank and credit card account in QuickBooks is the most reliable and quickest way to import transactions. Besides, it’s also secure because your login information of the bank will be encrypted and protected, this would prevent anyone from accessing your bank accounts.
1. Click Banking from the Dashboard.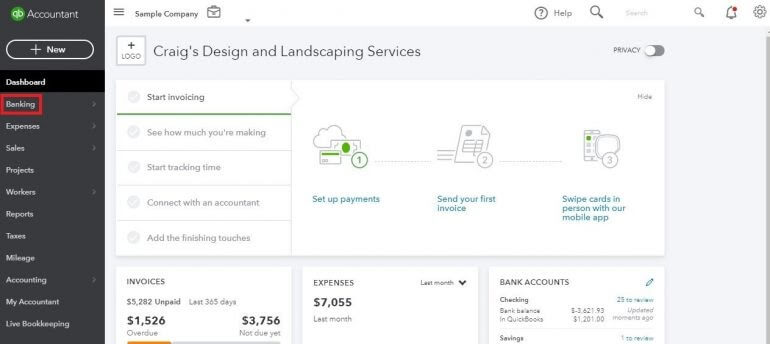
2. Choose the Add Account button.

3. When the new screen pops up, you will enter the name of your financial institution by selecting the correct option from the list in the drop-down box.
Alternatively, you could choose your financial institution quickly by clicking on the logo of the most popular banks shown.
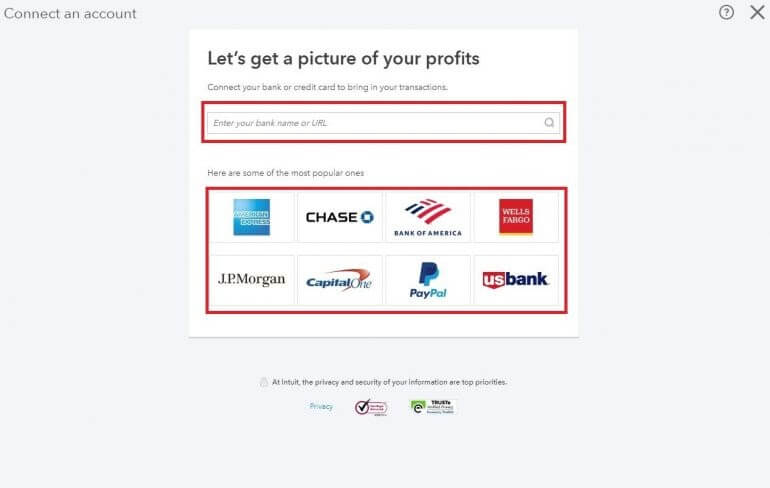
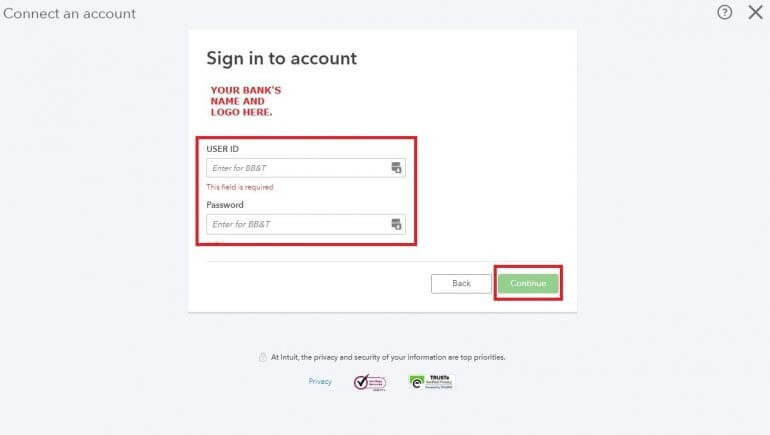
4. Then enter the information required and select the Continue button.
5. From here, there will be a list of accounts for you to connect. Choose the accounts you want to use to import transactions. If you have both personal accounts and your business accounts in the same financial institution, you need to ensure it only connects to your business one. Keep your personal and business finances separate, it’s very important to do that in accounting.
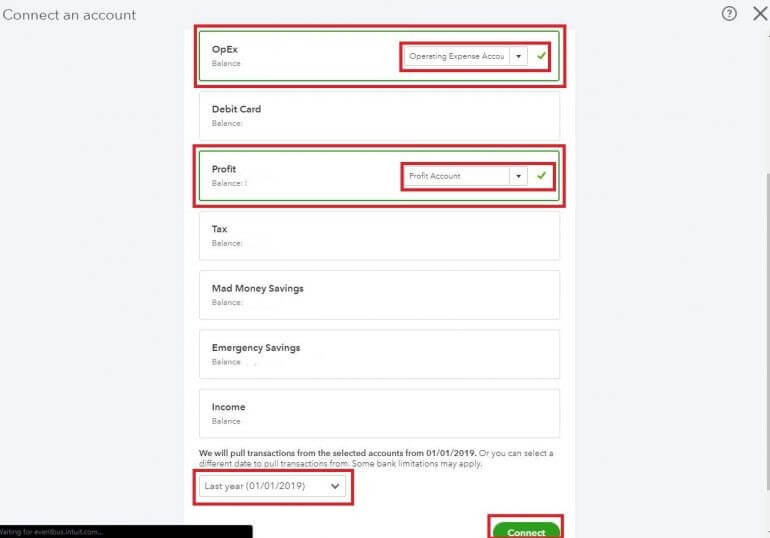
6. Depending on how many transactions there are to import, the bank transaction import screen will begin right away or maybe after a few minutes.
When you complete entering, you will be directed back to the Bank screen where you could start matching or adding transactions that are imported.
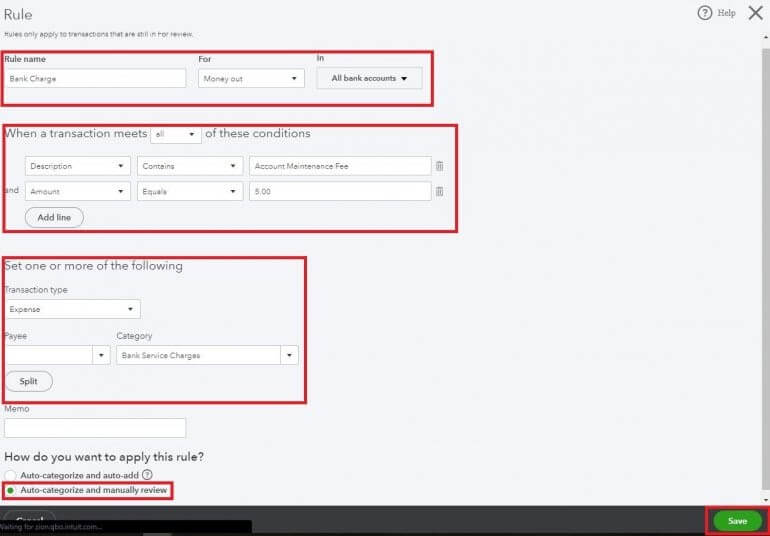
7. To speed up the process, you can click Create rules from this transaction and these rules will become very helpful for recurring automatic transactions that you don’t have receipts for, like bank free and subscriptions.
Now on this screen, set the conditions you want to apply. The Auto-categorize and manually review option is recommended because it allows you to see the transaction in your bank feed while still automatically categorizing based on the rules.
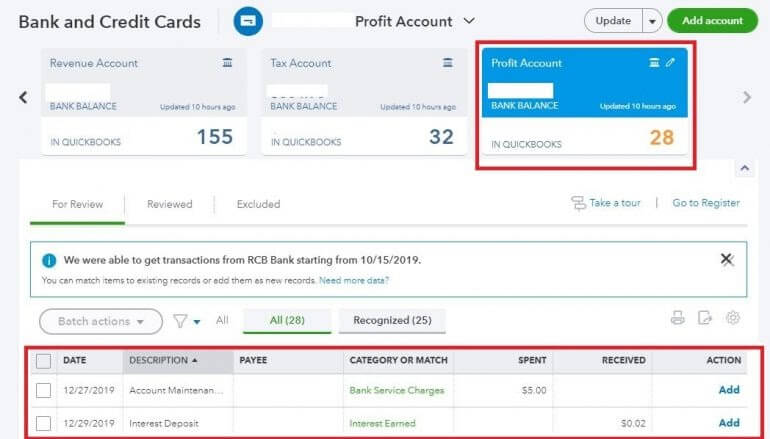
8. After the initial connection to the chosen financial institution, your bank transactions will be imported automatically on a daily basis and you can update the connection with the Update button if you want.
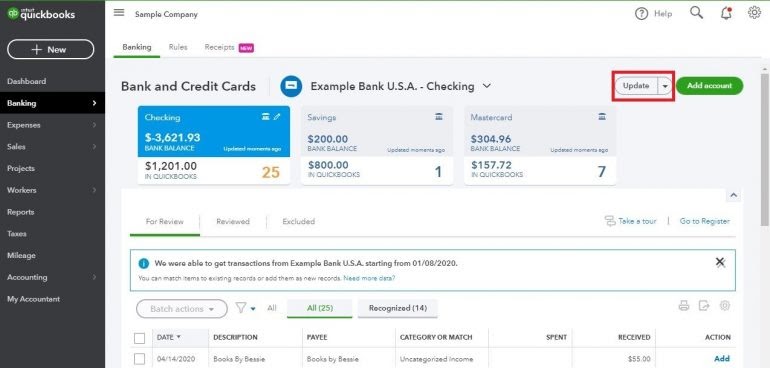
After importing your transactions from your bank or from a manual import, you can use the Banking screen to classify stuff. You also have options to add, view, or match transactions.
Match
To expand the transaction, you can click anywhere in this red line except the Match link on the checkbox on the left.
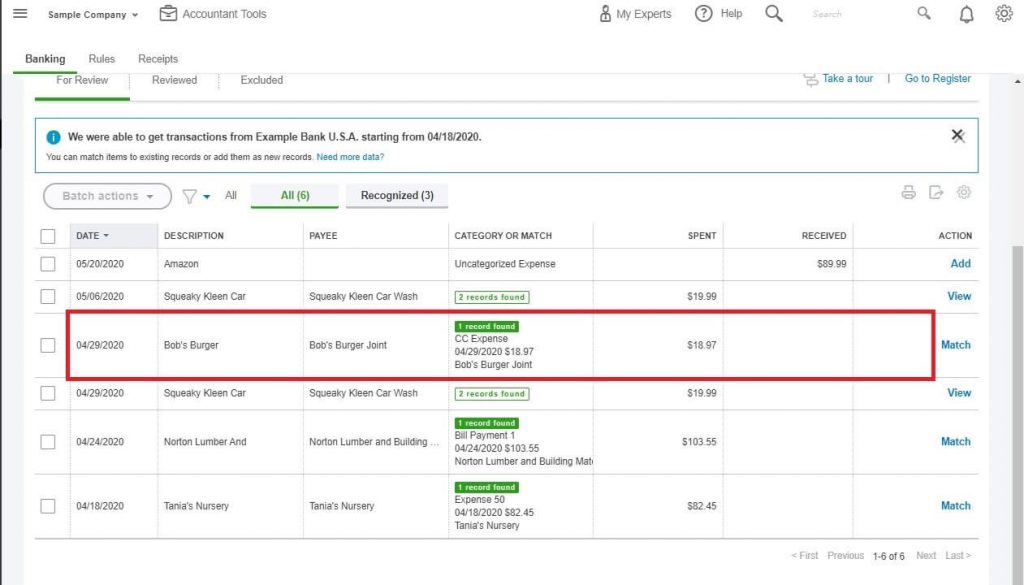
To make sure everything is correct you should review the transaction thoroughly. Ask yourself questions such as: Does the Bank Detail make sense with the Payee name? Is the date correct? If you are not sure, just click on the link CC Expense to review the transaction one more time. Click “Find other records” if you want to review other possible transactions that are linked to this one.

When you are certain about the information in the Match field, click the Match button. Just remember that you will not add any transaction here, you only should reconcile a transaction that is already entered in the bank feed.

View
The View feature will appear when QuickBooks finds out there is more than one transaction that is linked to the transaction in the bank field. You can click View to see the transactions in the detailed expansion.

In the expanded view, select the radio button and click Match.

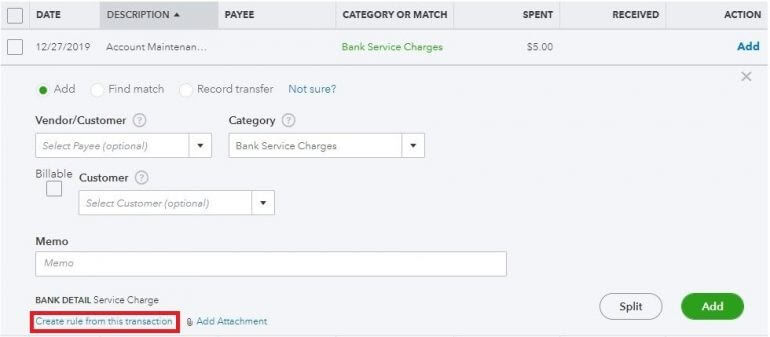
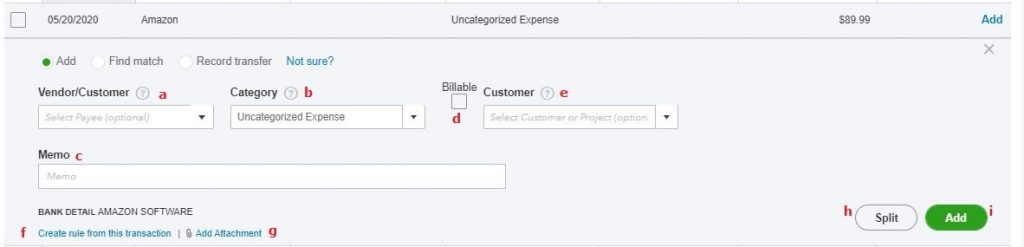
Add
Click into the transaction under the Match section to expand and then you will see more fields and options. This is a shorter version of the Expense screen in the first method for entering credit card charges in QuickBooks.
Enter the vendor’s name, the expense category, and a memo if necessary.
If this is a recurring transaction, a rent payment, for example, click on the “Create rule from this transaction” link to open the rules screen and add an attachment to the transaction.
Usually, you will need to split a transaction over by clicking on the Split button. Click the Add button to add transactions into QuickBooks.
#3: Directly enter credit card charges into the credit card register
If you don’t want to use either the expense entry method or the import method, you could think about entering credit card charges in QuickBooks directly into the credit card register.
This method should be used when you only use a credit card for a brief amount of time because if you close your account, you won’t be able to connect the bank feed or use Excel to import. There aren’t many transactions either.
Here is how you enter your transactions quickly with this method.
1. To set up the credit card, go to Accounting on the Dashboard and click the Chart of Accounts.
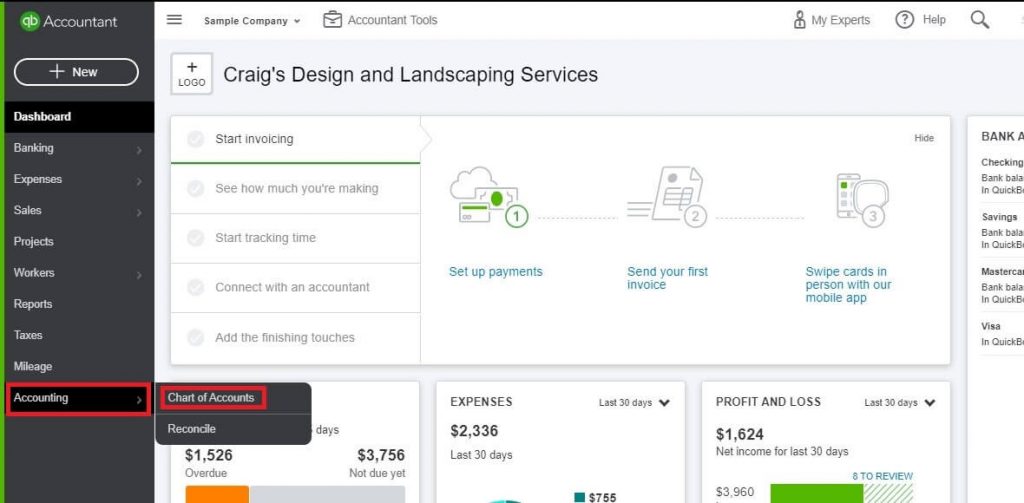
2. On the next screen, click New button.

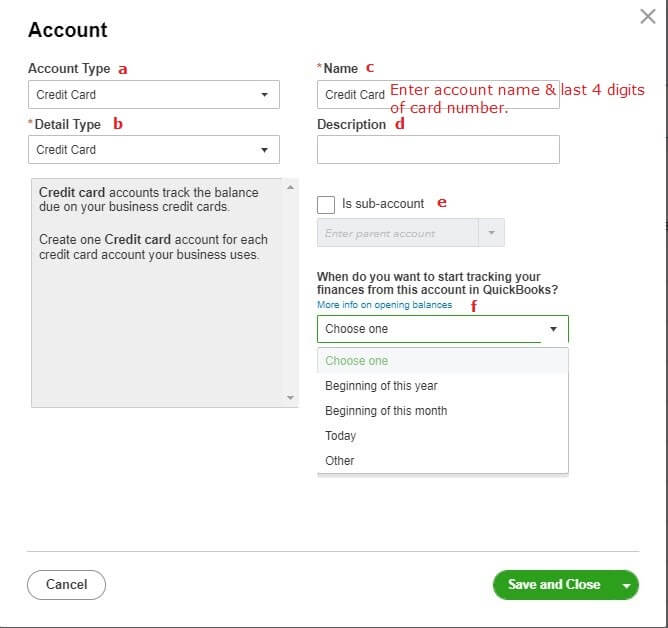
3. After clicking the New button, you will see a pop-up window where you need to set the Account Type (a) to credit card and the Detailed Type (b) will update accordingly and automatically. The Name (c) will default to “Credit Card” but it’s recommended to be changed into the account name and the last 4 digits of the card number.
You won’t need to fill in the Description field (d) unless you want to leave a note about the card.
The Sub-Account (e) feature would not be used either.
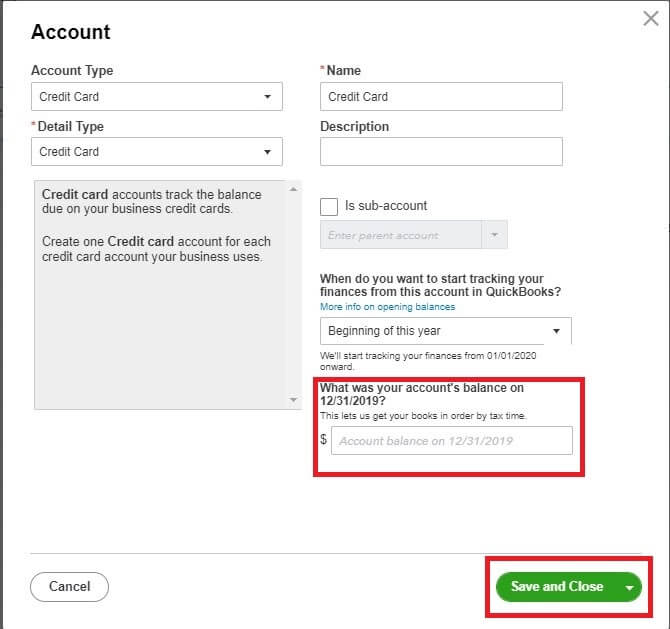
Opening Balances is the last field on this screen, you just need to choose the earliest date you used the card from the drop-down menu.
Then your account’s balance should be added according to the date you choose. In case you enter a new card, this field should be set to $0. In contrast, it’s better to consult with your accountant before proceeding to make sure the balance Sheet is accurate if you used the card before for business purposes. Once your beginning balance is entered, click Save and Close.
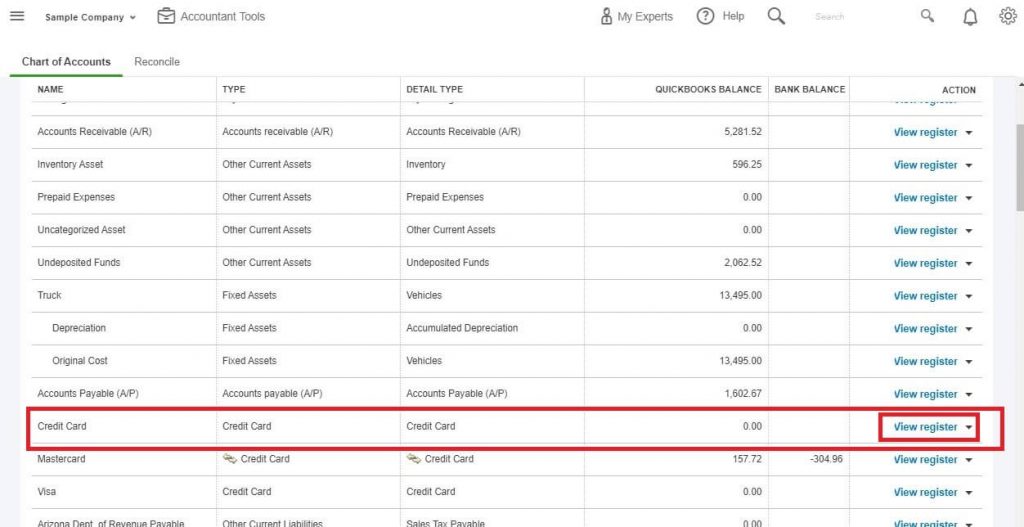
4. As the pop-up window is closed, you will go back to your Chart of Accounts screen. Find the account you have just created in the list of Chart of Accounts and click View Register.
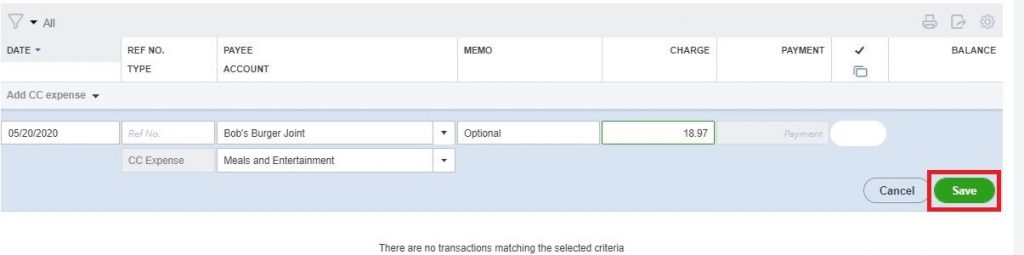
5. This is where you see the Credit Card Register screen for the account you have just created. To expand your first data entry line, click the Add CC expense.
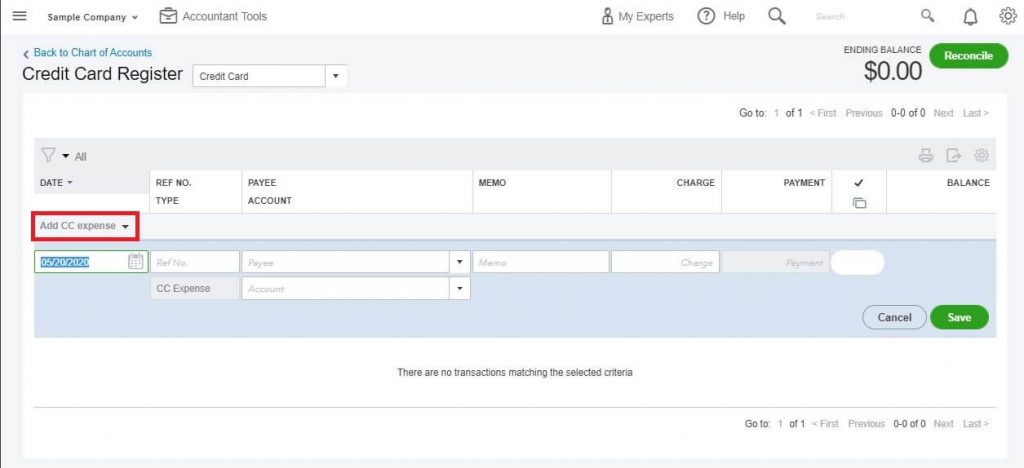
6. Before completing each field, ensure all the date fields are accurate. Ref No. and Memo are the only optional fields, apart from them, all fields should be filled with information. Click the Save button when you complete.
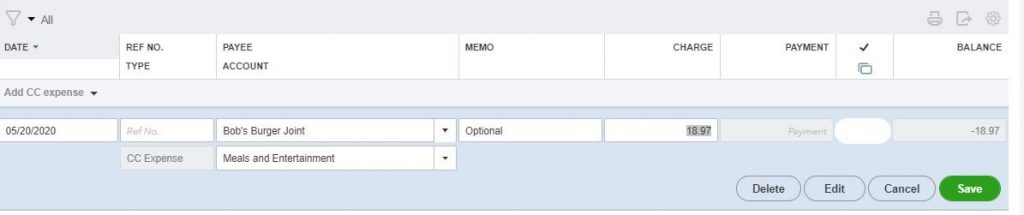
7. You need to continue entering until they are all completed. If you identify any entry error and want to change what you have entered, click on Edit to correct it. To delete a transaction, click the Delete button.
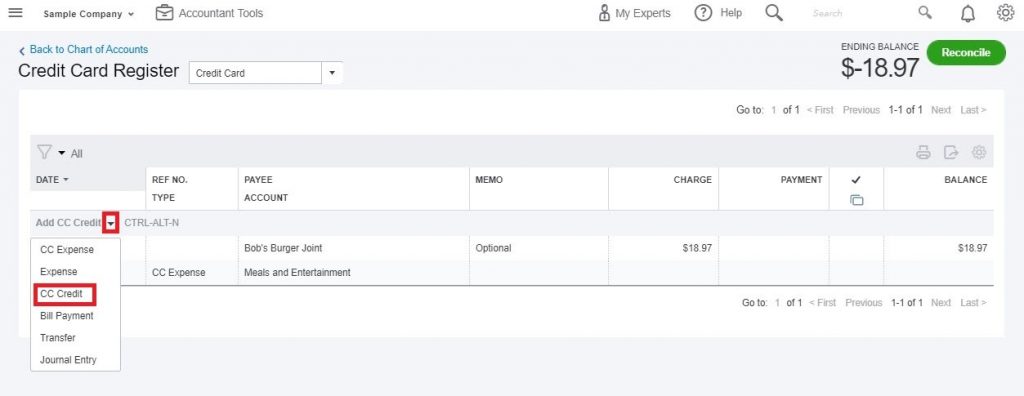
8. Next, to enter a credit card payment, choose CC Credit in Add CC Credit field. Note that it’s very important to use the correct type of transaction. CC Credit is for payments on the card’s balance but CC Expense is for purchases with your card.
Also, remember to enter the bank account in the Account field so that the Payment can be made.
9. After entering credit card charges in QuickBooks, click Reconcile button to start reconciling your account to make sure you haven't made any data entry error.
Conclusion
Entering credit card charges in QuickBooks is not too difficult to do correctly. In fact, it’s relatively simple and the hardest part is choosing the right process of entering the charges. Here it would be method 1,2 or 3. If you cannot determine which way to use by yourself, you can always consult with your accountant or a QuickBooks ProAdvisor. They can give you useful advice on which works best for your business and then you can apply the complete guide to entering credit card charges in QuickBooks we just introduced to you above.
Do you want us to recommend a tool to facilitate the process of entering your transactions? It must be QuickBooks Online Integration - a powerful extension to help merchants get better control in their financial management because it can automatically update all the data from your Magento 2 store to QuickBooks Online in real-time. Not only so, this extension from Magenest is free lifetime software updates but only a one-time payment with no hidden cost.
That’s it for today about entering credit card charges in QuickBooks Online, if you have any questions, just leave us a comment and visit our blog for other helpful posts like this.

Joel Pham
Joel Pham is the CEO of Magenest, with extensive experience in eCommerce, business operations, and digital transformation. He has led projects for major brands across Magento, Shopify, Odoo, and enterprise technology solutions.

Weekly Trending
-

Confirmation code: 5 things you need to know about it
March 30 2021 -

eCommerce Product Images: Which is the best size?
September 25 2020 -

Payment Gateway Comparison - Top 5 Providers in 2026
April 1 2026 -

Everything you need to know about Guest Blogging in 2024
December 2 2023

Recent Posts
-
Payment Gateway Comparison - Top 5 Providers in 2026
April 1 2026 -

Magento 2 Stripe Extension: Installation & Configuration
December 29 2025 -
5 Best-selling Magento 2 Extensions to check out before 2026
December 19 2025 -

8 Best Magento Subscription Extensions For Online Businesses
December 8 2025 -

How to set up payment methods in Stripe Payment Gateway
September 21 2025

