

Table of Contents
By default, Magento 2 allows customers to create a new account with some required info such as email addresses and passwords. However, we can easily add some more custom fields to the registration page of Magento 2 to collect more customer data.
1. Customer Attributes
Basically, customer attributes provide the information that is required to support the order, fulfillment, and customer management processes. Because your business is unique, you might need more fields in addition to those provided by the system. You can add custom attributes to the Account Information, Address Book, and Billing Information sections of the customer’s account. Customer address attributes can also be used in the Billing Information section during checkout, or when guests register for an account.
Custom customer attributes are necessary to make Magento 2 suit for your type of eCommerce.
2. Code and Explanation
Here is the situation:
Imagine that you need more customer information (E.g: phone number, ID number, etc.) for further confirmation, the most simple way is to create new fields in the customer registration page so that your customer can fill in. To make it work, you have to create a new customer attribute then add a new field to your customer registration page.
Note: This content is for anyone who has some basic knowledge of PHP and Magento 2. If you are not or just wanna see the result, you can download the code, put it in the app/code folder then run the upgrade command.
The code is written for Magento version 2.3 or above.
Step 1: Create a new customer attribute
First, you need to create a new attribute to store the data in which the customer registers in the form. We will create a datapatch to create our new customer attribute and add this attribute to the database. In the Setup/Patch/Data/AddPhoneAttribute.php
<?php
/**
* Copyright © Magento, Inc. All rights reserved.
* See COPYING.txt for license details.
*/

namespace Magenest\CustomerAttribute\Setup\Patch\Data;

use Magento\Catalog\Ui\DataProvider\Product\ProductCollectionFactory;
use Magento\Customer\Model\Customer;
use Magento\Eav\Model\Config;
use Magento\Eav\Setup\EavSetupFactory;
use Magento\Framework\Setup\ModuleDataSetupInterface;
use Magento\Framework\Setup\Patch\DataPatchInterface;
use Magento\Framework\Setup\Patch\PatchRevertableInterface;
use Psr\Log\LoggerInterface;

/**
* Class AddPhoneAttribute
* @package Magenest\CustomerAttribute\Setup\Patch\Data
*/
class AddPhoneAttribute implements DataPatchInterface, PatchRevertableInterface
{
   /**
    * @var ModuleDataSetupInterface
    */
   private $moduleDataSetup;
   /**
    * @var EavSetupFactory
    */
   private $eavSetupFactory;
   /**
    * @var ProductCollectionFactory
    */
   private $productCollectionFactory;
   /**
    * @var LoggerInterface
    */
   private $logger;
   /**
    * @var Config
    */
   private $eavConfig;
   /**
    * @var \Magento\Customer\Model\ResourceModel\Attribute
    */
   private $attributeResource;

   /**
    * AddPhoneAttribute constructor.
    * @param EavSetupFactory $eavSetupFactory
    * @param Config $eavConfig
    * @param LoggerInterface $logger
    * @param \Magento\Customer\Model\ResourceModel\Attribute $attributeResource
    */
   public function __construct(
       EavSetupFactory $eavSetupFactory,
       Config $eavConfig,
       LoggerInterface $logger,
       \Magento\Customer\Model\ResourceModel\Attribute $attributeResource,
       \Magento\Framework\Setup\ModuleDataSetupInterface $moduleDataSetup
   ) {
       $this->eavSetupFactory = $eavSetupFactory;
       $this->eavConfig = $eavConfig;
       $this->logger = $logger;
       $this->attributeResource = $attributeResource;
       $this->moduleDataSetup = $moduleDataSetup;
   }

   /**
    * {@inheritdoc}
    */
   public function apply()
   {
       $this->moduleDataSetup->getConnection()->startSetup();
       $this->addPhoneAttribute();
       $this->moduleDataSetup->getConnection()->endSetup();
   }

   /**
    * @throws \Magento\Framework\Exception\AlreadyExistsException
    * @throws \Magento\Framework\Exception\LocalizedException
    * @throws \Zend_Validate_Exception
    */
   public function addPhoneAttribute()
   {
       $eavSetup = $this->eavSetupFactory->create();


       $eavSetup->addAttribute(
           \Magento\Customer\Model\Customer::ENTITY,
           'phone_number',
           [
               'type' => 'varchar',
               'label' => 'Phone Number',
               'input' => 'text',
               'required' => 1,
               'visible' => 1,
               'user_defined' => 1,
               'sort_order' => 999,
               'position' => 999,
               'system' => 0
           ]
       );

       $attributeSetId = $eavSetup->getDefaultAttributeSetId(Customer::ENTITY);
       $attributeGroupId = $eavSetup->getDefaultAttributeGroupId(Customer::ENTITY);

       $attribute = $this->eavConfig->getAttribute(Customer::ENTITY, 'phone_number');
       $attribute->setData('attribute_set_id', $attributeSetId);
       $attribute->setData('attribute_group_id', $attributeGroupId);

       $attribute->setData('used_in_forms', [
           'adminhtml_customer',
       ]);

       $this->attributeResource->save($attribute);
   }

   /**
    * {@inheritdoc}
    */
   public static function getDependencies()
   {
       return [];
   }

   /**
    *
    */
   public function revert()
   {
   }

   /**
    * {@inheritdoc}
    */
   public function getAliases()
   {
       return [];
   }
}
When you increase your version number and run the upgrade command. The script will be executed. We create an attribute with code id is phone_number and their type id is customer and bind some attribute for it. There are many attributes can be used such as:
- type: data type of the attribute. Magento 2 allows 6 following datatypes: static, DateTime, decimal, int, text, varchar.
- input: input type of the attribute will be used in some specific form.
- required: define the attribute value is required or not.
- visible: define whether the attribute appears in backend forms.
- user_define: define whether the admin is allowed to delete the attribute in the backend site.
- position: define the position of attribute in grid
- system: define where the attribute is system attribute or not. System attributes are the default attributes shipped natively with the software.
After having created the attribute, we bind it to some specific form of Magento 2 by adding data into 'used_in_form'.
Step 2: Show customer attribute in the customer registration form
For showing customer attribute on the registration page, we need to do the following steps:
First, we will add our phtml files to ‘form.additional.info’ reference name using Magenest/CustomerAttribute/view/frontend/layout/customer_account_create.xml
<page xmlns:xsi="http://www.w3.org/2001/XMLSchema-instance"
     layout="1column"
     xsi:noNamespaceSchemaLocation="urn:magento:framework:View/Layout/etc/page_configuration.xsd">
   <body>
       <referenceContainer name="form.additional.info">
           <block class="Magento\Framework\View\Element\Template"
                  name="phone_number"
                  template="Magenest_CustomerAttribute::extra_field.phtml"/>
       </referenceContainer>
   </body>
</page>
By default, Magento 2 already creates container form.addtion.info for the developer custom registration form. We have just created a new block inside that container.
Second, in the /view/frontend/templates/extra_field.phtml file, we will write the code to show the additional textbox.
<div class="field phone_number required">
   <label class="label" for="phone_number">
       <span><?= $block->escapeHtml(__('Phone number')) ?></span>
   </label>
   <div class="control">
       <input type="text" name="phone_number" id="phone_number" value="" title="<?= $block->escapeHtmlAttr(__('Phone number')) ?>" class="input-text" data-validate="{required:true}">
   </div>
</div>
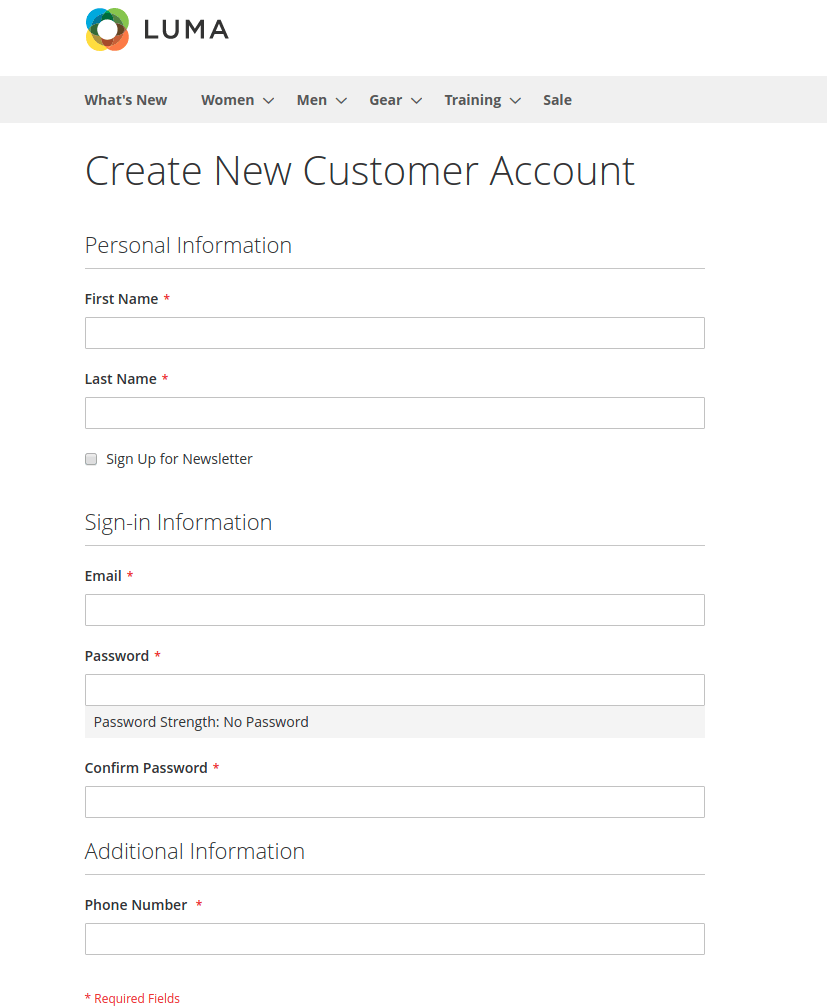
After performing all of the above tasks, the attribute will be shown on the customer registration page.
Let’s activate the module by running the command php bin/magento setup:upgrade.
Note: When compiling these scripts, there are some unrespected errors that can crash your code. In this case, if you need to run the script again:
- In the patch_list table in the database, delete the record which has a patch_name value like Magenest\CustomerAttribute\Setup\Patch\Data\AddPhoneAttribute.
- Then rerun the setup:upgrade command again.
All are done! Check the result.
You can add more fields on the registration page but also on the checkout and account page in Magento 2. This is the smart way to collect more customer data and analyze the insights to identify effective strategies for your business.
No need for any code customization, we provide merchants the Customer Attributes extension for Magento 2 with easy installation and setup.
Thank you for reading!

Lucy Pham
Marketing Manager


Weekly Trending
-

Confirmation code: 5 things you need to know about it
March 30 2021 -

Customer Value and Satisfaction: What's the Difference?
October 30 2020 -
10 Best Mega Menu Examples in 2024
December 21 2023 -

How to encrypt and decrypt data in Magento 2
June 5 2020

Recent Posts
-

11 Best Magento 2 Social Login Extensions Free and Paid 2024
January 27 2024 -

Payment Gateway Comparison - Top 5 Providers in 2024
January 21 2024 -

6+ Voice Search Statistics and Trends You Can't Miss in 2024
January 20 2024 -

2024 Hottest Trend: Voice Search Technology
January 16 2024 -

Salesforce - No.1 CRM Platform for Magento In 2024
January 14 2024


I just tried this guide and it did not work.
i did not get any errors when I did php bin/magento setup:upgrade.
as you can see (http://lommel.no/customer/account/create/) Phone number is not working.
Magento version 2.3
Theme: Porto
Thanks.
"We can't save the customer."
Hope to hear from you soon.
Please take a look at our complete example at https://github.com/huynhlehieunam/demo-customer-attribute.git. If you need any help, please send email to namhlh@magenest.com
What did I miss?
Please take a look at our complete example at https://github.com/huynhlehieunam/demo-customer-attribute.git. If you need more help, please send email to namhlh@magenest.com
i added a customer attribute with a select input and a source. The source gives back the options of my select. This works in the backend but not in the frontend:register.phtml.
How do I show those options in my extra_field.phtml?