
Table of Contents
While working with Magento 2 products, often you will need to create extra fields for storing additional product data. Although Magento already supports additional product attributes via an inbuilt EAV model, sometimes the data is required only for certain products, needs extra processing before stored or needs to be saved into custom models, etc. which will require custom fields with custom logic.
That is why we conduct this blog post. Steps to work with custom fields will be detailed in this article.
We assume modifications are done in a module called Magenest\CustomFields.
1. The two ways to create custom fields for products in Magento 2
Custom fields can be added via either:
- Modifying the data provider of product form.
- Extending product edit form via UI Component.
In the next steps, we will create some custom fields using both methods and compare the differences.
2. Create custom fields/fieldset
Step 1: Create the file Magenest/CustomFields/etc/adminhtml/di.xml define your modifier as a dependency for Magento\Catalog\Ui\DataProvider\Product\Form\Modifier\Pool.
<?xml version="1.0" encoding="UTF-8"?>
<config xmlns:xsi="http://www.w3.org/2001/XMLSchema-instance"
      xsi:noNamespaceSchemaLocation="urn:magento:framework:ObjectManager/etc/config.xsd">
<virtualType name="Magento\Catalog\Ui\DataProvider\Product\Form\Modifier\Pool"
             type="Magento\Ui\DataProvider\Modifier\Pool">
    <arguments>
        <argument name="modifiers" xsi:type="array">
            <item name="newFields" xsi:type="array">
                <item name="class" xsi:type="string">
                    Magenest\CustomFields\Ui\DataProvider\Product\Form\Modifier\Fields
                </item>
                <item name="sortOrder" xsi:type="number">100</item>
            </item>
        </argument>
    </arguments>
</virtualType>
</config>
Here we add to the pool of modifiers for product form data provider (DataProvider\Modifier\Pool) a new item called newFields, and define a responsible class and its sort order.
Step 2: Create the class Magenest\CustomFields\Ui\DataProvider\Product\Form\Modifiers\Fields. This class will create a field/fieldset for you.
class Fields extends AbstractModifier
{
    private $locator;
    public function __construct(
        LocatorInterface $locator
    ) {
        $this->locator = $locator;
    }
    public function modifyData(array $data)
    {
        return $data;
    }

    public function modifyMeta(array $meta)
    {
        return $meta;
    }
}
To add fields to product edit form, we need to modify $meta in modifyData function:
In which:
- modifyMeta() – creating field, fieldset.
- modifyData() – adding data when the product edit page is loaded.
- locator–getting product’s information by using $this->locator->getProduct().
To add fields to the product edit form, we need to modify $meta in modifyData function:
$meta = array_replace_recursive(
            $meta,
            [
                'magenest' => [
                    'arguments' => [
                        'data' => [
                            'config' => [
                                'label' => __('Magenest Custom Fields'),
                                'collapsible' => true,
                                'componentType' => Fieldset::NAME,
                                'dataScope' => 'data.magenest',
                                'sortOrder' => 10
                            ],
                        ],
                    ],
                    'children' => $this->getFields()
                ],
            ]
        );

        return $meta;
Here we’ve created a new fieldset with the name magenest with the label "Magenest Custom Fields". Next up let's create some fields in this fieldset: one select field and one text field. Create function getFields():
protected function getFields()
    {
        return [
            'status'    => [
                'arguments' => [
                    'data' => [
                        'config' => [
                            'label'         => __('Status'),
                            'componentType' => Field::NAME,
                            'formElement'   => Select::NAME,
                            'dataScope'     => 'status',
                            'dataType'      => Text::NAME,
                            'sortOrder'     => 10,
                            'options'       => [
                                ['value' => '0', 'label' => __('Inactive')],
                                ['value' => '1', 'label' => __('Active')]
                            ],
                        ],
                    ],
                ],
            ],
            'textField' => [
                'arguments' => [
                    'data' => [
                        'config' => [
                            'label'         => __('Text Field'),
                            'componentType' => Field::NAME,
                            'formElement'   => Input::NAME,
                            'dataScope'     => 'textField',
                            'dataType'      => Text::NAME,
                            'sortOrder'     => 20
                        ],
                    ],
                ],
            ]
        ];
    }
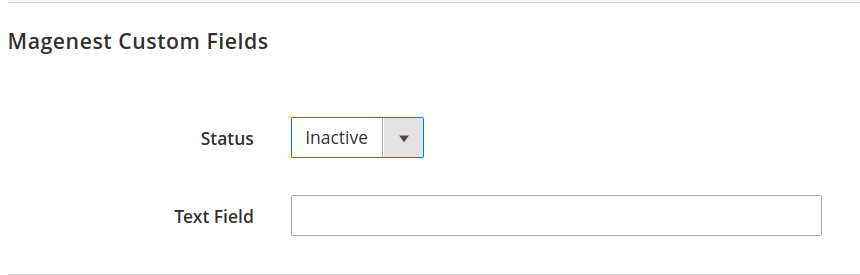
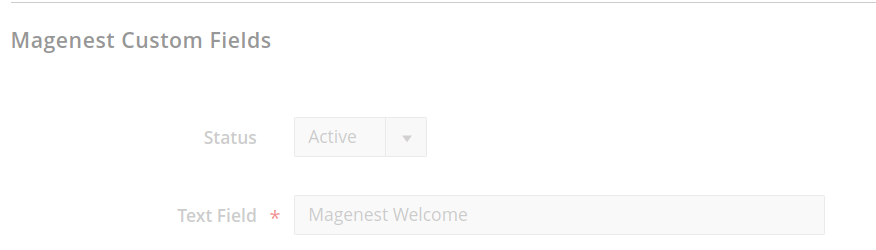
Now the product edit page will have our new fields as follow:
3. Create custom fields via UI component
- To create the same fields with UI Component, create the file:
Magenest/CustomFields/view/adminhtml/ui_component/product_form.xml:
<?xml version="1.0" encoding="UTF-8"?>
<!--
/**
 * Copyright © Magento, Inc. All rights reserved.
 * See COPYING.txt for license details.
 */
-->
<form xmlns:xsi="http://www.w3.org/2001/XMLSchema-instance" xsi:noNamespaceSchemaLocation="urn:magento:module:Magento_Ui:etc/ui_configuration.xsd">
    <fieldset name="magenest">
    <argument name="data" xsi:type="array">
        <item name="config" xsi:type="array">
            <item name="label" xsi:type="string">Magenest Custom Fields</item>
            <item name="collapsible" xsi:type="boolean">true</item>
            <item name="dataScope" xsi:type="string">data.magenest</item>
            <item name="sortOrder" xsi:type="number">10</item>
        </item>
    </argument>
    <field name="status">
    <argument name="data" xsi:type="array">
        <item name="config" xsi:type="array">
        <item name="label" xsi:type="string" translate="true">Status</item>
        <item name="dataScope" xsi:type="string">status</item>
        <item name="sortOrder" xsi:type="number">10</item>
        <item name="componentType" xsi:type="string">field</item>
        <item name="dataType" xsi:type="string">text</item>
        <item name="formElement" xsi:type="string">select</item>
        <item name="options" xsi:type="array">
        <item name="0" xsi:type="array">
            <item name="value" xsi:type="number">0</item>
            <item name="label" xsi:type="string">Inactive</item>
        </item>
            <item name="1" xsi:type="array">
                <item name="value" xsi:type="number">1</item>
                <item name="label" xsi:type="string">Active</item>
            </item>
        </item>
        </item>
    </argument>
    </field>
    <field name="textField">
    <argument name="data" xsi:type="array">
        <item name="config" xsi:type="array">
            <item name="label" xsi:type="string" translate="true">Text Field</item>
            <item name="dataScope" xsi:type="string">textField</item>
            <item name="sortOrder" xsi:type="number">20</item>
            <item name="componentType" xsi:type="string">field</item>
            <item name="dataType" xsi:type="string">text</item>
            <item name="formElement" xsi:type="string">input</item>
        </item>
    </argument>
    </field>
</fieldset>
</form>
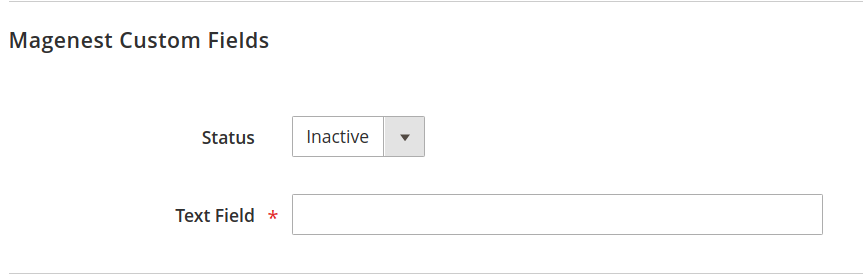
It’s possible to validate field value before save, for example, to ensure Text Field always required entry, we need to add a required entry to the field’s config array:
<item name="validation" xsi:type="array">
            <item name="required-entry" xsi:type="boolean">true</item>
 </item>
Now the product edit page will have our new fields as follow:
Our custom product_form.xml will be merged to the default form at vendor/magento/module-catalog/view/adminhtml/ui_component/product_form.xml to display on the product edit page. Here you can see the parameters are very similar to the DataProvider way, only formatted differently.
Although you only need a single product_form.xml to create custom fields using UI components, loading data into these fields requires a DataProvider class, therefore we recommend reading both methods to understand their structure.
4. Saving custom fields value
Now that the fields are ready, we need to catch their value when saving the product. We will declare and write a Magento 2 observer for the event catalog_product_save_before to get product parameters.
Step 1: Create /etc/adminhtml/events.xml:
<?xml version="1.0"?>
<config xmlns:xsi="http://www.w3.org/2001/XMLSchema-instance"
        xsi:noNamespaceSchemaLocation="urn:magento:framework:Event/etc/events.xsd">
    <event name="catalog_product_save_before">
        <observer name="catalog_product_save_before_observer"
                  instance="Magenest\CustomFields\Observer\HandleSaveProduct" />
    </event>
</config>
Step 2: Create class Magenest\CustomFields\Observer\HandleSaveProduct:
This observer needs to instantiate Magento’s RequestInterface:
protected $request;

    /**
     * HandleSaveProduct constructor.
     * @param \Magento\Framework\App\RequestInterface $request
     */
    public function __construct(\Magento\Framework\App\RequestInterface $request)
    {
        $this->request = $request;
    }
On the observer’s execute() function, use RequestInterface to get data from custom fields. Since we defined our fieldset with scope data.magenest, custom field data are located under magenest array:
/**
     * @param Observer $observer
     */
    public function execute(Observer $observer)
    {
        $params = $this->request->getParams();
        $customFieldData = $params['magenest'];
        //logic to process custom fields data
        // ...
    }
5. Displaying custom fields value
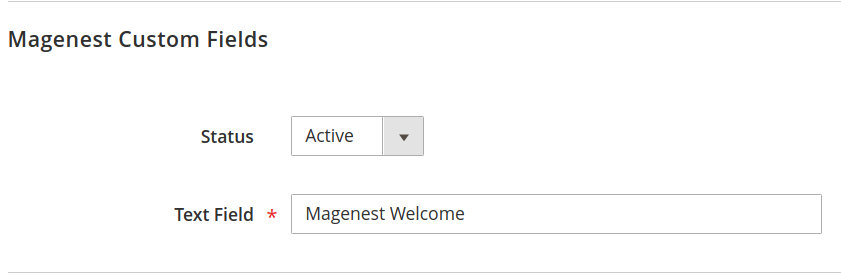
The last step is showing the custom fields’ value on the edit page the next time it’s opened. We will expand upon the function modifyData() from Ui\DataProvider\Product\Form\Modifiers\Fields class created in 2.
To get the ID current product, use LocatorInterface:
public function modifyData(array $data)
    {
        $product   = $this->locator->getProduct();
        $productId = $product->getId();
        $data = array_replace_recursive(
            $data, [
                $productId => [
                    'magenest' => [
                        'textField' => 'Magenest Welcome',
                        'status'=> 1
                    ]
                ]
            ]);
        return $data;
    }
6. Turn on/off custom fields/fieldset
As mentioned at the start of this article, you can enable custom fieldset only if the current product meets certain criteria. This is done from modifyMeta() function of Ui\DataProvider\Product\Form\Modifiers\Fields class
public function modifyMeta(array $meta)
{
   //check if product if valid for custom fieldset magenest
   //...
   if ($invalid) {
       $meta['magenest']['arguments']['data']['config'] = [
           'disabled' => true,
           'visible'  => false
       ];
   } else {
       $meta['magenest']['arguments']['data']['config'] = [
           'disabled' => false,
           'visible'  => true
       ];
   }
   //...

   return $meta;
}
If you use product_form.xml, you can:
<item name="visible" xsi:type="boolean">true</item>
SUMMARY
In this article, we went through two ways to add custom fields to the product edit pages, how to capture and display their value, and how to limit custom fields to certain products.
In a nutshell, with the Custom field/fieldset you can extra product information as your desire and I hope that this tutorial will help you clearly understand the custom field/fieldset at the Product edit page in Backend of Magento 2.
We hope you have gained valuable knowledge about Magento 2 development. Feel free to leave your questions and opinions in the comment section below.

Lucy Pham
Marketing Manager


Weekly Trending
-

Confirmation code: 5 things you need to know about it
March 30 2021 -
10 Best Mega Menu Examples in 2024
December 21 2023 -

Customer Value and Satisfaction: What's the Difference?
October 30 2020 -

18 Best Customer Reviews Apps Free & Paid 2024
November 14 2023

Recent Posts
-

11 Best Magento 2 Social Login Extensions Free and Paid 2024
January 27 2024 -

Payment Gateway Comparison - Top 5 Providers in 2024
January 21 2024 -

6+ Voice Search Statistics and Trends You Can't Miss in 2024
January 20 2024 -

2024 Hottest Trend: Voice Search Technology
January 16 2024 -

Salesforce - No.1 CRM Platform for Magento In 2024
January 14 2024


What is Context class in this part...
public function __construct(
Context $context
//other objects
) {
$this->context = $context;
$this->_request = $context->getRequest();
//other objects
}
Thank you!
I want to create form row with click "Add New" button like customize option tab. Click "Add Option" then the row will generated know like that.